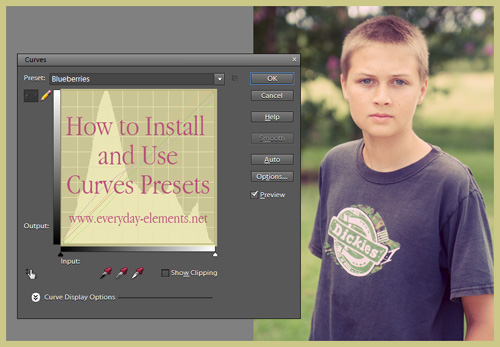
Remember (way back) when I did a tutorial on how PSE users can access the Curves adjustment via an action? Presets were briefly mentioned towards the end and for a while I gave a few away as a free download.
Today I am revisiting curves presets, which can give you some very quick and easy creative looks without adding more actions to your Photo Effects palette.
First the easy part – running the action and using the presets.
Once the action is installed in your PSE (Photoshop users – you don’t need the action because Curves is a standard adjustment layer for you), then simply double click on the thumbnail to run it.
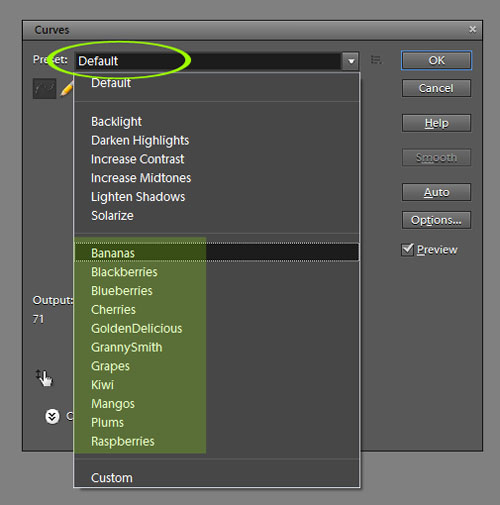
The action will create a duplicate layer, and then open the Curves dialogue box. Beside the word Preset you will see Default. Click on that word and a list will drop down. The “fruity” presets will show up towards the bottom.
If you have Photoshop CS, you can run a Curves adjustment, then access the presets in the same dialogue box.
To apply a preset, just click on it. Want to change it? Just click on a different preset. Want to go back to the default one? Click on default.
After you have found the preset you like, press okay.
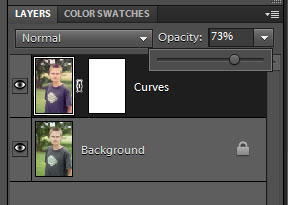
If the preset is a bit strong on the whole image, lower the layer opacity. If it is too strong in certain areas, use a black brush and brush over areas you wish to conceal.
When you are happy with it, continue on editing or flatten save.
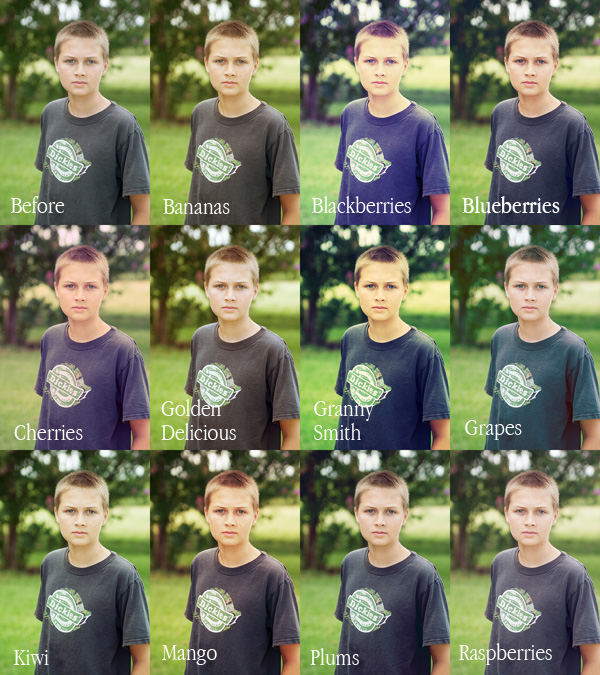
Below are examples of all the presets.
Now, let us get to how to install these fruity presets. The steps are very similar for both Photoshop and Elements.
First open the folder with the presets and highlight all of them and press control + c (command + c on a Mac).
Then navigate to your presets folder and paste them in. How to get to your preset folder is the tricky part.
PC users you will follow the path in the picture below.
- Local disk
- Users
- Your user folder
- AppData
- Roaming
- Adobe
- Photoshop Elements
- Your version
- Presets
- Curves
Photoshop users – after Adobe, you go to your CS# version, then follow same folder path.
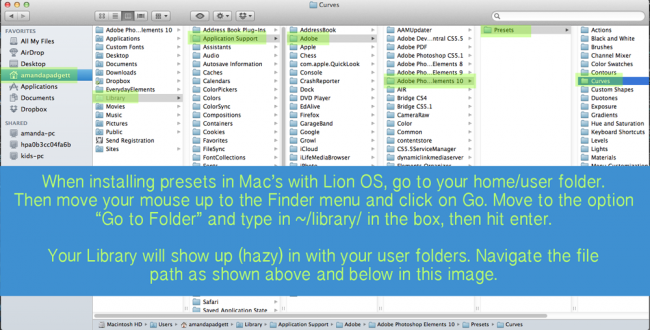
Mac users – your steps are a bit trickier if you are using the Lion OS system (I do not have the steps for Snow Leopard). The path is shown in the image below. Click on the image to enlarge it.
- Your user folder
- In Finder menu, click on “Go” then on “Go to Folder”
- Type in ~/library/ and hit enter
- Continue to the Application Support folder
- Adobe
- Adobe Photoshop Elements
- Preset
- Curves
I have zipped together the curves action and a folder with the presets. If you only need/want the presets, download the folder and only go to the preset folder and ignore the action.
A quick video showing how to install (on a pc) and use the presets is below. If you are reading in a blog reader or email, you can view the video by clicking HERE.






This is great! I had no idea that you could add custom presets in the curves panel!! Thank you so much!!! =)
I am so excited about these curves presets! THANK YOU!
Thanks so much for these, Amanda. I’m looking forward to playing with them. I appreciate your gifts and helpful tutorials a great deal and have learned so much from you.
Thanks so much! I cant wait to give them a try.
Thank you so much for these! You give away the most stuff! 🙂
Thank you for the easy tutorial and presets! I love your site and find it very helpful as a new PSE 10 user.
Thanks so much! This is so great!
I have Windows 7. Does this video work with that verison because I do not see the App folder and I do not have any options to view hidden folders.
Heather, I was using Windows 7 in that video. Your folder path may be different if it was installed in away other than Adobe defaults to. Does that make sense?
I’m trying to install, I have PE 10 and a Mac, I get to photoshop elements and there isn’t a preset folder…?
i figured it out! yay!!!
Where did you find it? I followed the steps and when I clicked on Adobe PSE and didn’t see the PRESET folder? I have PSE 10. Thanks!
Thank you so much for the presets….curves presets in PS5; who knew!!!!!
Thank you! These look wonderful. One question though … I don’t have a button in my effects panel for curves. How do I get one? Or is there another way to access these? I’m using PSE 10. Thank you for any help you can offer!
These look great. I have PSE9 and I don’t see that you have told us where to put the action. Shall I just put it where I have my other actions? I watched the video, but don’t see where the curves adjustment is in PSE. Any more help available?
I got the action up by eliminating the en us file and rebuilding, so now I see how the presets work. Very fun and not too overbearing. These are nice a subtle. I will play more tomorrow. Thank you for your generosity is sharing these.
Do I copy only the curves presets or action and preset to curves folder?
Got it Amanda, no need to respond to my question, Thank you sooooo much.
so great. thanks Amanda!!
Hi Amanda,
Can’t follow the path to install the .acv files, can you give instructions for xp? (PSE 10) thanks…Allysoon (above) seemed to have the same issue but didn’t say how it was “found” thanks…
Anne Hathaway
Thank you very much
How to see the APPDATA folder
http://windows.microsoft.com/en-US/windows7/Show-hidden-files
I have a question I went in and downloaded the presets the correct way like you had mentioned above but they aren’t in my presets when I go to curves. Is this because I am using Elements 11?
Just wanted to add that I figured it out. It took some time going back and forth but after 2 hours i figured it out. Thanks so much for giving this out. It really will help.
Priscilla I Would love to know how you figured it out…its not coming up in my presets either after I dwnlded it the way it was explained…HELP!!
The firmware will include the option to unlock 30 exclusive levels
of the Angry Birds Space game if the game is unlocked in the
first three months after the update is released.
One therefore needs to keep formatting and
re-formatting the i – Pod while switching from Mac to Windows etc.
It’s not unusual to leave the computer in sleep mode for hours and see very little change in battery status.
Just want to thank you for the curves action–I was finding a lot of the effects I wanted to create using “real” curves I couldn’t, because PSE doesn’t have that adjustment. You gave us a way around it. Thanks again!