If you have Photoshop Elements 11 or 12, go to the tutorial to see how to install actions. If you have Photoshop CS, see this tutorial.
********************************************
Installing actions can seem like a very daunting task, but really it is very easy once you have done it a couple of times. I hope this post will demystify the process for new users and help them enjoy finding new actions, and be able to install with confidence. Videos for BOTH Mac and PC users are at the bottom of this post.
Installing New Actions:
- Download the Zip file and move to a easy-to-access folder on your computer. I recommend one on your desktop, named actions or something similar.
- Unzip the file by right clicking and choosing “Extract All.”
- Unhide your hidden files and folders by going to Tools, then Options and View and select to “show hidden files and folder” (watch video tutorial)
- Go to where your actions are saved (that folder I told you to put on your desktop). Locate the .atn and .png files (sometimes metadata.xml files if the designer has included them) and highlight them and go to Edit, Copy to Folder.
- Navigate to the Photo Effects folder by following the right path for your computer (see below) and click Copy.
Those with PSE 5 need .psd files for thumbnail images, but not all action designers are providing those anymore. You can create your own with the Make a Thumbnail action if you need.
Paths to Follow When Installing Actions
Windows Vista and 7:
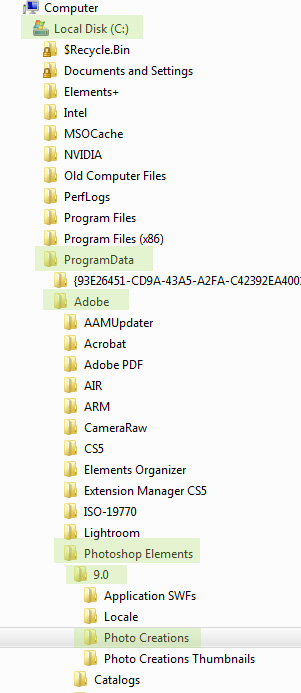
C drive / Program Data / Adobe / Photoshop Elements / 9.0 (or your version) / Photo Creation / Photo Effects
Windows XP:
C drive / Documents and Settings / All Users / Application Data / Adobe / Photoshop Elements / 9.0 / Photo Creations / Photo Effects
** The biggest cause for hiccups with Windows 7, Vista and XP is not unhiding the hidden folders. This needs to be done before you start trying to copy the actions. This is easily done by going to the Tools option in Windows Explorer and then Options (or Folder Options), then View, and click on “show hidden files and folders’ and hit apply.
Mac (two steps):
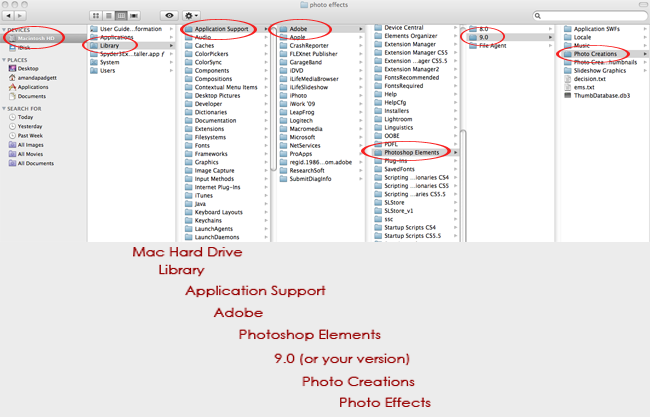
First – Hard drive / Library / Application Support / Adobe / Photoshop Elements / 9.0 / Photo Creations / Photo Effects
Second – Hard drive / Library / Application Support / Adobe / Photoshop Elements / 9.0 / Locale / En_US / and DELETE the mediatdatabase.db3 file.
NOTE: If you are on Lion, you need to find your hard drive by going to your Finder, then click on GO in the menu, then down to MacIntosh HD, then Library and then continue on the path listed above.
Do not rename the .db3 file, just delete. I promise it will be okay. When you restart your PSE, you will get a box saying “Building Content and Effects.” It will take a minute or two and then your actions are there.
** The biggest hiccup that Mac users have is that there are two Libraries. If you cannot find the above path with the Library you find, go search for the other. I hope to come back and update this post with screen prints from a Mac user’s screen to help others.
Below is a screen print of the path for Windows 7 and Vista users.
Here is a screen print of the file path on a Mac. Sorry it’s so small, it was on my Macbook Pro, so limited space.
After copying over the .atn, .png and possibly the .xml files, you need to restart your Photoshop Elements. If you have installed in a lot of actions at once, give your program some time to load them all.
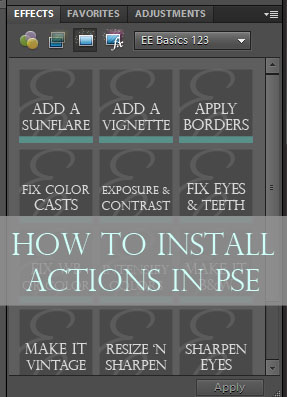
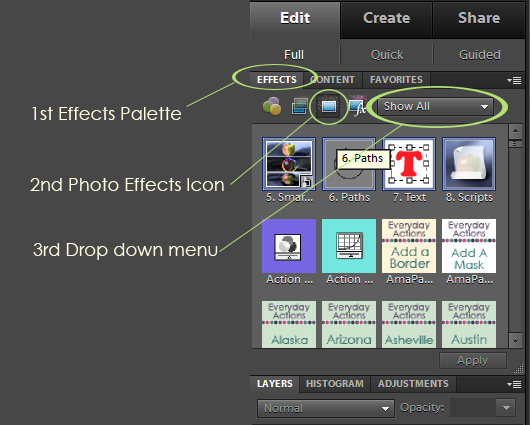
To find the actions, click on the Effects tab, then the Photo Effects icon, then change the drop down menu to the ‘Show All” category. You should see your actions there.
Installing Actions in The Action Player
If you have Florabella’s gorgeous actions, she has her actions in sets that also play through the action player. You need to locate those particular actions in your zip file (they will not be accompanied by .png files) and copy those using a slightly different path:
Windows 7 and Vista: C drive / Program Data / Adobe / Photoshop Elements / 9.0 / Locale / En_Us / Workflow Panels / Actions
Windows XP: C drive / Documents and Settings / All Users / Application Data / Adobe / Photoshop Elements / 9.0 / Locale / En_Us / Workflow Panels / Actions
Mac Snow Leopard: Hard drive / Library / Application Support / Adobe / Photoshop Elements / 9.0 / Locale / En_Us / Workflow Panels / Actions
Mac Lion: Finder / Go (in Menu) / Computer / MacIntosh HD / Library / Application Support / Photoshop Elements / 10.0 / Photo Creations / Photo Effects
Below is a screen print of the path in Windows 7:
Below is a video tutorial showing how to install actions both in the Photo Effects palette and in the Action Player, using Windows 7. If you have Vista it is very, very similar.
PC users the video below is for you. Mac users go to the next video down.
Mac users the video below is for you.


Hi, I am a new Mac user and I followed all directions for downloading atn and png files into the photo effects folder, deleted the thumb database.db3. When I restart PSE 10…none of my actions are there and the drop down box also isn’t there to select “select all.” I’ve tried this for 2 days now with no luck in getting the actions. The actions are present in the folder on my computer so I know they are there but they aren’t showing up in Elements. How long after the rebuild finishes could it take for these actions to be available?
I am having the same problem as Leslie (#11). I have photoshop elements 7 and I cannot find the photo creations folder… help?!
I am watching the video and going through this step by step and when i right click to extract file i dont have that option. I believe i have Windows XP but i might have 7, not sure. This is pretty tough stuff. hehe I need some help please and thank you.
I have watched your tutorial on installing the actions and have successfully installed my first one…..the problem i have is once its in my special effects folder in adobe, i cant seem to open it. I downloaded the perfect portrait action. I am using adobe photoshop elements 5 as i am very very new to this…so please bare with me…. love your videos very imformative!!!
Hi Amanda!
Thanks for spending your valuable time teaching us how to download actions. Really a great help for beginners like me. I just want to ask if why I can’t seem to find the previous downloaded actions on my PSE 9. I downloaded 3 actions before and it was successful but then when I downloaded 2 actions today, the previous actions disappeared. The 2 new actions appeared successfully. I even tried to erase the mediadatabase and allowed some hours before using PSE. Still unsuccessful. Help please.
I have the new PSE 10 and want to download these lovely actions. There is not a folder called ‘Photo Creations’ or ‘Photo Effects’. I’m really confused as to where to send these. I’m having such a hard time getting them downloaded onto my PSE10. HELP!
I’m trying to download actions to my PSE 10 also & having problems! Were you able to?
Thanks so much for the free Haze action! I haven’t tried it yet, but I DID successfully add it to my effects – yay me! 🙂 Thank you so much for the easy-to-follow instructions!
Rejoice! There is a way to add actions to the Mac App Store version of PSE 10!
If you go to the Applications folder and ‘Right Click’ you can choose ‘Show Package Contents’. If you then go to the path: Application Data/Photoshop Elements/10.0/Locale/en_US/Workflow Panels/Actions and copy your actions into that folder it will work. You will almost certainly be asked for your system password as it is a protected folder but it will work!
I just downloaded the Coffee shop luminous burst action. I unzipped the file and copied the ATN, PNG, and JPEG file. I now have two thumbnails showing up in PSE 9 for the Coffee shop luminous burst action. Not sure why. I am using windows 7 and PC.
THANK YOU THANK YOU THANK YOU!!!
The information that nanny cams can return you is priceless. Catch a spouse who is cheating on you when youre gone off to work – This is a a very much cheaper alternate to employing a private detective. In some states proof that a spouse is cheating might effect the outcome of a divorce dispute.
Is it possible to install actions on xp system into the full edit effects panel. I followed your steps but went from workflow to actions and they are installed in the guided editor. Is there a step that I missed?
Amanda, THANK YOU. I have been searching and searching for how to do this and remembered this post. Your steps are precise and they WORK. If I was in front of you right now I would hug you. Several times. 🙂
I have PSE 10 and I can’t seem to find the above mentioned files Photo Creation / Photo Effects. Tried the other method too, but in my en_US folder I didn’ have the above mentioned Workflow Panels. Instead, I have application_swfs, Plug-Ins and Support files. Can anyone help? Oh and I have Windows 7 🙂
Hello Amanda!
I’m a little lost. Do you have a tutorial on how to install Everyday Essentials on Photoshop CS5 on a Mac? Any help would be greatly appreciated!
Thanks!
hi i am having an issue, I went by the instructions and maybe im not understanding it, but after copying them into the photo effects folder, do the actions go right into elements? If so I cant seem to find them, where are they located in elements or is there something else I need to do that im not doing. The video didnt have sound on my end so maybe Im missing something. thanks for any help.