
Two and a half years – that’s how long it has been since I posted last. Why? What happened to me? Why did I disappear and where did I go? My life was getting more hectic by the month, with homeschooling four kids, and I couldn’t keep up with Everyday Elements. So, it was sold […]
How to Customize the Workspace in PSE 11-13
November 2, 2014 by 2 Comments

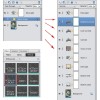
One of the things I love about PSE is that you can alter the “Expert” workspace. Why would you want to alter it? Well, changing the layout of the panels in the Photoshop Elements workspace is a great way to customize the screen to suit YOUR needs and how you best move around the space and […]
Add a Little “Faux Fall” with PSE
October 17, 2014 by 1 Comment

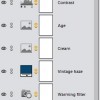
This post is by Andrea Thomas of Speechless Photography. Fall is always a busy time for photographers. Everyone wants to take advantage of the beautiful autumn colors and cooler weather, not to mention the timing is perfect for getting a few great shots for the Christmas card. But Mother Nature is fickle and no matter […]
Recompose Images in Photoshop Elements with the Recompose Tool
September 1, 2014 by 1 Comment

Every now and then Adobe puts little hidden gems inside Photoshop Elements to make it remain a handy program to have for most avid photographers. A tool they added in the last couple of years was the Recompose tool. I’ve used it several times, but never thought about doing a tutorial on it until today. […]
Grouping Layers in Photoshop Elements With Free Grouping Action
August 22, 2014 by 4 Comments
Grouping layers together can make your Layers panel more manageable if you have a complicated template or collage, or even a complicated photo edit. However, Photoshop Elements users do not have the option to group their layers like Photoshop users do, until now. I’m excited to share Make Group, a free grouping action, with you […]
Ungroup Layers in Photoshop Elements With Make UnGroup Free Action
August 20, 2014 by 2 Comments
If you have downloaded free or purchased templates and collages, you may have seen one or more grouped layers which Photoshop Elements users are unable to get access to. There are also many actions that come with the layers grouped, which makes it impossible for PSE users to access and adjust. Today I am sharing […]
3 Easy Steps to Apply Textures in Photoshop
July 8, 2014 by 5 Comments
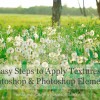
One of the best things yet most confusing things about Photoshop and Photoshop Elements is that there are always different ways to do the same thing. That is wonderful because users can experiment and find the way that works best for them. However, it can be confusing to new users because they keep seeing and […]
Introducing “Blog Template set 2”
May 7, 2014 by 13 Comments

written by Beckie of beckiegkengle.com Hey everyone! It’s been a while since I’ve posted anything, but I’ve been working on a new template set for blogging! I am really excited about this set! There are so many photographers that also use Instagram to reach their clients. I wanted to design a template set that can […]
Landscape Hacks – Tips for Photography on Vacation
May 5, 2014 by 6 Comments

Hi, I’m Susan Dusseault of Lily Fields Photography. I will be an occasional contributor to Amanda’s great teaching blog. It is an honor to join her in her efforts to educate and encourage photographers. When Amanda found out I was going to Montana for a short trip, she asked me if I could put together […]
Newborn Photography Safety Tips
April 25, 2014 by Leave a Comment

This post is by Andrea Thomas of Speechless Photography. It seems that more and more often newborn photos feature fabric-wrapped babies suspended from tree branches or perched on rocks above a waterfall (ok, maybe I’m exaggerating a little on the last one – but not by much). As clients and fans ooh and aah over […]


