Every time I teach a beginners workshop, be it on Lightroom, Photoshop or Photoshop Elements, a question that always comes up at least once is “What is raw?” So, I thought I’d do a basic overview of the two file types. Again – a BASIC overview. The listed information is not all-inclusive; there is a LOT to this topic that I cannot go over right now.
Raw is a file type, like JPG. You set it on your camera, usually under the “Quality” option.
How is raw different from JPG? When you take a picture in raw, your camera saves all the data; everything is deemed crucial. When you take a picture in JPG, your camera says “Okay, we don’t need this info, scrap that. We don’t need that either, chunk. Oh, and let’s add a bit of processing and sharpening.”
Raw files save all the data collected. JPG deletes some of that data and adds processing.
Now, to make things more complicated for you, you can choose to shoot only raw or raw plus JPG. That means two files are made each time you release your shutter: a raw file and a JPG file – of the same picture.
What do I do? I either only shoot raw or only shoot JPG, no raw + JPG business. I feel like that’s a waste of space on my card and my computer.
File quality choices you (probably) have:
- Raw
- Raw + JPG Basic/Small
- Raw + JPG Normal/Medium
- Raw + JPG Fine/Large
- JPG Basic/Small
- JPG Normal/Medium
- JPG Fine/Large
Another choice you have when shooting JPG is the image processing added, found under “Picture Control” on a Nikon or “Picture Style” on a Canon.
If you shoot JPG on a Nikon, then you can choose between JPG neutral, standard and vivid. Vivid will give a punch of color to your pictures, which may save you time in post processing. However, it has been my experience that shooting in vivid can produce some color tones/casts that can be tricky to remedy later on.
On Canons, you have to go in and tailor the various “Picture Styles” to have the contrast, saturation and sharpness you like. You can also change the setting of the Picture Controls on a Nikon, but they do have some adjustments already set, whereas on a Canon you have to do the initial setting (at least that’s what I’ve found on my Canon 50D).
Below are three examples for you. Please forgive my laziness in not even making my model get off her bed or quit using the iPad while I took the shots. I was keeping things simple.
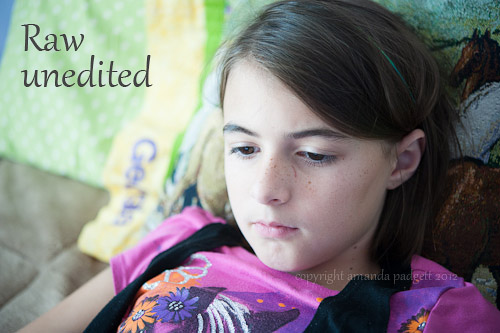
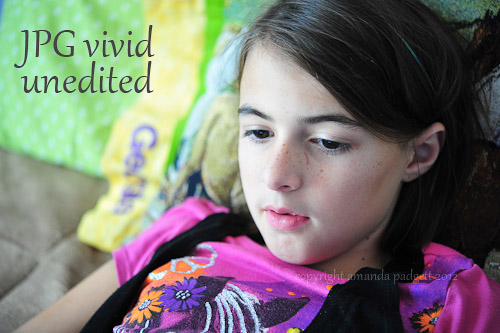
The first is a shot in raw, unedited. Then I changed to jpg neutral, unedited and finally JPG but set to vivid in-camera. My ISO/aperture/shutter speed did not change one bit between the pictures. The only thing that changed is the file type.
There isn’t a huge difference between the raw and JPG neutral, is there? Well, raw images really are a bit more hazy and less color-filled, but when I brought into Lightroom, it gives raw files an automatic “bump” which makes them a bit more jpg-like. Still, both the raw or JPG-neutral images are a bit hazy, wouldn’t you say? That is just the nature of digital files.
For the image below, I set my “Picture Control” (in my Nikon D700) to JPG – vivid. The resulting image certainly had more color. Look at her shirt, pillow case and lips – all have more color pop than the raw and jpg neutral images.
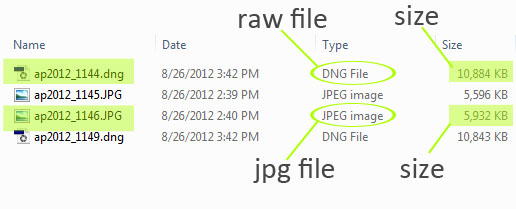
A big difference between the two file types is the file size. Remember how I said that with raw files, the camera saves all the data, chops off nothing. Well, the result of that extra data storage is increased file size.
The files below show two raw files (although the file endings say .dng – I will explain that in another post) and two JPG files. The raw files are almost 11 MB and the JPG files are half that size. JPG files chop off some data and that is why the file saves are half as big as the raw files – less data.
Your file sizes may be larger/smaller than mine, depending on the age of your camera. Newer models have higher megapixels, which create larger file sizes.
The last way raw differs from JPG is how they are opened/processed in Photoshop or Photoshop Elements.
You upload the files from your camera to your computer just the same. However, when you go to open a raw file in PS/PSE, the raw converter plug-in Adobe Camera Raw (ACR) will open up. You have some editing options in ACR, then you can take the image into PS/PSE.
One BIG perk to shooting raw is if you over/under exposed your image in-camera, it is much more rescue-able. While you are learning how to shoot in manual mode, I recommend shooting in raw so that when you miss your exposure, you can save those pictures.
What do I shoot – raw or JPG? I go back and forth. For family snapshots, I keep it simple and shoot in JPG. When doing a shoot for someone else, or when taking pictures I will use during workshops, I shoot in raw.
One thing I don’t want you to do is to use raw as an excuse to not get exposure right in camera. Too many people use it as a safety net – “Oh, it’s okay if my exposure isn’t right, I’m shooting raw and can fix it later.” Sometimes those images cannot be saved.
Before anyone tries to correct me because I did not capitalize “raw” – it is not a file ending nor an acronym. It is just a term. NEF or CR are raw file types and would be capitalized. ACR is an acronym and thus capitalized. Raw is just a generic term. Look in photo-editing books and you will see that raw is written raw, not RAW.


I LOVE this post! Such great information since I’m considering the benefits of shooting in raw. Thank you so much for all your hard work to teach, Amanda! 🙂
You’re very welcome, Myra! I’m so glad you found the post useful! 🙂
Great post! Thanks for sharing. I need to switch to raw.
Thank you, Maria! Let me know how it goes!
Great post!! My husband keeps wondering why I want to switch to RAW because it takes up so much space. I’ve been holding out and trying to wait before switching to get an external hard drive. Love how you lined everything out here! =)
Thank you, Anna! Yes, the extra space can certainly make shooting in raw more challenging. Good luck with your switch! 🙂
excellent write up, thank you for doing this!
You’re very welcome, Tina!
Thanks for this article! Which size Raw photos do you set your camera on? Mine has a small, medium and large option. Just curious which is best. Thanks
This is going in my file of “what to do with my camera” – I can learn so much from you! I am trying to push myself to do more – I think I’m lazy! Thanks for your tips and help!
Becky B.
http://www.organizingmadefun.com
Organizing Made Fun
I’ll bet you’re more busy than lazy, Becky! 😉 It can be hard to find time to learn all the new things we want to sometimes!
Loved this post! I’m still not ready to start shooting raw photos but I’m glad to have this resource.
Blessings,
Cyndi
You’re very welcome, Cyndi! And good for you; going at your own pace is always a wise move! 🙂
Great info Amanda! If I ever get a DSLR this will come in handy. Doesn’t look like there’s a raw option on my P&S.
No, probably not! 🙂 But hopefully the info will still come in handy one day. Thanks so much, Amanda!
I shoot in raw and JPEG and always question if I should just leave my camera on raw all the time. I do it the way you do so now I feel better;) JPEG most of the time and raw for blog posts main pictures. Thank for always sharing your brilliant info.
You’re very welcome; I’m so glad you found it useful! 🙂
such good information! i’m so challenged in all of this, but plan to dive in this Fall!
Thank you! Good luck; the more you work at it, the easier it all gets! 🙂
Thank you for the raw/JPEG post. I’ve been wondering months what shooting in raw meant. Now I know. =)
That is wonderful to hear, Monica! Thank you! 🙂
This is a great post, Amanda! Very informative! 🙂
Thank you, Beckie! 🙂