 TidyMom’s Candy Bar Cheesecake
Post written by me, but all tips, pull-backs and beautiful pictures are from Cheryl, TidyMom.
Do you love to cook and bake? Do you love to blog? Maybe you have combined the two and already share your love of creating in the kitchen with your fellow blog friends. Are you including pictures with those recipes? If you are not, I recommend you give it a try. People love seeing the finished product and even steps during the process. Gosh, that was what first brought The Pioneer Woman such attention, her beautiful, step-by-step images of her recipes.
Okay, let’s say you are doing that already, but how do the pictures look? Are they blurry, flat, dark? Want to know how one blogger gets great food shots? Cheryl, from TidyMom, shares many incredible recipes at her site and she provides gorgeous shots of them to help the recipes come to life! Recently she took some “pull-back” shots so that I could share her tips and tricks with you. Thank you, Cheryl!! ♥
Setting up the shot:
The tips that follow will benefit you regardless of what kind of camera you are using for your food shots.
First, find a room with great light. The light in Cheryl’s kitchen isn’t the best, so she goes to the room with the best light, her office. Below is a shot of her “food studio” that she sets up. To enhance her light (and sometimes use as a background) she uses inexpensive foam boards from Michaels or Hobby Lobby.
If you do not have great light, this Artificial Light Food Photography post was wonderful tips and pullbacks to illustrate.
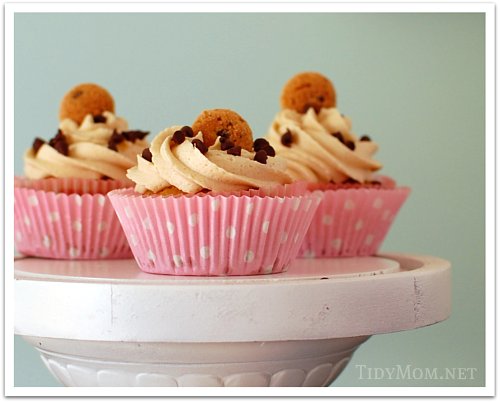
Second, use a sheet, paper or wall paint to be the “canvas” in your background. Cheryl doesn’t add anything extra for her cupcake shot because her wall color is a lovely shade for the picture. The the image past this one, you see that she uses a black foam board to be her backdrop. (The resulting cupcake shot is share later in this post.)

Third, find a nice surface to hold your food subject. This can be a table cloth, fabric, wood cutting boards, cake stands, etc. Try to use something visually pleasing. Above Cheryl used the cake stand and below she uses a wood cutting board and a place mat.

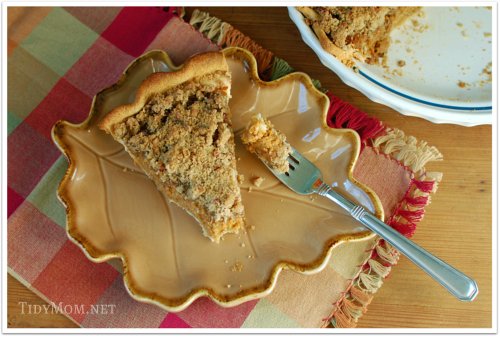
Fourth, try to keep attractive, season-related plates and bowls around to place your food on. Below Cheryl used a leaf shaped plate and it was the perfect plate to use for that shot, since it is a Thanksgiving related pie post.
A good place to find very-inexpensive, seasonal plates, bowls and cups is the Pier 1 Imports, Kohls, World Market (check for clearance items after the season passes). Try not to go into debt just to get a nice food shot for your blog. 😉 Also, get up early one Saturday morning and do some yard-sale shopping. I am sure you find some really neat dishes that would make for great pictures.
For non-holiday food shots, plain white dishes work well. Simple ones from Target or Walmart will do fine. Cheryl also suggests getting small ones, in both square and round shapes; square food = round plate, round food = square plate. Brilliant!!
 TidyMom’s Apple Butter Pumpkin Pie With Apple Streusel Topping
Taking the shot:
The following aperture and focus tips apply more to bloggers using a DSLR camera to take their food pictures, but some higher-end point-and-shoot cameras enable to you to change aperture, so check your camera’s manual. The composition tip applies to photography in general, regardless of camera type.
Aperture: When taking food shots, a good working aperture is probably 2.8 (if you have a prime lens) or 3.5 (if you are working with the lens that came with your camera). The wider your aperture (smaller your F#), the more your background will be out of focus and make your food subject be the main thing the view looks at (since it’s the only thing in focus LOL). For the cupcake shot below, Cheryl used an aperture of 3.2, which provided a nice focus range for her, but still gave her nice blur in the background.
Focus: Place your focal point on the food item you want to be in focus, the one you want to be sharp. Cheryl obviously focused on the cupcake in the front/center; it is in focus and the ones in back are blurry, out of focus.
Composition: As with most pictures, the Rule of Thirds makes for very eye-appealing images. This is true also for food photography. You don’t usually see the food item slapped dead center in a picture. No, it is off to the left or right. And, often the main subject will fall in one of the intersecting points on the Rule of Thirds grid.
For the shot above, the pie piece on a leaf plate, the pie is in the top, left intersecting section if we laid the Rule of Thirds grid over it.
Now for the part where you start to laugh your head off (at me)….
Cheryl is hosting a fabulous pie party, Love the Pie, and giveaway and I actually made a pie in order to participate!! I did NOT think ahead of time about the actual food pictures, so when it came down to me taking the shots, I had do the best I could. I know now, though!
I went into my office (best light in my house also), brought my wood cutting board, plate with pie and fork, and set up my tri-fold foam board on a shelf. I stooped down to the plate level and focused on the top of the pie.
Now, my pie crust kept falling off and Cheryl gave the tip to prop it up with a napkin, which I illustrate in the image below. Of course, you would normally want to turn the pie such that you can’t see the napkin. 😉

Sharing to illustrate napkin trick to hold up crust
Something to note: I was using my Nikon 60mm f2.8 macro lens for this, which made this shot a little harder for me. I think it would have gone better had I used my 35mm f1.8 or 50mm f1.4 (loaned to my sister right now).

Buttermilk pie, on the way to being eaten by me!
If the pie does not look too appetizing, trust me that it really is delicious and is super easy to make!
Buttermilk Pie
Ingredients:
- 3 eggs
- 1/2 cup buttermilk
- 1 2/3 cups of sugar
- 1/2 cup of melted butter (one stick)
- 1 tsp vanilla
- 1 unbaked pie crust
Instructions:
- Mix ingredients and pour into unbaked pie crust
- Bake at 350 degrees for 1 hour 45 minutes*
- Allow to cool and “set” for several hours
* Cooking time may run longer.
If you need inspiration on how to make your food shots more interesting, here are some great food bloggers who are also fantastic photographers:
Another helpful food phtotography tutorial is at Digital Photography School, where they shared a post on 11 great camera angles for food photography.


Thanks for all the tips and love Amanda!!……..you pie looks and sounds outstanding!!!!
Thanks for linking up to the party too!
GREAT tips, Cheryl!!! You ROCK the food photos! And definitely put more effort into it than my black and white fabrics, LOL!
i totally want to be a food photographer when i grow up!!!! i love it!! except i fear i might eat all the food after taking pics of it and get fat haha!! anywhoooo.. i love this little tutorial you put together, thanks for sharing!!!
Love these tips! I’m always looking for food photo tips as I’m trying to improve my photos. The pie looks delicious.
Love this and linked to it in my wanna-be-food-photographer post: http://my3boybarians.com/2010/11/food-photography-is-hard-yo/
My applause to Cheryl because seriously, before started this recent 6 week food adventure, I had NO idea how hard food photography is.
Very well-written, Manda.
Talent abounds with you two. Combined? Fearsome duo. Well done.
This was a FABULOUS tute! I can’t believe that the cupcakes set up was on a desk, lol, excellent!
So much fun! I love how you showed your work space for capturing food shots. We have very limited space to do ours.(My girls and I) We have to be creative.
Great tips and terrific looking pies. I love the behind the scenes sneak peeks. 🙂
This was super helpful! And all the shots are gorgeous…oh Amanda, you may remember, my new lens of choice is that 60mm you talked about! I don’t have a 50. Do you think I can successfully take food shots w/ a 60?
xoxo
Robin
Yay! I’ve been wanting tips on this and am so glad y’all shared some! I’ve been practicing on food photos this month and am just now getting to where my eye notices things that I’d like to change regarding lighting but I had not idea where to start. My favorite photo is here: http://abitbloggish.blogspot.com/2010/11/how-to-pop-pocorn.html.
I’m a bit overwhelmed by seeing Cheryl’s office set-up, but maybe I’ll just try one new thing at a time? I’d like to figure out how to bounce the light and use a backdrop.
Thanks, again! Off to check out Darcy’s post.
Great post Amanda! And your pie looks AMAZING.
cheryl, I’m just now commenting (my browser has been opened to this page for about 24 hours now!), and just wanted to say to you and Amanda that you’ve inspired me! My favorite place to take food shots is admittedly my back deck (perfect lighting year round) but I think I may try out my bedroom next. Hopefully my husband doesnt steal any of the food though while I’m finding props (he’s been known to do that!).
What a great post! You are full of useful information and a pie! Since I don’t cook, I’ll have to buy something yummy looking to shoot!
Thanks.