A fun and simple effect you can apply to your pictures is a dreamy, ethereal look. In addition to the tutorial on how to do it yourself, I am giving you a free action to use, called Make Dreamy, so read through to the end to see how to download it.
Okay, first things first – you need to duplicate your background. You can do this by pressing ‘control’ (‘command’ on a Mac) and the ‘j’ keys at the same time.
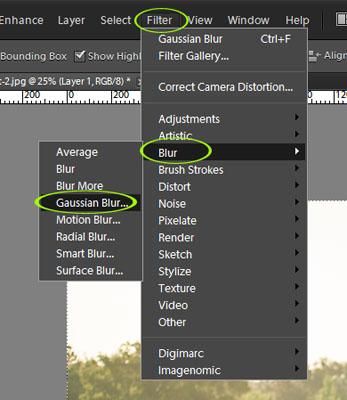
After duplicating the background, you will blur the layer with a blur filter. For this effect, I like to use the Gaussian Blur filter. You find it by going to Filter in the main menu, then down to Blur, then Gaussian Blur.
When the dialogue box pops up, set the radius to around 20 pixels. You will see a heavy blur get applied to your image.
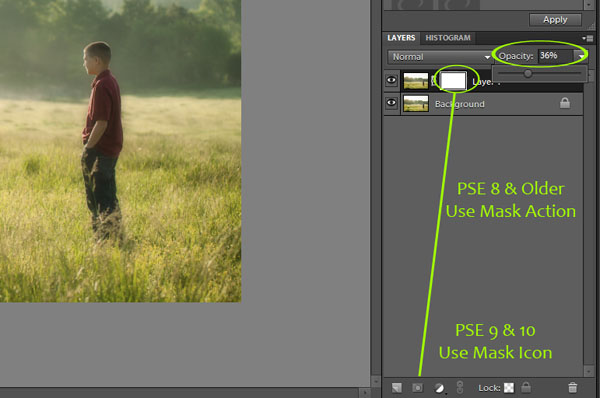
After the filter is applied, lower the layer opacity (see image below) to between 20-30%, depending on your image. If you have a person/subject that you would like to reduce the blur on, simply add a white mask to the layer and brush over them with a black brush.
How do you apply a layer mask? In Photoshop, you simply click the mask icon at the bottom of the Layers palette (similar to example below). In PSE 9 and 10, you click the layer mask icon, which looks like a rectangle with a circle in the middle. In PSE 8 and older versions, you need to install a layer mask action like Add a Mask, and simply double click on it to have the mask added to the layer.
Once the layer mask is on the layer, click ‘b’ on your keyboard for your brush. Make sure the two little color boxes at the bottom of your tool bar shows black on top. If not, hit ‘d’ on your keyboard, which will set the colors to black and white. If the white is on top, press ‘x’ and they will flip.
Brush over the area you want to hide the blur. Use a brush opacity of around 50% so that you don’t hide too much at first. If you want to hide more, you can keep brushing over the area.
If you would like an action that will do this same exact effect, you can download my Make it Dreamy action for free. Simply click HERE and you will have a box pop up, and save it to a safe location on your computer that you can easily find again. If you are unsure how to install actions, read my extensive Action Install tutorial.
Make Dreamy is a part of the Everyday Essentials action set. Several of the actions in that set are those found in the Everyday Samples page, but it also includes many actions that are not free, including Deep Clean, Baby Clean, Eye Clarity, Eye Tricks, Five Points, B&W Variety and many more.
Everyday Essentials is a set of actions that I feel are extremely useful, functional actions that save you time by quickly doing steps you may do on a daily basis. I will be launching a majorly updated and enhanced upgrade for the set so check back!


Thank you Amanda! Great tips and actions as always.
Thank you Amanda for the great action and the instructions.
Thank you so much for the action!!!
Thank you!
Thank you!!
i’m downloading PSE today. eek. hoping it all works out & then i’ll be stalking your blog for tutorials.
thanks for sharing it all!
kellie
Amanda, thanks so much for the wonderful action. I have already put it to use on a few of my portraits and was PRAISING you in the proces. All your sharing is MUCH appreciated!!!
Thank you so much! I find it incredible that you update the action package that I purchased a few months ago, and wanted you to know that it was much appreciated.
Is this dreamy action for free still available? I clicked on the (click HERE) and it went to a blank page. Just wondering!
Never mind, figured it out! =)
Oh wow, thank you! 🙂
After reading through a few of your articles here, I’m realizing how little I know about PSE8–and I’ve learned a *lot* over the past two years. I think I just might sign up for one or two of your classes. I want to raise my skills up to another level.
Amanda, I used the Make Dreamy action in this stream picture. I think it added just the right touch. Thank you so much for sharing it.
http://nicolebullphotography.zenfolio.com/p984281031/h4f2885ac#h4f2885ac
Thanks a bunch! Can’t wait to try it out 🙂
Amanda — I am using PSE 8. I purchases 10 but didn’t ever install it…it’s still in the original box. Then I purchased 11 when it was introduced, but I’m afraid to upgrade. 😉 I don’t know what all I have to do to save my actions, editing programs, etc. that I use with 8. Can you please advise? Thanks in advance.