There are times when photographing subjects that the light is just not what you want or need, leaving one side of the image darker than suits you. In Lightroom, the graduated filter can quickly fix that but there isn’t anything like that available in Photoshop Elements (or Photoshop, but there is a grad filter in Photoshop’s ACR).
I am excited to bring you a fun new, functional workflow action for Photoshop and/or Photoshop Elements that I mentioned last weekend on Facebook – Gradual Light. This action adds direction light from the top, bottom, left and right, to help you even out the lighting in the picture.
When would you want or need to use this action? Whenever one area of your image is a good bit darker than another. The action uses Photoshop or PSE graduated filters to gradually add light, starting on the edge of the image, where the light will be the strongest, then gradually fading out.
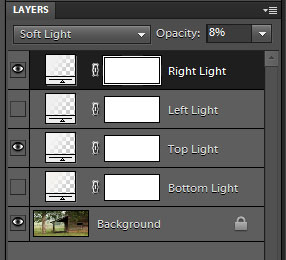
Below is a screen shot of the action layers in Photoshop Elements 10, but the layers are the exact same regardless of what Photoshop or PSE you use. When you first play it, all the layers are turned off and you just turn on the layer(s) you wish to use. In my example I wanted light coming from the top and right, so I turned those layers on and then lowered the layer opacity to suit.
You can tailor the light to your picture even more by clicking on the graduated filter icon (next to the mask in the layer) and when the dialogue box comes open, increase or decrease the scale of the light (how far out the light reaches into the image) or the direction of the light by moving the angle of the light.
For instance, if you want it coming more from the right corner, turn on the Right Light, then click in the adjustment thumbnail icon, then move the angle until it is coming from the corner you want.
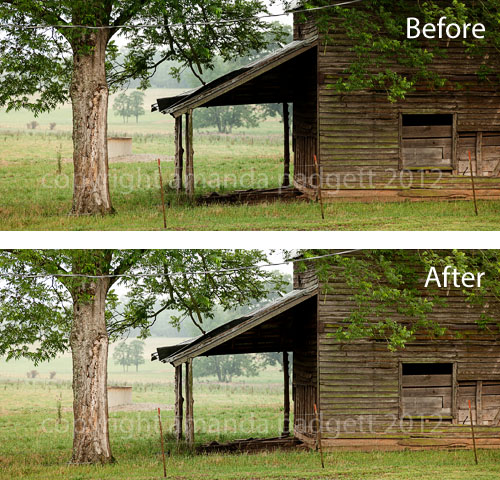
Below is the before/after of the example image I used. The barn was quite dark in the top and right of the image, so I turned those layers on. I tweaked the layer opacity and the scale a bit then flattened and saved the edit.
Right now I am giving away Gradual Light for free. To download, simply click the thumbnail image below.
The action works in both Photoshop CS and Photoshop Elements (all versions). Please note that if you are installing into PSE, you need to copy/paste all three files – the .atn, .png and .metadata.xml files, into the Photo Effects folder. The .metadata.xml file will make the action fall into the Everyday Essentials category (in the drop down menu).
The download is via Media Fire. I pay for a pro account, so there are no pop-up adds and such, and safer for downloading to your computer. However, some anti-virus software programs may block the download. If that happens, send me a message via the contact form.
This action is still in the development phase really. I know in my bones that it will be altered and improved in the coming months. As it changes, I will let you know so you can download the most recent version.


Thank you for sharing!
Amanda,
I’ve used your action many times — never thought to use the adjustment option to control how far into the photo it reached. Nice!
Thanks so much!