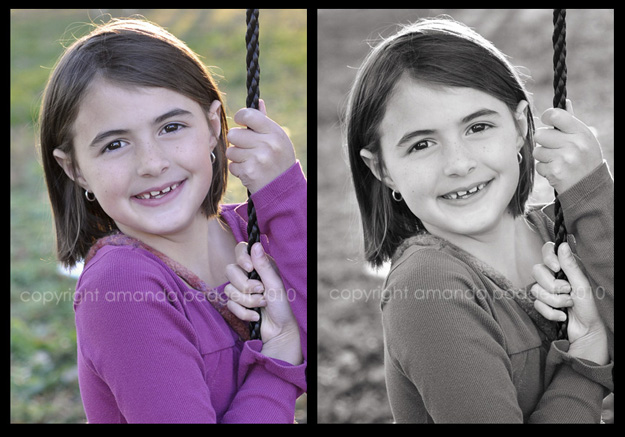
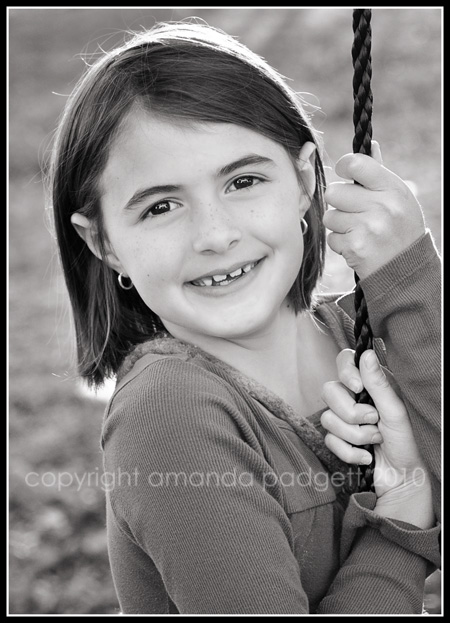
This is actually my second tutorial on how to convert your image to a black and white in Photoshop Elements, but since the “challenge” for Show Your Skills was to make the shared image a black and white, I thought I would do a post on my steps, plus share a video showing it in action.
First, and foremost, before I ever start steps toward taking this image to B&W, I give it a good, clean edit in Photoshop Elements 9. I “saved as,” putting ‘clean’ in the file name, leaving the original untouched.
**I recorded a short video tutorial showing these same steps that follow, which can be viewed HERE. **
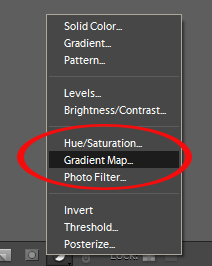
1. Click on the half white/half black circle at the bottom/top of your Layers palette. Choose ‘Gradient Map.’
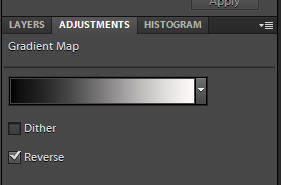
2. Once the Gradient Map box comes up, it will likely be a black and white gradient already. If it is not, click on the little triangle beside the gradient map that is there and more options will drop down for you. Choose the Default and you will then see the black and white gradient map.
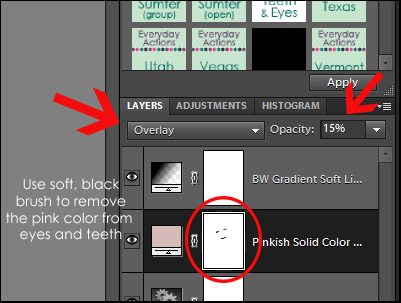
3. Go back to your Layers Palette and click on the Adjustment layers icon (half white/half black circle) and choose ‘solid color.’ Pick out whatever color you would like. I chose a light, soft but warm pink/rose color, to help give the B&W conversion a slightly soft and feminine feel. Then I changed the blend mode to Overlay and lowered the opacity to 15% (maybe 20% in the video LOL).
I then took a soft, black brush at 100% opacity and brushed over her eyes and teeth, just to get off any of the pinkish tint from the color layer. You can see on the mask (circled in image above), where I brushed off the color.
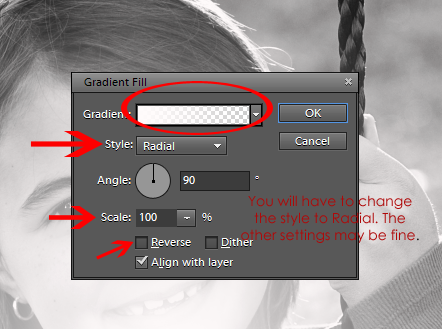
4. Click on the Adjustment icon again, and this time choose ‘Gradient.’ When the dialogue box comes up, click on the gradient color box and choose the black and white. When the box comes up, it may have black and white there already.
Change the ‘style’ to ‘radial’ and increase the scale to like 120%. Depending on your PSE and what gradient came up for you originally, you may or not need to click on the reverse option.
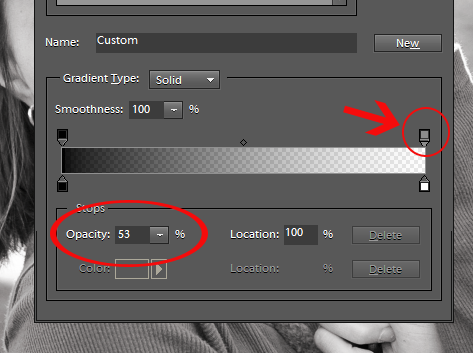
5. Click into the gradient box, the one circled in the image above. When the new dialogue box comes up, click on the small tab that is circled below (it will be black to start with). Once you click that, you then have the ability to go to the opacity (oval around it in pic below) and reduce the opacity of the white.
Why am I doing this? I am going to change this blend mode to Soft Light and I don’t want to blast the image with so much light and white color that I “blow” some area of the image. By reducing the opacity of the white, less harsh light is being put on the center of the image.
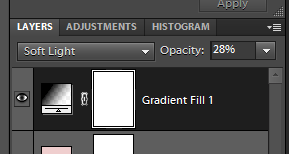
6. Change the blend mode of the Gradient layer to Soft Light and reduce the layer opacity to like 25% or to suit.
7. Adjust all your layer opacities to suit and flatten. Save as a JPG, with quality of 10. To share on the web, make sure your resize it by going to Image, Resize Image, change resolution to 72 and pixel width to 450 (what I use for portrait orientation, I use 600 for landscape orientation).
I simply used CoffeeShop’s Web Frame It action to add the simple but effective frame and to resize the image for the Internet.
Now, after you have gotten the hang of converting images to black and white, why not try out some wonderful, free B&W actions, not only to speed your workflow but also just to experiment. I love finding lovely new B&W actions!
Here are some of my favorites freebies:
If you don’t mind buying actions, here are some good ones:
- City Lights Action Set (me again, sorry) set of six black and white actions for $12
Do you have a favorite B&W action, free or purchased? Leave the place you found it in a comment so that others can go take a peak too.
And, if you have had a good time learning how to convert your images to black and white, Darcy at My3Boybarians had a little link-up party just for B&W pics a few days ago. You can still join in. Simply post your image to Flickr or your blog and “link up” on this page at her blog.



Well-written! Love that you break it down step-by-step.
Thank you, Darcy! I think I get carried away with the screen prints sometimes. LOL
Viewed the video. Thanks so much. I have learned sooooooooo much from you!
Betty,
You are very welcome! I really enjoy helping others make the most of PSE. Can’t wait to see your B&W play.
Very beautiful : ) You did a great job! Love your style!
Thank you very much!! It was a basic B&W, and there are many ways to make different versions, but I wanted to keep it simple for those just learning.
Wow! You are always so helpful! Thank you!