It’s Friday again, which for many in the online photog world means Fix It Friday time with I Heart Faces. This week’s image was provided by a friend of mine, Michelle Johnson of Love That Shot. She did a great job taking the shot and as with all pictures that are “right” coming from the camera, it was an easy fix. (Getting it right in camera cuts your post processing time down exponentially).
Note: All edits done in Photoshop Elements 9 but same steps can be taken in any version of Photoshop (CS5 and earlier)
The main thing that concerned me were the hot spots on the man’s forehead. So, to tackle that I opened the JPG image in Adobe Camera RAW (ACR) by going to File, Open As, clicked on the picture and in ‘file type,’ chose Camera RAW.
Once in ACR, did the following tweaks:
- Pulled the exposure down to reclaim those areas that were too bright
- Moved the temperature slider to the right a bit to warm up the image
- Increased the contrast
- Moved the clarity slider to the right a little to help define the edges
- Moved the vibrance slider to the right, making the colors pop a bit
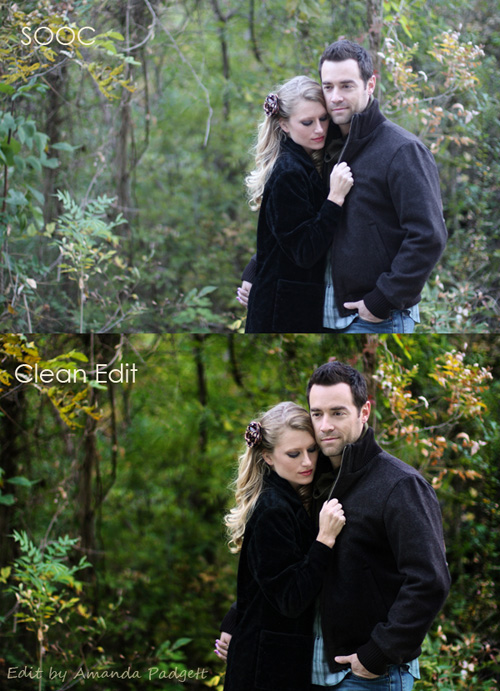
When finished, I clicked Open Image and it opened into the Full Edit Workspace. I tweaked a few things, like a Levels adjustment to warm the skin tone some, and another Levels adjustment to make the background nice and rich (brushed off the couple). I also removed a couple of branches that were distracting me. 😉
After I had played with the image a while and brought it to a point I was happy with, I saved it with ‘edit’ in the new file name, then cropped to a 5×7 and then resized and sharpened for the web. Below is my before and after comparison.
After doing the clean edit, I wanted to play with a texture or two, so after saving the web version of the edit, I used my Undo History to go back before the web resize and sharpen step and here is the “playing” I did:
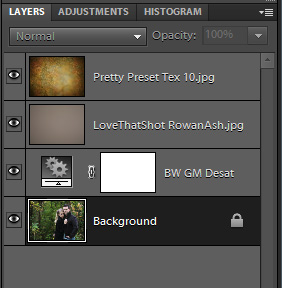
- I added a Black and White Gradient Map adjustment layer, which I pulled down to about 20%. This was to desaturate the image a bit.
- I added a photo veil from Love That Shot, set the blend mode to Soft Light and pulled the opacity to about 60%
- I added a texture from Pretty Presets, set the blend mode o Soft Light and pulled the opacity to around 40%
- While on the texture layer, I lassoed the couples’ faces and went to Filter, Blur, Gaussian Blur and set the radius to 20. This was to blur the texture so that it wasn’t harsh on their faces, but left the color from the texture.
Here is a screen shot of those few layers (for those who struggle with using textures or veils):
The texture, veil and gradient map helped me created a subtle, rich, warm image, which was very appropriate for the setting and time of year the shot was taken.
Michelle at Love That Shot just released her newest set of photo veils, Botanical Collection, and they are gorgeous!! To celebrate the new release, they are giving away two of the Botanical sets (plus one of those winners gets their first set, the Simplicity Collection). While you’re there, pop into their FREE forum and just make yourself at home. It is a very supportive and encouraging community to be a part of.










That is a stunning before and after! I’m glad you took out the distracting branches, makes a big difference. The richness of the background and warming up the couple makes this picture really shine!
Thank you so much! The branches, although right for the setting, were a bit distraction. Luckily they were easy to remove.
Girrrl….you rocked that Clean edit didn’t you? I LOVE the finished product with the textures too, the colors are beautiful!
wow! Perfectly done! Thanks for the step-by-step!
So pretty! Is it faster to open in RAW to get the process started with the settings? I actually took a photo and used your tips. Tah dah! 🙂 What happens to the space though when you remove a branch? How do you fill it in again?
Thank you! What I did for the branches was lasso a section about that same shape near it, then did Layer, New Layer Via Copy. Then, I used my move tool on that layer and moved it over top of the branch. I will do a tutorial soon on this technique.
Beautiful edits!!
Amazing, Amanda! Such a beautiful edit, and, I wish I’d thought of getting rid of that branch too … I went back to look at mine, and it is a bit distracting! Great job, and thanks so much for sharing each step! You’re a gem! 🙂
Gorgeous!
That edit is GORGEOUS. (just no other word for it)
Just amazing and nicely done. Thanks for sharing !!