To help those new to Photoshop Elements (and Photoshop) get an understanding of the various layer types available to them, I am going to talk about the three types of layers you will use when editing a picture.
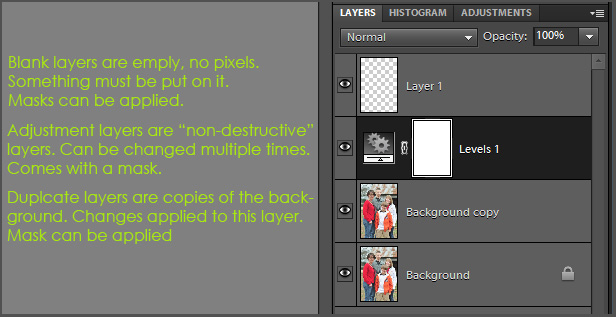
- Blank – no pixels, just a blank slate for you to put something on.
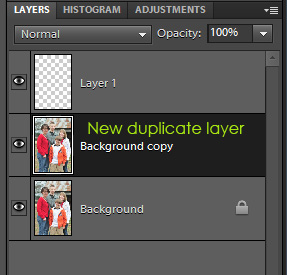
- Duplicate – a copy of the background, changes can be made to this layer, blend modes changed, layer masks added. BUT, once the edit is done you cannot tweak it, you can only adjust the layer opacity, brush off the mask or delete and try again.
- Adjustment – “non-destructive” edit layers that allow for multiple changes now or a year from now, can be delved back into and tweaked endless number of times. Comes with layer masks, blend modes and layer opacity can be changed. **most recommended type of layer for editing**
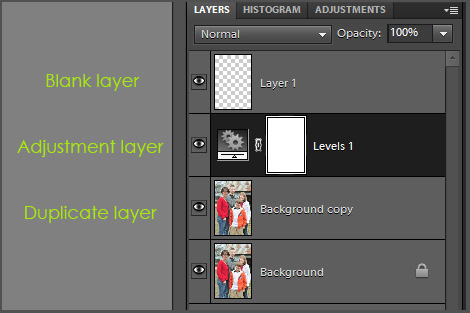
Below is what they look like in your Layers palette:
1. Blank Layer – To make a blank layer, simply click on the ‘new layer’ icon at the bottom of the Layers Palette (or top for PSE 6 & 7). Your image will not be altered at all until you put something on that blank layer.
2. Duplicate Layer – To create a duplicate layer, press ‘control’ and ‘j’ while on the Background layer. Or, go to Layer, Duplicate Layer. There are multiple ways to create duplicate layers, but I won’t confuse you by listing more than those two.
I do not use many duplicate layers in my edit process, but I do use them for skin smoothing, fixing blemishes, eye sparkle and overall sharpening. All other edits are done with adjustment layers.
Duplicate layers are used so that edits are not being made directly on the image/background and so you can manipulate the edits with layer opacity, blend modes and masks. Those things cannot be used on the background. PLEASE do not make edits straight to your background.
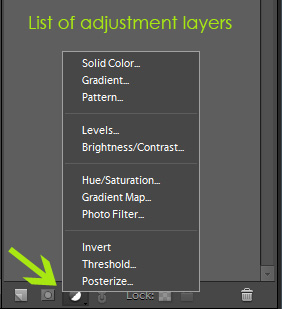
3. Adjustment Layer – To create an adjustment layer, click on the half black/half white circle at the bottom of the Layers Palette (or top for PSE 6 & 7). Choose the adjustment you would like to create.
Adjustment layers are the preferred way to edit images as they are small changes to the data in your file and the changes can be accessed an infinite number of times.
You may see tutorials that lead you to do apply adjustment-layer-type edits (via Enhance menu) on a duplicate layer. Most of the time, you can alter those steps and just do a true adjustment layer.
The next tutorial will delve deeper into layers, adjustments and masks. I didn’t want to overwhelm you with too much information at once (like I usually do).
So, a recap of the layer types and how they can be used:
Below is a short video tutorial about the three types of layers. After explaining the layers, I do some quick edits: a Levels bump (adjustment layer), fixed blemishes with the spot healing brush (duplicate layer) and reduced under-eye circles (blank layer).
When I say I hope you use a lot of adjustment layers in your edit, I did not mean that you need to only, that I hope you use a majority of adjustment layers and not duplicate layers. Sorry for the confusion. 🙂


Wow, thanks so much for this post! Very helpful!
Thank you so much for this, very helpful indeed ! looking forward to more !!
Thanks so much. Your tutorials so easy to understand.
You rock! Thanks for the straight-forward explanation.
Okay, I’m going to try to start with PS Elements 9, and I don’t really understand what you’re talking about even. Do you have any tutorials that are more basic than this?
Like, step 1 open PS Elements. Step 2 here’s how you import a photo. Step 3, here’s the first thing you do.
I don’t know what layers do or how they work or why I’d choose duplicate or adjustment or blank.
I just don’t really understand any of it.
Have any ideas to help a TRUE beginner?
This is so helpful – thank you!!
You are awesome! Thank you! Its great seeing help for PSE as most website seem to focus on full PS.
Your tutorials are so helpful; I am loving them! Now, I am new to layering and don’t completely understand the need for a layer on each edit…why use layers instead of just edit out the blemishes and under eye circles on the original?