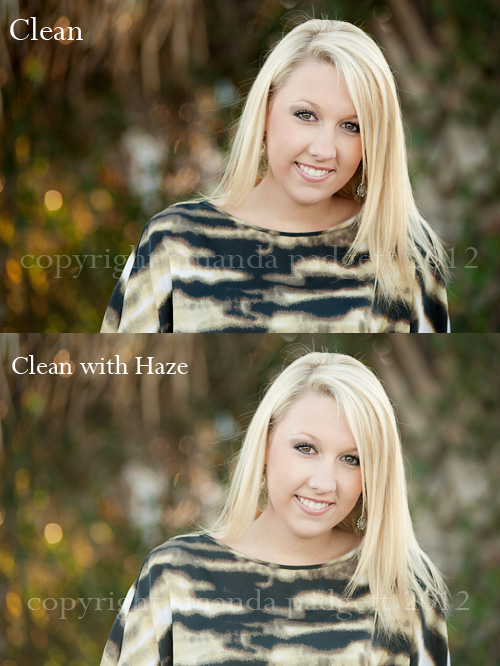
Recently there were some questions on Everyday Element’s Facebook page about how to add a haze to an image. I had added a haze to a beach shot of this lovely subject, and while it is not something I do very often, it can be fun to play with and very simple to do.
First, I advise editing your image and saving it, then start experiementing with some hazes and that way if you don’t like them, you can go back to the clean edit.
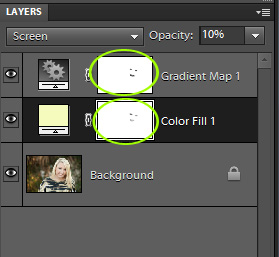
Okay, the two main ways I add a haze in Photoshop Element is either with a solid color adjustment layer or with a gradient map, but both ways I change the blend mode to SCREEN and lower the opacity way down.
To make a color or gradient map adjustment layer, click on the circle that is half black/half white at the bottom of your layers palette (at the top for PSE 6 and 7).
- The menu that pops up shows all your available adjustment layers.
- Try solid color first.
- Choose a color that suits the image.
- I chose a very light, creamy yellow because I wanted warm tones for this image.
Now you need to change the LAYER blend mode, which can be found right under the work LAYERS.
- Change the blend mode to SCREEN
- Lower the layer opacity to between 10 and 15%
Next, try a Gradient Map adjustment layer. Click on the colors in the gradient box to be able to change them.
- I like to set mine to two light colors, but you can also try a dark and a light
- If you have no idea how to change your gradient map colors, read my Gradients tutorial
You can have two layers of haze, like I did here, or just use one layer. One thing you may want to do is take a black brush and brush off the haze over the eyes and mouth, as shown below.
What if you like the haze but need just a touch of contrast brought back into the picture? Well, there are many ways to go about that, but a quick and easy way is a Soft Light layer.
- Create a Brightness/Contrast adjustment layer and bump up the contrast a good bit
- Change the Layer blend mode to Soft Light
- Lower the layer opacity to suit
No video tutorial for this one (although if there are a lot of questions I will add one later). I do have a fun little (free) action and you can download it HERE.


This is nice Amanda. I will have to try this one.
beautiful!
Thanks Amanda. I have been wondering how to do this and it’s so simple.
I’ve been searching for a way to do this. Many thanks!
Thank you! Thanks for linking the gradient tutorial, I have been trying to fiqure out how to change the colors forever 🙂