I love, love, love Gradient Map and Gradient adjustment layers in Photoshop Elements (and regular PS)! You can create subtle or dramatic color and temperature changes with them, and I often use them in my actions and general work flow. So I thought I would share how to create your own gradients and how to save them for future use.
Okay, start with an image, preferably a nice, clean edit.
Step 1: Create a gradient map adjustment layer. Quickest way in both PS and PSE is to just click on the half black/half white icon in your Layers palette. A box will pop up and simply click on ‘gradient map.’

Step 2: Click on the gradient that comes up, no matter what it looks like. We are going to change it, so don’t worry, even if it is red and yellow. 😉

Step 3: Double click on the color box in the left. Choose a color you think you would like. Click okay. Then, do the same for the color box on the right.


Step 4: If you want to save this gradient for future use, type in a name for it in the ‘Name’ box and click ‘Save.’ You will need to name it again when the file opens up. Note: this saves all the gradients in this set. Whenever you want to load this one gradient, it will reload all the gradients in the set again, so you will have duplicates. I’ll share how to save a set at the bottom of this post.


Step 5: This is what your gradient will look like in the Layers palette. Change the blend mode to Overlay, Soft Light or Hard Light (sometimes Vivid Light can produce neat results too). Lower the layer opacity to suit.


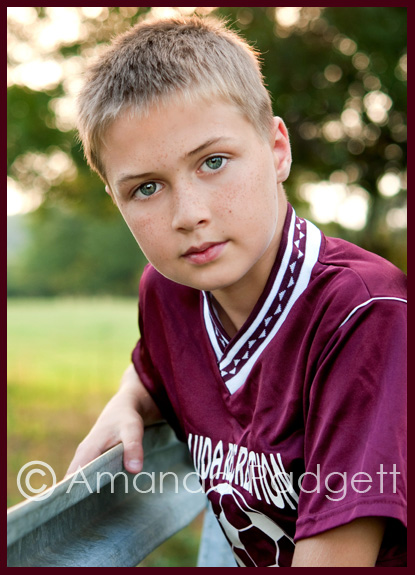
Final Image:

This gradient added a subtle creamy coolness to the image, but you can do all kinds of things with gradient layers. Have fun playing around and if you come up with something really cool and want to share, please post it to my Everyday Elements fan page. I promise to “ooh and aww” over it! 😉
*****************************************************
Okay, to create a custom set, meaning set of gradients that you decide on, you need only those gradients to be in the window before saving. So, to get rid of the others ones, right click on it and choose ‘delete gradient.’ Don’t worry, this does not delete if from your gradients altogether, just from this set. Once you clean up all the unwanted ones and include the ones you do want, choose save. Then, rename the set whatever you want. In the example below I renamed it “FavoriteGradients.grd.”
Now, when I open a new image and create a gradient map, I can choose to use the sets PSE has or I can load my Favorite Gradients set and choose from there. Clear as mud?


[…] Gradients […]