I have done many beginner level tutorials lately, but today I am going to tackle a topic that is more intermediate level, but so very easy to do. What makes is intermediate is the concept of layer masks and that those who will are able to utilize this will have to have a firm understanding of them.
If you are newer to PSE (or Photoshop CS5), see my tutorial on the basics of layer masks, then come back to this post.
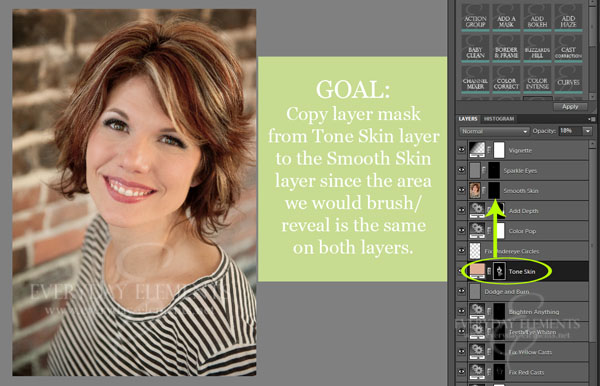
When you are editing a portrait, many times you will end up using a mask the same exact way for different layers. That is time consuming, isn’t it? Well, there is a way to copy layer masks from one layer to another, cutting down the time you spend editing.
FYI: My brush strokes were not fantastic for this tutorial, for a variety of reasons that I won’t get into. However, you can take this away: things do not have to be perfect in PSE/PS to still be effective. I release you from the burden of having perfect masks.
For the purpose of this tutorial, I ran Deep Clean on a picture I took of a friend of mine (and now business associate as we are working on the upcoming photography workshop/conference together). There are two layers in this action where I will end up brushing on almost the exact same areas. So, I am going to copy the layer mask from the “Tone Skin” layer to the “Smooth Skin” layer so that I’m not doing the same thing twice.
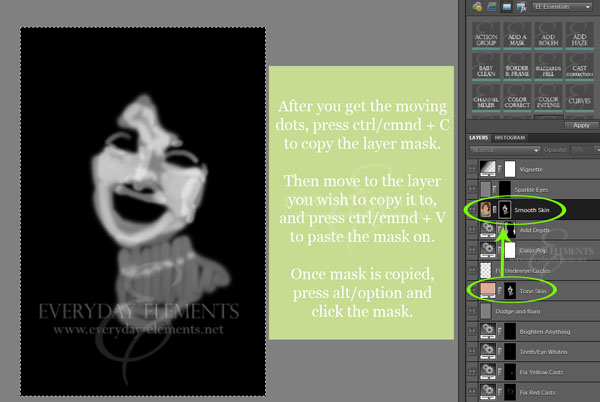
Step 1: Make sure you are on the layer with the mask you would like to copy. In my case that is the Tone Skin layer. Hold down the alt (option on Mac) key and click on the mask. This will turn your image black and where you brushed will be white or gray.
Step 2: Press your control (command on Mac) key and the A key. Little moving dots/dashes will appear around your image. This is telling PSE/PS to select the entire area.
Step 3: After you have done the ctrl/cmmd + A step, press control/command and C (for copy). This tells PSE/PS to copy everything selected.
Step 4: Go to the layer with the mask you would like to paste the copied mask to. In my example it is the Smooth Skin layer. Click on that mask and then press control/command and the V key on your keyboard. This pastes the copied data to the new mask.
Step 5: Get rid of the moving dots by pressing control/command + D (to deselect). To see your image again, simply press alt/option and click the new mask.
Once you have copied and pasted the layer mask to the target mask, make sure to adjust the layer opacity of the target layer. For my example, I lowered the opacity.
Below is a VERY short video tutorial showing these exact steps. If you are reading in an email or blog reader, pop over to the blog to view the video.


I always knew there must be a way to do this. Thank you so much for the simple, easy to follow tutorial! 🙂
Kristin,
Yay! I am glad that it was something you were wanting to learn. It is a fun and quick trick, one I use all the time.
Thank you for taking time to comment. I don’t often get a chance to say thank you, but I really do appreciate it!
HUGE thank you!!
There is also another, very simple, way to copy a layer mask to another layer:
1) Press and hold the ALT/OPT key
2) Grab the mask you want to copy with your mouse and drag it to the layer you want it on.
3) Let go of the mouse button.
4) It might ask if you want to replace that mask that is there.
Looks like there are a few ways to do this. All are good. Its what ever is easiest for the user.
The way I have always done it is as follows: (because its the fastest for me)
PSE10
Click the mask you want to copy to select it
Once selected … right click it
Choose ‘Subtract mask from selection’ (you will see the marching ants around the selection)
Click on the layer you want to copy the mask to
Then click on the Add Layer Mask icon at the bottom of the Layers Panel
DONE!!!
I love this tip! I had no clue you could do this until you showed us this in your Everyday Live workshop last year. I have used this so many times since then! Thank you so much for all your easy to follow tutorials!
awesome trick! Thank you Amanda!
Thank you so very much for this most helpful tutorial!!!