Let me start this tutorial with a disclaimer: these brushes are NOT a necessity. I am not saying that everyone should use them on all pictures of women. These are useful at times and just plain fun at other times. That said, let the fun begin. 😉
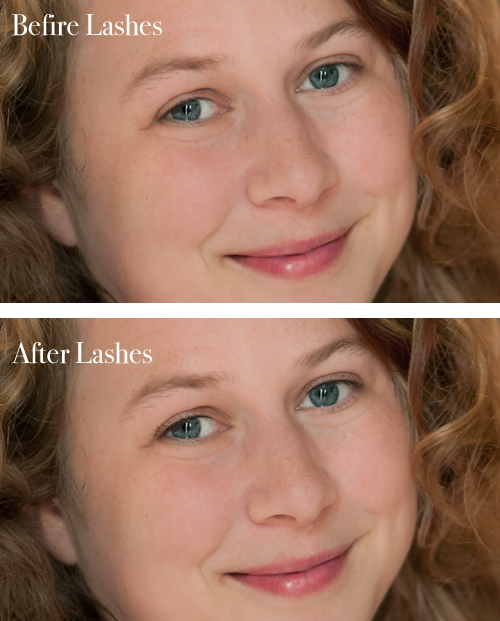
Have you ever take a picture of a woman (young or old) and they mascara they had was not even on both sides? Heck sometimes I have walked out of the house with mascara on only one eye. If you have a subject that has that issue, using eyelash brushes can help even the eyes out without looking “Photoshopped.”
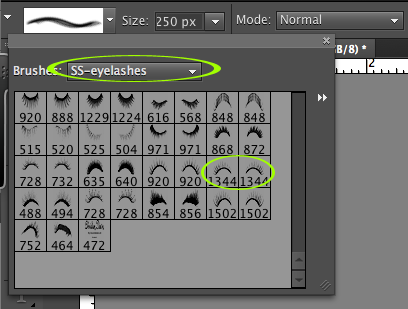
The brushes I use were downloaded for free from Obsidian Dawn. After downloading the zip file, I moved it to my folder where I save all my brushes. Then I extracted the file (double click on a Mac or right-click and choose ‘extract all’ on a PC). While PSE is open, I navigate to the option to load brushes, then navigate to the folder where I saved the file and then open the .abr file.
The image I am using for this tutorial is of a sweet, sweet blogger who let me take her picture at a recent conference. She is perfectly lovely without any make up on, including no mascara. I am only using her picture for this tutorial because it gives me the opportunity to show a good “before/after” comparison.
As with all brushes, the color that is in the foreground of the color palette is the color that your lashes will be. Set the color to be black or a dark brown. Then pick the lashes that most closely match the type of eyelashes your subject already has.
Once you have your eyelash type picked, and the correct color for the lashes set, now size the lashes down to fit the eye by pressing the ‘[‘ key on your keyboard. It will probably work best if you have your picture sized up to 100% zoom.
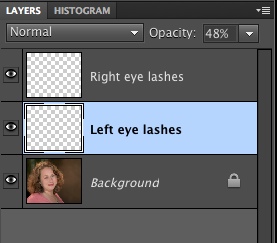
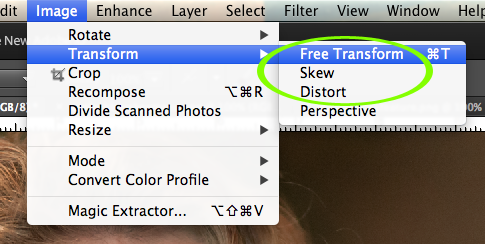
Create a blank layer (icon in bottom left-hand corner of Layers palette, looks like paper with corner folded), then click the brush over the eye. After the eye lash is on the blank layer, you need to use Free Transform, Skew or Distort to mold and squish to fit the person’s eye. Don’t get discouraged with this step, the more practice you have the easier it gets.
Once you have added the lashes you want, go on with the rest of your edit. You may want to save the layers unflattened as a .psd file in case you later think that the lashes were too strong or not strong enough, etc., because then you can go to those layers and tweak as needed. After you’re happy with everything, flatten and save as a .jpg file as usual.
Below is a quick video tutorial showing how to use the eyelash brushes. If you are reading this post in a blog reader or via email, you will have to click over to the original post at the blog in order to view the video.



That’s pretty cool! I need that in real life – for when I walk out the door without my mascara on!
Thank you, Kristen! I cannot tell you how many times I walk out with mascara on only one eye. LOL With four kids (like you) I get distracted and then forget what I was doing.
Thanks Amanda! This also showed me how to use the free transform and skew tool, which I never knew about.
Jayne,
I am so glad that it tipped you off to those handy tools. I will do another post in a few weeks that will be even cooler – using the skew tool (graphic related, not portrait editing related).
Thank for sharing this technique, and yes it may not be for some but I know a lot of women who as they age their eyelashes have thinned out some and they would appreciate this little touch.
Cindy,
You are so right! I am just entering my 40’s and I can already tell mine are thinner, especially on the left eye. Very discouraging, but having the eyelash brushes helps balance them out a bit.
Thanks for the reminder about that. I may edit the post to add that little ditty. Thank you!
Great tutorial. I apppreciate your taking the time to share these with us.
That’s so cool! I thought something looked different. 🙂
Nicole, thank you for letting me use the picture for the tutorial! The picture I posted on your FB was w/out lashes. And, actually very little was done to the picture; you are beautiful!
That is just too cool! Thanks for all you do Amanda! 🙂
oooh, I’ve seen eyelash brushes and never tried them! thanks for the great tut Amanda
Wow, I didn’t even realize this existed in PSE!
this is so cool. i had no idea! thanks for the tutorial!
This will come in handy….thanks for the lesson, Amanda.
This was so fun to try! I immediately downloaded the lashes and followed your tutorial. Thanks for everything, Amanda!
Quick question? Installed the action, but when I go to use it, it says it not compatible with my photoshop. I have PSE 10 installed by the way. Any clue why it won’t work?
I had no trouble downloading the eyelashes, but for some reason it wont let me “click” and drop the lashes on the eye. It continually moves with the curser. Do you know what I might be doing wrong?
Thank you so much,
Kathy
What do you do if you are photographing a beautiful teenage girl that thinks MORE is better and has sooooo much masscara on that she looks like she has a black eye? Short of giving her a baby wipe.