Do you have a blog or business and like to use the colors in your branding on graphics and borders of images and such? Or maybe you just have colors you like to use often in your graphics, cards, templates, etc.?
Today I am going to show you how to save those colors are separate swatch sets which you can quickly access for borders, type, shapes, and more!
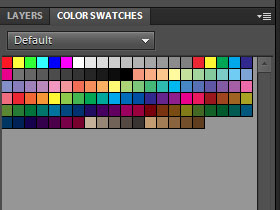
Not sure what I mean by color swatches? Those are set colors that PSE/Photoshop has readily available to you via the Color Swatches panel.
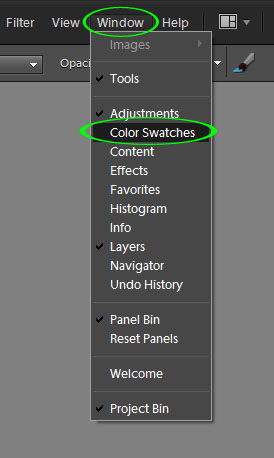
If you don’t see your Color Swatches panel right off, go to Window, then down to Color Swatches. You can pull it away from where it pops up and nest it wherever suits you best (see my tutorial on customizing your workspace for more information).
Let’s say you want to get all the colors used in your blog design. We first want to make a screen print.
- PC users: Press Print Screen on your PC keyboard, then inside PSE, create a new document (the size should default to he size of your screen) and paste the screen print onto it by pressing control + v.
- Mac users: Make a screen print by pressing shift+command+3. That creates an image of the screen on your desktop. Open PSE and navigate to your desktop to open the image.
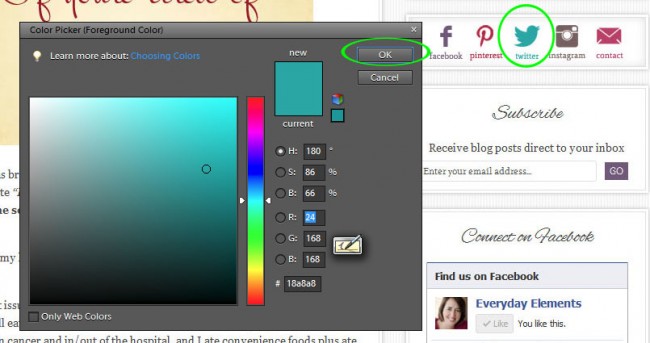
Below is a screen print of my newly updated personal blog (which used to be Moving Forward, but now is just AmandaPadgett.com). I wanted to save the colors my blog designer used, so I made this screen print and used the social icons to grab the colors.
To pick a color just click on the foreground color and the color picker will pop out. Use the eyedropper (will show up when you move out of the Color Picker) and click on a color in the image.
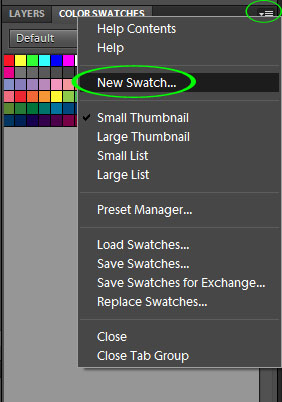
To save the swatch, click on the top right-hand corner of the Color Swatches panel. A drop down menu will open and you should click on New Swatch.
Name the swatch whatever you like.
Now, PSE may prompt you to save each color (depending on what color swatch set you were on to start with), but don’t. Just hit cancel. Wait until you have all your colors named that you want in the set.
Once you have all your colors, go to your Preset Manager. Where is that? Go to Edit, then down to Preset Manager (same for PC and Mac).
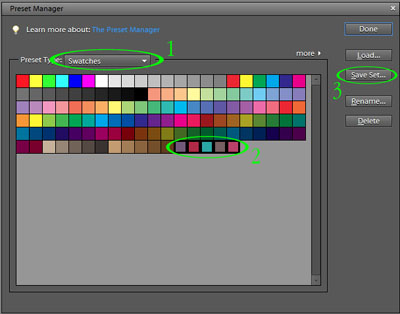
When the Preset Manager is open, click where it says Preset Type and choose Swatches. Your colors should be the last few colors on the bottom row. To save the colors as a set do the following:
- Click on the first one, hold down your SHIFT key and click on the last one (this selects all your colors).
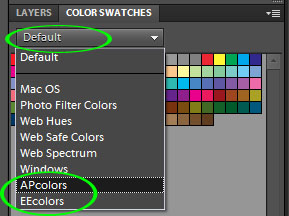
- After they are selected, click on Save Set. Name it whatever you like; I have two sets: EEcolors and APcolors.
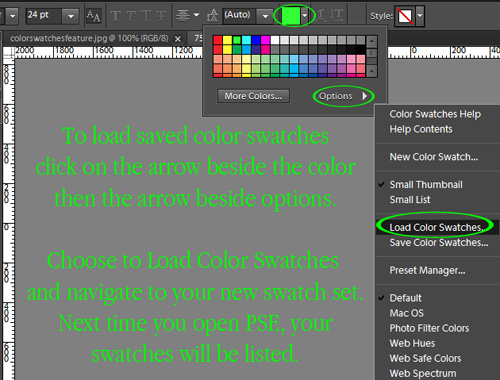
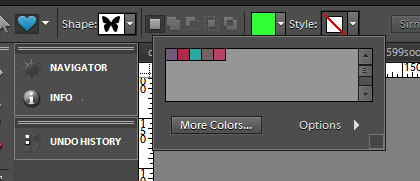
Once you have your color swatch set saved, you can access them via the Type and Shape option menus as well.
Once you have your swatches saved, the next time you start your PSE, the sets will be accessible via the drop down menu within Swatches.
It really is quite easy and kind of fun. Hope you enjoy it also, and find that it saves you time!
Would you like to see these steps played out “real time?” Below is a video tutorial showing me doing the steps on my Macbook Pro laptop. Sorry PC users. I tried and tried to make it on my PC desktop but my webcam has decided it wants to act like it’s not there, and I need it to record the audio.
For those who do/don’t care – making a corresponding video tutorial can be a real labor of love. Some days they are a piece of cake, but other times it can take as many as six tries to get what I want. It could be kids interrupting, technical troubles, my own mess-ups, you name it. Today it was kids being too loud, then the mic didn’t work (didn’t know until after recording), then went to the Mac and it recorded onto an older video. So, today’s video was take number FIVE. If I sound tired in it, that is why. 😉






Thanks, Amanda! I saved this and will also link in my blog post!
Thanks so much for this. It is definitely going to save me some time from now on 🙂
I never knew this! Thank you! Pinning!
thanks for all you do with your tutorials.
once the kids are in school, i’m planning on devouring all your tips!
thanks.
kellie
Thank you so much! I am new to elements and this is very helpful. Just used it to save my blog colors! Thanks again 🙂
OMG Amanda you just saved me so much time! First of all, I did not know that little trick about the screenshot providing the color, so that’s awesome! Second, this little swatch trick (I followed all the way through and created my own) is going to definitely save me time since I seem to always be looking up the colors. Thank you so much!
Hi, Amanda! Thanks for this tutorial! I’m having trouble, though. I’ve done everything and double-checked I did them correctly (twice even), but for some reason they don’t show up when I restart the program. The name of the set is there for me to choose from, but when I click on it the colors stay the same as they were before. Any ideas?
homeownersinsurance 554375 car insurance in florida D health insurance rates 664 life insurance %-[ business insurance %[
? ??? ??????? ??? ???????