Ever take a picture of someone who has beautiful blue or green eyes, yet when you look at the picture in Photoshop or Elements, the eyes seem a little dreary and lacking the color they have in real life?
Today I am going to show you how one adjustment layer in Photoshop or PSE can bring color and life back to those eyes in no time!
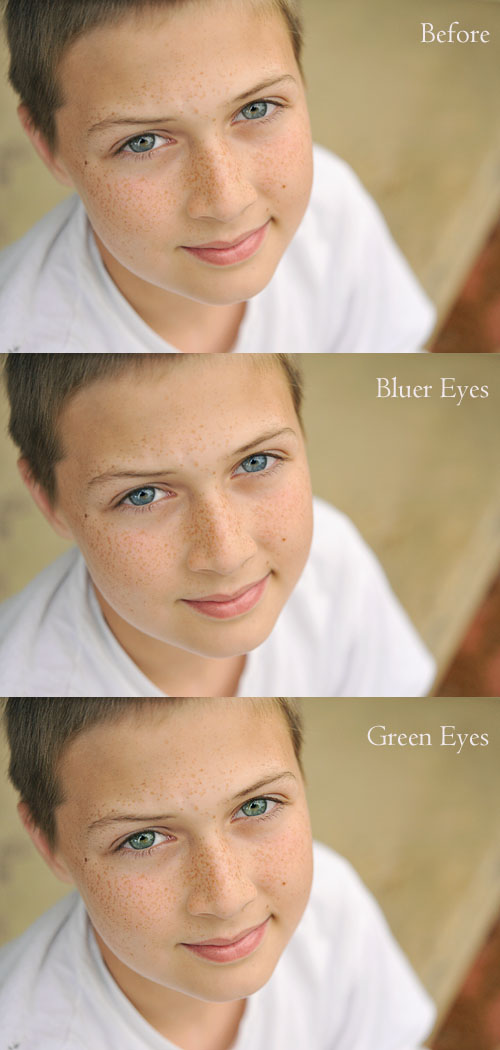
For this tutorial, I am using a picture of my son Daniel, who has blue-green eyes. Sometimes they are blue, sometimes they are green. I am going to make his eyes both more blue and more green. However, his blue eyes then to be a bit grayish and I often tweak them a little to look more blue in pictures.
Photoshop CS# Users – Yes, this tutorial works for you too!
To tweak eye color, the main adjustment I use is……Levels! Surprised? You shouldn’t be. 😉
A quick note before we move forward – You need to know a little about how the RGB colors work in Photoshop/Elements. RGB stands for Red, Green and Blue. Each color has an opposing color: Red – Cyan, Green – Magenta, Blue – Yellow. Typically when you reduce one side, you are increasing the other. For example when we reduce the blue channel, the image becomes more yellow. When we decrease the reds, the image has more cyan.
Alright, on to the tutorial!!
If I want to enhance blue eyes:
- I go to the blue channel, by clicking where it says RGB (next to the word Auto).
- Once in the blue channel, I move the gray slider to the left a bit, increasing blue in the whole image.
- Then I go to the Red channel and move the black and gray sliders to the right (this increases the cyan in the image).
- Invert the layer mask by pressing control/command and i on the keyboard, then brush with a white brush over the iris and pupil.
If I want to make green eyes greener or change blue/gray eyes to green:
- I go to the green channel and pull the gray slider to the left.
- Then I switch to the red channel and move the black slider a bit to the right.
- Invert the layer mask and brush over iris and pupils with soft, white brush.
This is NOT an exact recipe. Play with the slider until you achieve a color that you like and that looks realistic (please).
You may be thinking “why isn’t she addressing brown eyes?” Brown eyes are a whole other tutorial because those are a bit trickier to get right, and not have them looking like red, vampire eyes. Hopefully I will get to brown eyes in the next couple of weeks. But, you know, you don’t have to wait on me. Start playing today and see what results you get. Tip – work with the reds and yellows.
Below is an example of all three eye colors – not enhanced, made bluer and turned green.
Now for a quick, four minute video tutorial walking you through the steps. PSE users, don’t be alarmed when you watch it. Yes, I used my CS6 program for the video, but all the steps are identical in PSE.


Amanda! Thank you for the tutorial. Could you give me the steps before selecting Levels ie how to select the eyes? Do you just use one of the selection tools and then the layer mask?
This is probably quite obvious, but I’m having a bit of trouble with it!
Julia,
I will get a video tutorial up tonight for this tutorial and that should clear up any questions. Sorry I didn’t have it ready when the tutorial went live.
Nice job! Thanks!
Thanks, Kathryn!! ♥
Thanks for the tutorial, I’ve got some cute portraits of my green-eyed daughter that I was just thinking that I wish I could amp up the green a bit. And now I know how!
Another solid tut. ~Thanks!