*** Adding an update – I have written two other texture tutorials which can be read HERE and HERE. ***
This is a very picture-heavy tutorial, because, in my opinion, it is the lack of enough pictures that leaves people confused and not understanding particular steps given by the writer. So, I documented almost every single move I made while applying textures to a picture today.
One thing I do need to say before going on with the tutorial – this is written with the assumption that you have bought textures or downloaded free ones. They are simply pictures/images that you save as a JPG file. I recommend making a folder especially for textures, and then having separate folders inside that folder for the makers of the textures. For instance, I bought all of Flora Bella’s textures, plus I have found some free ones on the Internet. I have Flora Bella’s in their folders (two sets) and I have the free ones in a different folder.
Step 1: Open up the picture you would like to add texture to in the FULL edit workspace.

Step 3: Go to your textures folder.
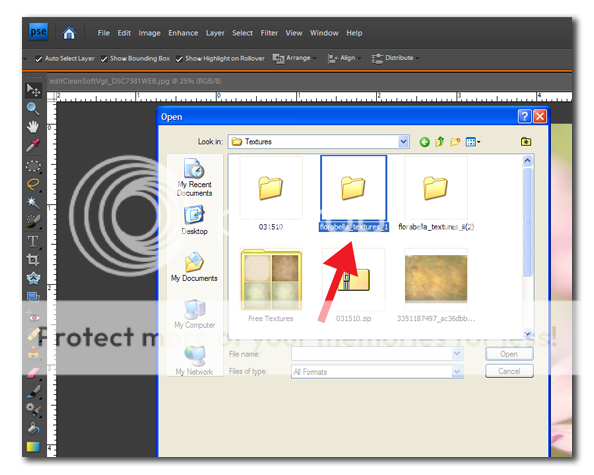
Step 4: Double click on the texture you want to use.

Step 5: This opens up the texture as another picture in your Full edit workspace. Click on the little icon that is like two squares, one after the other. This will tile your picture and the texture.
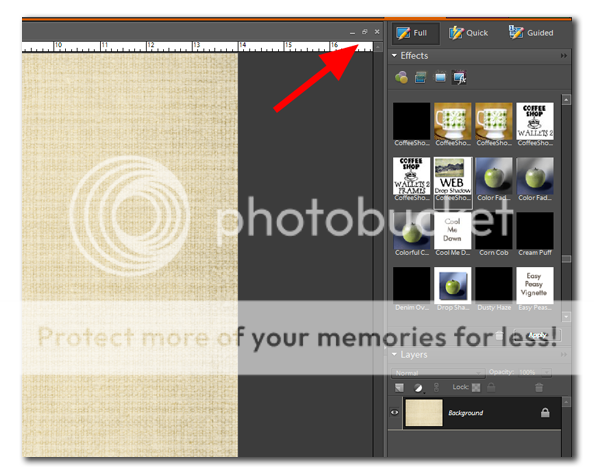
Image to show picture and texture tiled.

Step 6: While the texture picture is active (meaning you see it in the Layers palette in the bottom right hand corner of the workspace), put your mouse on the little tile of the texture (says background next to it) and drag it into the window with your picture in it. This will drop the texture onto the picture.

Image to show what your screen may look like after dragging the texture to your picture. It may look like you simply have to texture windows open. Don’t worry.

Step 8: In your texture window, click the little line up near where the double boxes was. This will decrease the texture and bring the picture (with texture) forward.

Step 9: The texture will have to be sized to fit the picture. Simply click on a corner (1st) of the dotted lines and move inwards until the texture fits perfectly over the picture. Sometimes you’ll have to fix the top/bottom or sides. Click on the green arrow (2nd) when finished.
Step 10: Now you can see the picture, with a layer of the texture. You will need to change the Blending mode (1st) to Overlay (2nd).
Step 11: If you want to add another texture, repeat the above steps but this time try changing the Blend mode to Soft Light. I like Soft Light because it gives, well, soft light. 😉
Here is my image, with both textures added to it.
Step 12: Lower the opacity of each texture layer to suit your taste.

Step 13: Now we’re going to erase some of the texture off of the flowers. Look to the left hand side of your work space and find the eraser (it looks like an eraser). Click on it (1st) and then go to the top and make sure it’s a nice soft brush (see next picture). Lower the opacity of the brush to like 20% (2nd).

Where you see 1st, click to reveal the brushes, then choose one with a soft halo around it. It doesn’t matter the size because you can increase or decrease the size of a brush by hitting a bracket [] key. The left [ to decrease and right ] to increase.
Step 14: Make sure your texture layer is active. You’ll know it’s active if it is in black (see where my arrow is pointing).
Step 15: Move your mouse over the flower petals, clicking and holding it down as you go over them.
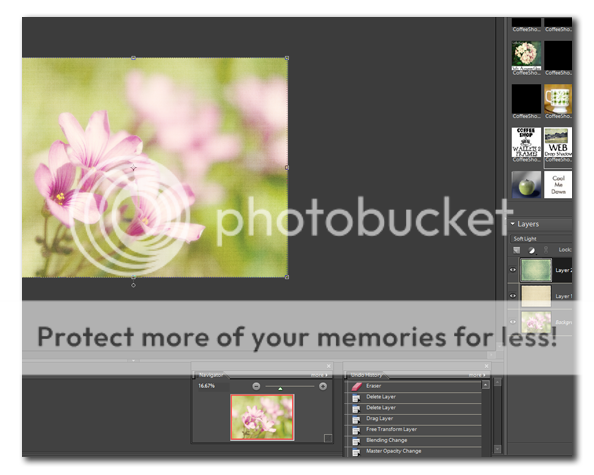
Activate the next texture and erase again. Below you can see where I have erased over the petals on both layers.
Once you have the texture layers opacity where you like it and you’re pleased with the picture, flatten it (go to Layer at the top and choose Flatten at the very bottom of the drop down menu).
If you’re going to post to the Internet, you need to resize it not only for space but so that people are less likely to steal it. I run Coffeeshop’s Web Drop Shadow and Resizing action. If you don’t have that action, go get it – it’s awesome! There are tutorials on how to download, install and run actions, but I will be writing one next week also.
Step 16: Click on the Web action (1st), then click Apply (2nd). Then put in the size you want (3rd) to make it and click Okay (4th). My blog post area can only handle about 550 pixels, so that is what I make my landscape style images (portrait style I make 450 or 500).
So, here is the before-textures shot:
Here is the after-textures shot:
It is only a slight change, but sometimes that is all you need. I’ve only been playing with textures a few weeks, and trust me, I’ve had them get away from me! 😉
I hope that this tutorial helps at least one person out there. Goodness knows I did enough screen prints for it. LOL I think it’s probably a record! If you use this tutorial to add texture to an image, please let me know so I can uh and aw over it.
Update: After writing this I learned that as of PSE 7, you can drag from the Project Bin. I will do a video tutorial using both methods and post back.








Awesome tutorial, thanks Amanda. I needed this ‘hand holding’ tutorial.
That’s a great tutorial. I knew everything except how to do a better job of erasing. I should have turned down the opacity more … this was great information!!
Thanks SO MUCH for this tutorial. I never knew how great textures were!
YES! I think it will help…can’t wait to get home & give it a try. I have to tell you that I might have read 75% of your post and watched 10 of your videos last night. I’m looking forward to watching the rest and putting to practice the tutorials I read today!
Thank you VERY much for the time you take, I know it’s A LOT! Happy Friday!
~ingrid H
Thank you for this, Amanda. I have been wanting to play with textures and now I can!