
It’s Friday, and for me, that usually means Fix It Friday time! Each Friday I Heart Faces shares a picture that you can edit any way you like, then link up at their site and go visit others to see how they edited the same image.
Here are my preliminary steps:
- Level’s adjustment, pulling the black slider in a good bit to bring out some contrast.
- B&W Gradient Map set to Luminosity, and lowered to about 40% opacity.
- Flatten.
Then, to add light, color and hue to the picture, I decided to add a couple of photo veils from Love That Shot
- Go to File, Open, navigate to my Textures folder, then to my Veils folder, and pick the veil I want.
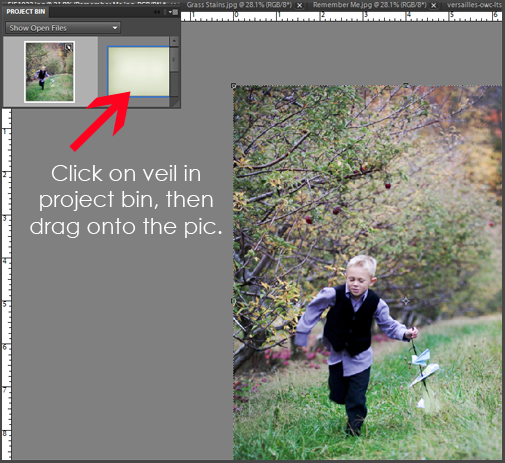
- Go to the Project bin and click on the picture I’m working on.
- Activate my move tool (v on your keyboard) and then locate the veil in the project bin.
- Drag the veil onto the picture and size to the image.
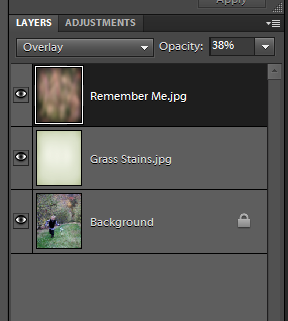
- Change the layer blend mode to Overlay or Soft Light.
- Reduce layer opacity to suit image.
Below shows the two veils I used.
After I added the photo veils, I decided I wanted a texture or two.
- Navigate to my Textures folder, open the one I want.
- Open Project Bin and click on the image I’m editing again.
- Find the texture in the Project Bin and drag it onto the image, size to fit.
- Change the blend mode to Overlay or Soft Light.
- Repeated steps with another texture.
- Used a soft, low opacity eraser brush to brush off some of the texture from the boy.
- Note: I used one texture from Love That Shot and one texture from Shadowhouse Creations

My last step was to add some soft pop and depth:
- Duplicate layer, Filters, Blur, Gaussian Blur, radius 20.
- Set layer blend mode to Soft Light and reduced layer opacity to suit.
- Grabbed eraser brush, set to 30% brush opacity, and brushed off his face and some of foreground.
- Flatten.

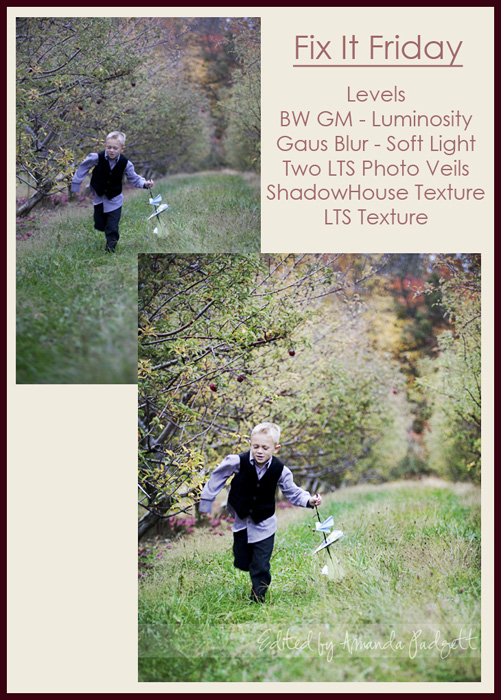
Below is my Before/After comparison and a run down of what I used.


This turned out so nice Amanda…great job!!
Thank you, Angie! This was a really fun one to edit because of the different ways you could go with it. LOVED the colors in it.
Love your edit Amanda!!
Now, are veils like overlays? I’m not familiar.
Kelly,
Thank you. Yes, they are very much like overlays, but many of the ones made by http://lovethatshot.com have more depth and character than a regular overlay. I love using them!
Amanda, I LOVE your edit and how you made the colors pop! Great choice of overlays and textures! 🙂
Thank you, Debra!! Coming from a fellow texture addict, it means a lot to me. 😉
What a beautiful blog you have, so much information…
Love the edit!
That is BEAUTIFUL!!!
Thank you so much, Bridget!
Absolutely incredible.
Laurie, thank you so much for the sweet and generous comment. Not sure about incredible, but I’ll take it! 😉
Nice fix! I love the subtlety you applied. Many times this effect is overdone, but I think your application of this texture is excellent. Well Done!
Kent,
Thank you so much for the kind comment!! I am very honored you stopped by and took time to comment!
Hi, Amanda! I followed this tutorial for a photo we took today on a walk. I didn’t have veils or textures so I sort of made my own veil and used some digiscrap textures that I have. I’ll put the photo on my blog next week, I think, for Sweet Shot Tuesday. I love following your tutorials, btw!!