Some questions I get asked a lot are “what is a clean edit” and “what are your steps for a clean edit?” So, today I thought I would share the steps I take in Photoshop Elements to achieve a basic, clean edit. Now, you Photoshop (CS#) users can apply 100% of this in your program also.
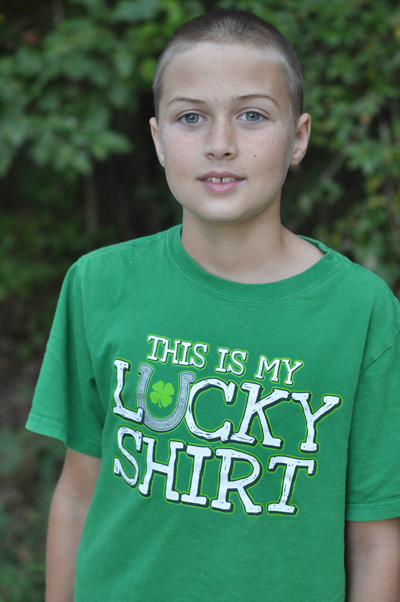
Start with an image that is straight-out-of-the-camera (SOOC). Open it up in Full Edit mode in your Photoshop Elements (PSE).
————————————————————————————————————–
A list of the main steps I go through:
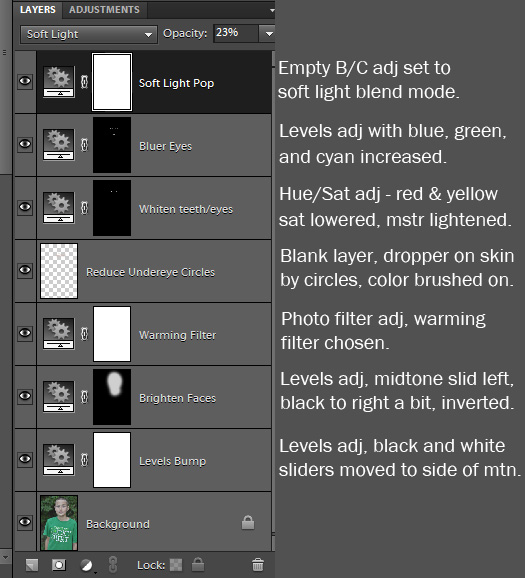
- Levels adjustment to bring in the black and white sliders to meet the sides of the histogram “mountain.”
- Levels adjustment to brighten the face, moving gray slider to the left a good bit and the black slider to right a tad. Invert the mask by pressing ‘control’ and ‘i’ (‘command’ and ‘i’ on a Mac). Brush over face with white brush. Adjust layer opacity to suit.
- Warm or cool the image with a photo filter, as needed. Adjust layer opacity to suit.
- Reduce under-eye circles by creating a blank layer, activating the eye dropper tool and clicking on “good” skin near the circles. Then activate the brush tool and brush over the under-eye circles. Reduce layer opacity to suit.
- Whiten teeth and eyes by doing a Hue/Saturation adjustment layer, going into the reds and yellows (sometimes blues and cyans) and reduce the saturation. Go to the Master and increase the lightness. Invert and brush over eyes and teeth with white brush. Lower layer opacity to suit.
- Make blue eyes bluer by doing a Levels adjustment, going into the Red and moving the black slider to the right a bit, then Green and move the gray slider to the left a bit, then the Blues and move the gray slider to the left a bit. Go to the RGB and move black slider to right a bit and gray slider to left a bit. Invert and brush over iris of each eye. Adjust layer opacity to suit.
- Give a color pop by doing a Brightness/Contrast adjustment but change nothing. Change blend mode to soft light. Lower layer opacity to suit.
- Flatten
————————————————————————————————————–
Some finishing touches:
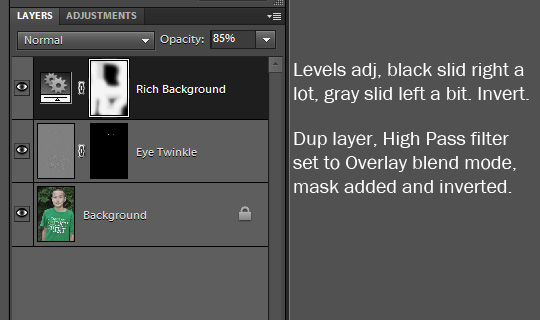
- Make eyes sparkle by doing a duplicate layer, High Pass filter (Filters, Other, High Pass, radius of 8). Change blend mode to overlay. Add a mask (for versions older than PSE9, use Coffeeshop’s Layer Mask action), invert and brush only over iris/pupil of each eye. Adjust layer opacity to suit.
- Make the background a little richer by doing a Levels adjustment, moving black slider to the right a lot, and the gray slider to the left a bit. Invert and brush where you’d like the colors a little deeper. Adjust layer opacity to suit.
- Flatten.
————————————————————————————————————–
Save and crop:
- Save your image, but make sure to change the name slightly so that you do not overwrite the original. I usually put ‘clean’ at the end of the file name.
- After saving, choose a crop ratio or put in your own. Change the resolution to 240 or 300 (my printer likes 240, so that’s what I use).
- Click and drag the crop tool to the image size/shape you’d like.
- If you do not plan to share on the web, do the following. If you do plan to share on the web, go to the next image below.
- Sharpen your overall image by doing a duplicate layer, High Pass filter, radius of 2.5, set to soft light, lower opacity to suit. (This step not shown).
- Flatten and save with crop ratio in file name, so you can identify it when you go to print. I usually put like ‘5×7’ at the end of the file name.

————————————————————————————————————–
To share on the web, on a blog, Flickr or Facebook, do the following:
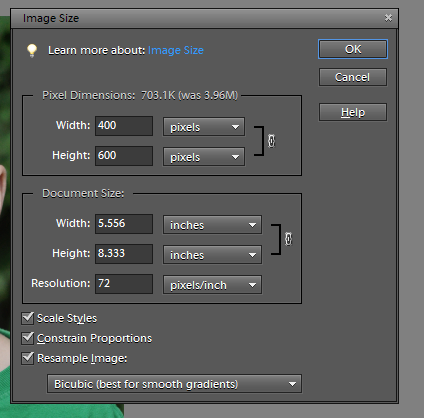
- Resize the image by going to Image, Resize and change the resolution to 72 and the width or height to whatever size suits your needs.
- For portrait orientation I prefer 400 pixels wide.
- For landscape orientation I prefer 600 pixels wide.
- Make sure the boxes at the bottom are checked so that your image doesn’t loose it’s proportions.
————————————————————————————————————–
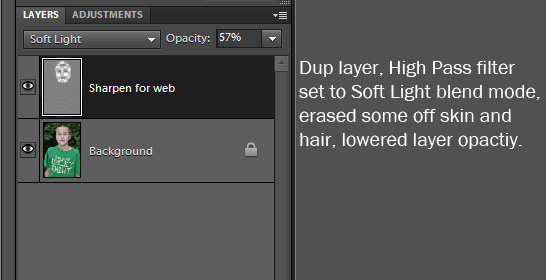
Last thing needed is a slight overall sharpening.
- Duplicate layer, High Pass filter, radius of .9 to 1.2. Change blend mode to Soft Light. Lower opacity to suit.
- I often brush off of hair, as hair sharpened can look straw-like.
- I brushed off the skin here too because it made it look to edgy, it had lost the smoothness.
- Add a watermark (or simply use the Type tool and write your name on it). Step not shown.
- Flatten and save with ‘web’ in the file name so you know which one to upload.
————————————————————————————————————–
Here is the final product:

And here is a side-by-side comparison:

Special Note: I did a video tutorial for the main adjustment steps, to see it go HERE.
If you follow these steps to give an image a clean edit, please feel welcome to share it at the FB fan page for Everyday Elements.


omg…that is a LOT of steps! I thought I was doing well just by the levels adjustment layer and that’s it. I am going to try your way. I love the step-by-step instructions!
THANKS!
Amanda, thanks so much for doing this. Sometimes it’s hard to remember everything from your videos (LOL)!. I printed it out in PDF form using joliprint. I plan on three-hole punching and putting it in my photography notebook.
In case anyone is interested: http://joliprint.com/
Thanks again!
Whoa-this Joliprint just made my life a whole lot easier-thanks for this!!
You’re welcome! I love this little button on my favorites bar now!
That Joliprint is cool! I just popped it into my favorites toolbar. Thanks! I love little helpers like this 🙂
oh my that is so awesome! thank you so much for sharing this!
Way too cool! joliprint is so helpful!! Thanks!
Thank you for this tutorial! 😀
I am so glad you did this! Thank you!
Thank you so much! My friend Rachel told me about your tutorial. I have Photoshop so will try it there.
Thanks I just printed this and think it will be of great help. Like I told you in an email yesterday I am having some problems getting things to work. I finally got what I would describe as a partial edit done was so happy but when I saved it it turned into a little green dot. Spent the rest of the night doing another one. And i mean it was four thirty when I finished I usualy eat breakfast at five. Not a good edit but I still cane open and all that good stuff. If I reach I can call it progress. Looking forward to the make up session for beginners.
wow. I have a LOT to learn. 😉
As long as I’ve been using PSE I’ve never noticed the Photo Filter option in the Level Adjustment box. Thanks! Great tutorial!
Best. Tutorial. EVER!!!
I cannot thank you enough for this!
It must’ve been a lot of work to put this post and the tutorial together, but I am so grateful! I feel like I’ve learned a lot about Elements over the past six months but I still have so much to learn. Tutuorials like this are perfect because your steps are so easy to understand and follow! Thank you so much for helping me to get to the next level in my editing process! I am so thankful for your website!
Awesome, I do things a little different, but I really like the colour eye part. Thank you so much for sharing this with us! 😉
Thanks! Your tutorials are so great and opening up a whole new world of editing for me! I love learning something new everyday!
Wow, you are terrific for spelling that all out for us.
Wow! Your awesome. Thanks
Can someone explain ‘soft light’ to me, it seems to be the opposite of what I am thinking. I thought soft light would make a picture look more soft. To me it seems to make the picture have a more edgy harder feel to it.
This is awesome! In my 2 years of owning PSE I’ve been constantly learning how much there is to learn. Love the step by step.
Thank you very much! Wow, that is a lot of steps! Does the Deep Clean actions perform all these steps? Do they do basically the same thing?
oh wow! many many thanks to you! I have been looking for a step by step of this kind for a long time! This is perfect and so well explained. Thank you, Michelle
To me it seems to make the picture have a more edgy harder feel to it
wonderful tut, thanks!
Oh, my goodness, Amanda!! You’re so awesome! You mentioned on one of my edits a while back about doing a hue/sat later to fix the teeth/eyes and I struggled with figuring out what you meant… well, duh, me! I should have just came and dug around your site a bit first before struggling – because between your explanation above and the video tutorial – I got it!! 🙂 Thanks for all your help!
Thanks so much for this great detailed explanation. I am still trying to learn on PSE and I love that I can come here for help!!!
I am so new to Photoshop Elements…yet so excited about learning it. But most of all I feel so blessed to have found you! I have never done anything with layers…just used the basic edits that are in Elements. Do you have a workshop for someone who is just getting started?
You are amazing Amanda. Thank you again for another super helpful tutorial.
Being new to PSE9 I am often overwhelmed at what to do when I open up an image and usually only do a level adjustment because I don’t know how or what else to do. This step by step tutorial definitely will help me.
You Rock!!!
I was wondering if you ever have a problem with the Resample Image check box when you are preparing your files for print? I use PSE 8 and a Canon T2i and what I’ve noticed is PSE defaults my images to 72ppi when I open them directly in Full Edit Mode (when I open them via ACR they are 240ppi). I have made 4×6 and 5×7 prints through Shutterfly with images I didn’t realize were 72ppi and they came back sharp (thank goodness!) 🙂 I’ve also read that you should never upsample your images when you change the resolution from 72 to 300 ppi because it causes PSE to add fake pixels and that doesnt look good, but then I’ve also read that you must upsample when changing the resolution in order to get the enlarged print you are looking for. Thoughts? Thank you!!!
THANK YOU!!!! This is so so helpful!!!
I wish there was a way to print these steps out without having to print the actual pictures! Any suggestions?
Hi ,
I am trying this edit today but after resizing my image got really blurry like pixels were spread (600 wide plus 72 resolution) and secondly in my PSE12 hIGH PASS filter doesn’t show any box to set radius. Any idea what I am doing wrong?
Its like you read my mind! You appear to know so much about this, like you wrote the book in it
or something. I think that you could do with some pics to
drive the message home a bit, but instead of that, this is wonderful blog.
A great read. I will definitely be back.
Thanks for contrubitnig. It’s helped me understand the issues.