Disclaimer: I am not a professional newborn photographer, but I have done enough to have learned from many mistakes.
Have you taken newborn pictures and found it difficult to get the pose you wanted? Or, did the baby do nothing but fuss and squirm for you? Newborn photography can be challenging to get started with; so many aspects of it seem to have to be learned the hard way. I have learned a lot of things to do and not to do and I share them below. I hope these tips prove effective for you the next time you have a newborn to photograph.
Getting the Baby to Sleep During the Shoot
- Most newborn photo shoots work best when the baby is 5 to 10 days old. A day before or after that time frame may still work, but I do not recommend pushing past it more than that. Why 5 to 10 days? Because the baby is very sleepy, making it more likely that s/he will sleep for you. And, with the sleeping baby comes the sweet poses. Babies that are awake often do not stay in the position you want to them to be in. They squirm, stretch, flail and more.
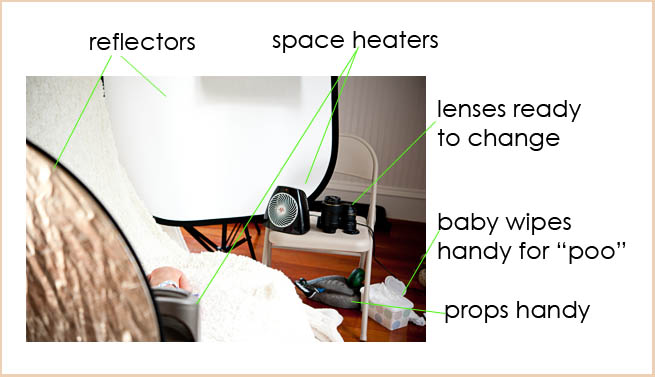
- The space you use to shoot needs to be very warm. Let me say it again….VERY WARM. You should be sweating. Sorry, that’s just the way it is. How to get it hot in there? The best way is to bring the heat with you: space heater(s). I started with one and now use two. Not only do babies love the warmth, but they love the noise from the heaters too.
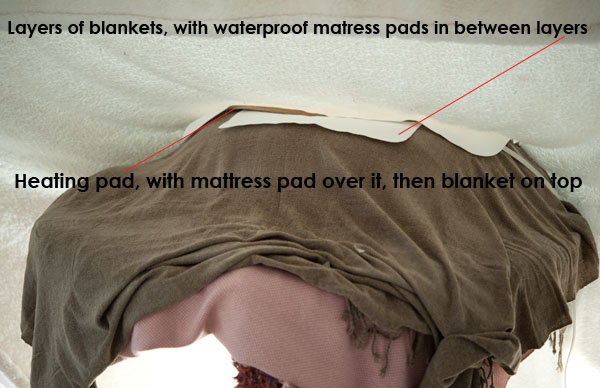
- Another way to keep baby warm and asleep is to put a heating pad on low under the blanket which he/she is laying on. Please use caution when using a heating pad; it is easy to get the baby too warm. I used to use it on medium with two blankets in between, but now keep it on low. When laying your hand on the blanket, it should just feel a tad bit warm.
Lighting for Your Shoot
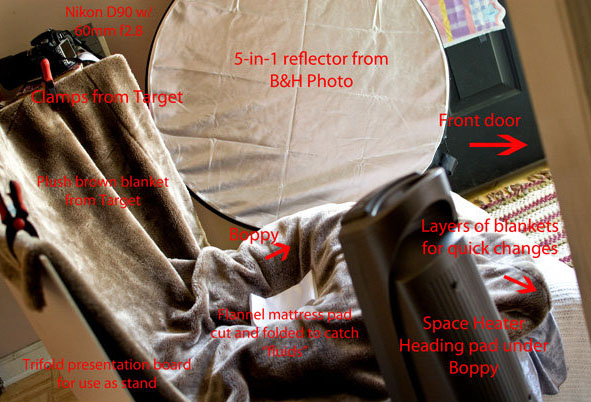
- Set up in front of the best window light the house provides. When I go to the house for the shoot (usually first time I have been there) I ask to go through the house and look for the best light. I have set up in kitchens, upstairs bedrooms, playrooms and a study. One time I got to a house and there was no good window light, none. What did I do? I set up in the front hallway, using the front door for light (see picture at the end of the post for a pullback of one of my early set ups)
- Reflectors. Buy a couple and learn how to use them. I usually position one off to the side and then use the other for extra light right on the baby. You can also buy white core boards from Walmart or Target (in school supplies area) and position those to reflect light from the sides.
- Buy a speed flash. I am sorry to say, but there are times when I have lost light and still needed to shoot pictures. Buy a speed flash and learn how to use it. Bounce the flash off the ceiling or walls. Reduce the strength until you get a nice soft, natural looking light.
Setting up Your Traveling Studio
- Use some type of soft, mold-able surface, like a bean bag, to lay the baby on. You can even use large ottomans if the family has one (it isn’t something you will want to tote around).
- Layer the blankets you plan to use over the bean bag, with water proof mattress pads in between each blanket layer, so if the baby pees, it will stop at the mattress pad and not go down to the next blanket. Have all your blankets laid out so that when you want to change “backdrops” it is as easy as lifting baby and pulling the top blanket up and off (and then tucking heating pad under the blanket below).
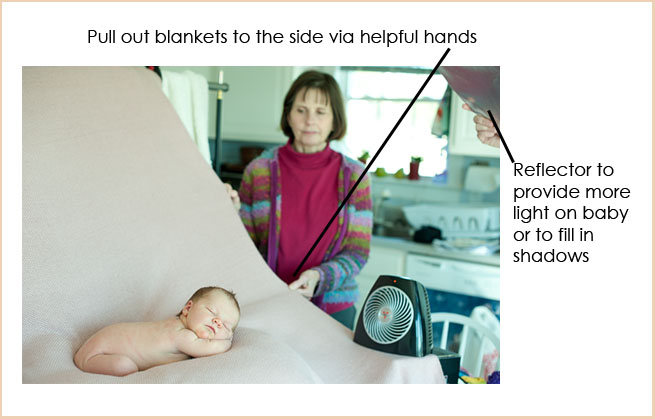
- Use clamps to hold the top blanket over your stand. Whether your stand is a homemade one or a purchases backdrop stand, you will need something to hold the blankets on. Try to pull the blankets tight enough so there are no wrinkles and folds. This was a mistake I made early on and didn’t learn to keep the blankets smooth until shoot #4.
- Put space heaters close enough so that the baby feels the warmth, but not so close you overheat the baby. I can put the little one (in the pic above) closer because it is a sad little heater, doesn’t push much heat. I got it from Target, do NOT get that one.
- Position reflectors or white boards on the sides to reflect more light into your “studio.”
Getting the Pose
- Once the space is warm and cozy, blanket is warm, lay the baby down. She or he does not need to be a sleep before laying down on blanket. I often start with an awake baby and get them to sleep there on the bean bag.
- Slowly work baby into a pose on his or her belly or back. Do not worry if it is not the exact pose you are trying to replicate (via a posing guide or something else), just get them into what looks to you to be a sweet shot.
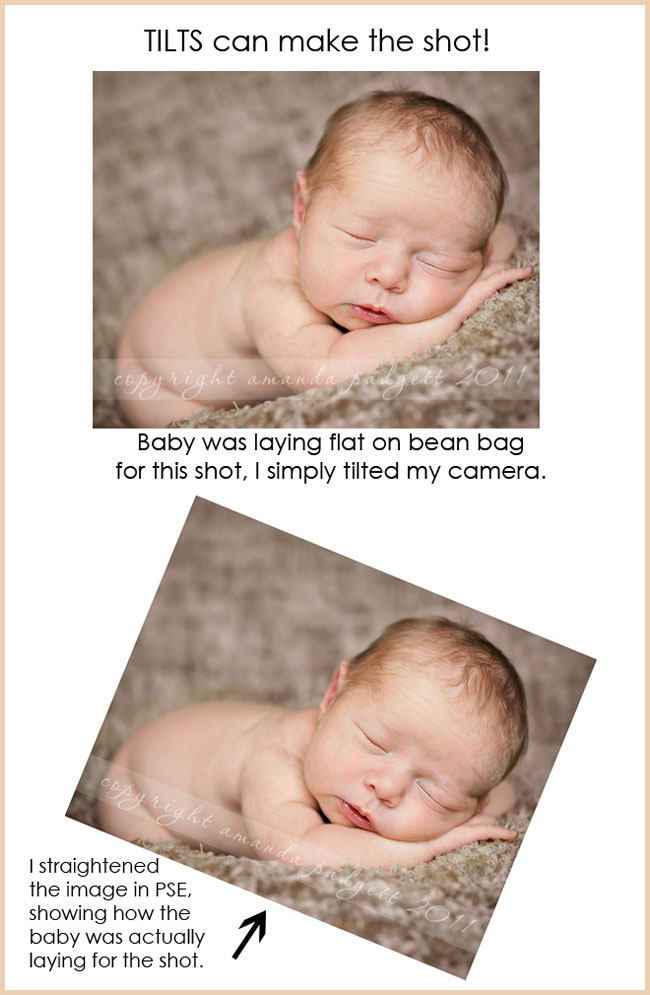
- Frame your shot and then (here is the secret tip) tilt your camera. Yes, I promise it is usually just that simple. I tried hard during three different shoots to get certain poses and never could until during the fourth one I realized if I just tilted my camera, everything came together. Maybe other people have shared that tip, but I had not heard it before, and it was a big “a ha moment” for me.
Blankets and Props
- Blankets you use need to have texture. I learned this through much trial and error. The texture helps hide creases and gives a matte finish, while those with little texture show creases and lines, and also reflect light. My favorite blankets have come from IKEA, Bed Bath and Beyond, and Dollar General (yep!).
- Props can be baskets, headbands, wraps, hats and more. Make sure that they are sweet and subtle. Try not to use things that are going to date your pictures, something that is likely to be a passing “fad.”
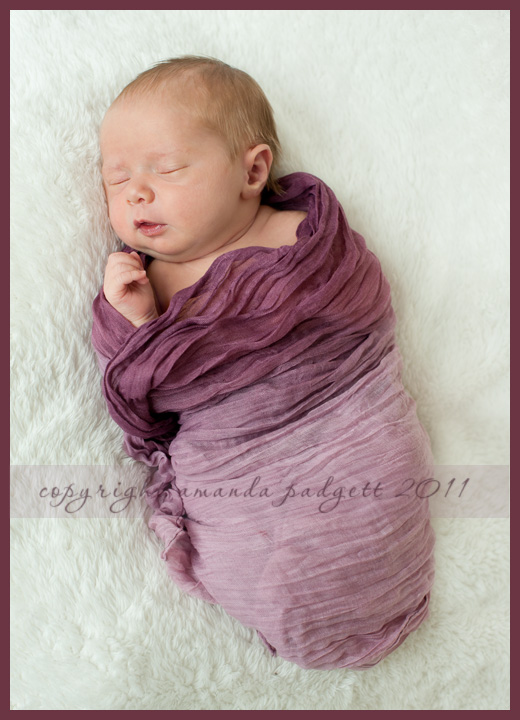
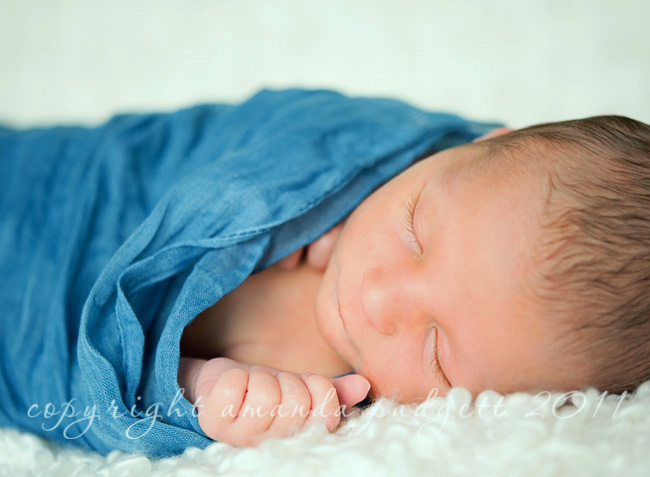
- I love to use wraps because those can be used with the diaper on, allowing for longer posing and more use of your blanket/backdrop. Also, they often provide just enough of that “something special” for your shot
Mistakes to Avoid
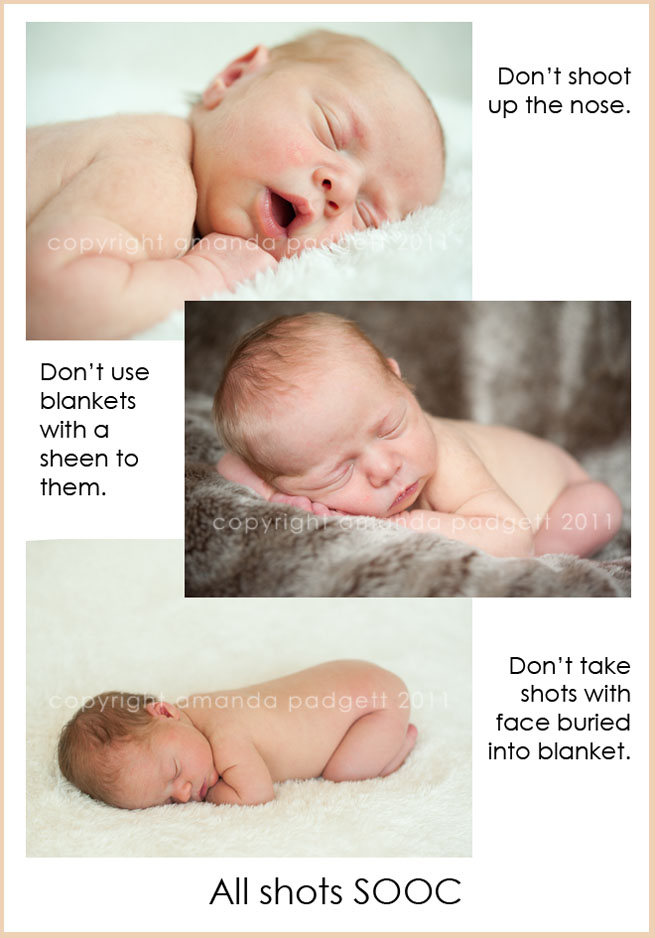
- Shoot with blankets with a sheen to them, reflects light on all the creases.
- Shoot up the baby’s nose. Try to shoot head on, from above, from the side, etc. Not up the nose.
- Let baby’s head stay buried into the blanket. Pay attention and gently position the head so nose is going out, not down.
- Tilt camera so far you can’t recover. Tilts can make the shot, but they can also ruin the shot. Trust me.
Other Helpful Tips
- Pack all your necessary items (especially those following) into a rolling suitcase. I used to use a plastic container, but since moving everything to a large suitcase, it is so much easier!
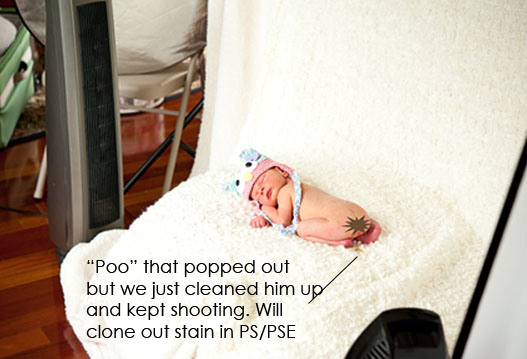
- If you get a little “poo” accident, wipe it up and keep shooting, if baby is content and it was not a full “blow out.” Shoot from an angle where you cannot see it, or just plan to do a bit of cloning in Photoshop or Photoshop Elements.
- Bring a noise maker, if you have one. Babies like the sound of the ocean or rain, or simply the white noise. My heaters provide enough of the white noise so I am not buying one just yet. (Funny thing, we used to have one and my husband threw it out just a week before my first newborn shoot LOL).
- Have all your props, lenses, WB card, posing guides, etc, already laid out in a convenient spot to grab.
- A boppy can be helpful, but they can also make things difficult. I have yet to really love using a boppy for my shots, but I bring one to each shoot and always try it out. 🙂
- Make sure to set up far enough away from your light source to allow for shooting space, especially if you like to use “long” lenses like the 105 mm f2.8 or 85mm f1.8. Those lenses require more focusing distance than the 50mm.
- Buy a pack of white T-shirts and pack them in your box to bring. These will make you cooler in your hot little studio and help reflect light. I bring three, so I have back-ups when the baby pees/poos on me (has happened three times, so far, expect it).
- Pack knee pads for when you are shooting on hard wood floors (last shoot was on wood, I ached for days).
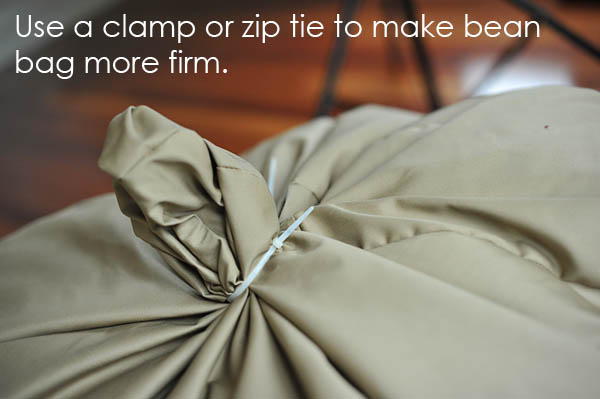
- Make your bean bag more firm, less floppy (from kids using it) by gathering up at the bottom and clamping or tie with a zip tie.
- Buy extra clamps, you will be surprised how many you can find a use for (like the bean bag, as mentioned above).
- Keep a burp cloth handy for little spit ups.
- Bring extension cords in case you are set up in an area with not many close outlets.
- Shop at consignment stores for the headbands, hats, blankets, boppy, etc. Or, yard sales and flea markets. You do not have to buy new!
- If you cannot afford a stand, buy a tri-fold board from Walmart and drap your blankets over it. I used that technique up until my last two shoots. The picture below shows how, but remember to get those blankets smooth, not bunched up like they are in that shot.
I made a checklist for you, if you would like it. If you would like to save/print it, click on link following, then click on it again in the new screen. When the document shows up, you can save or print it from there. newbornchecklist


Great job on this post! You tips are excellent, can’t wait to try them out! Thank you for all that you share.
This was an extremely helpful post. I’m not a professional photographer (just a hobbyist at this point) but I’m planning to take newborn pics of a friend’s baby who is due in April. Your tips are going to help me immensely! Thanks for always putting out such user-friendly information for the novices like me!
Thank you so much! This was great! I have purchased a wrap from Pretty Panda as well and love it. Practical advice that will come in handy. 🙂
what an awesome post! I just wish I’d seen it a few hours earlier. I had literally just finished a newborn shoot when I saw it. Lots of great tip in here, thanks again 🙂
Great post! One thing you didn’t address was a “pushy mom”. Do you do all the baby handling? How much is/isn’t she involved?
thanks Amanda……as I continue to shoot my newborn these tips will really help!!!! Although she will be a month this weekend and has been a wide awake wiggle worm from day one!! So looks like those sleepy baby shots in the nude I wanted are not going to happen! Shooting newborns is a lot harder then I thought it would be!!
thanks again! Alisa
Thanks, Amanda! Great post, great tips, and I *love* the checklist–that’s exactly what I needed. 🙂
Fantastic tutorial Amanda and this will come in handy when my friend has her baby! Thank you for the step by step instructions and the pull backs really help me too because I’m a visual person!
I’m astounded at how much goes into newborn photography. I photographed a baby one time and I loved the pictures, but it was a hurry up and wait game that I didn’t anticipate, because I don’t have kids myself.
I do love newborn photography pictures; the props and lighting are just amazing. The images just shine with innocence.
You always astound me with how generous you are with your knowledge!!!! Thanks again for sharing!! You could be a pro photographer, by the way!!!!
Wow! This is definitely the most thorough list of tips, do’s and don’ts that I’ve ever seen on infant photography! Thank you so much!
I’ve linked to this article from the “Resources” page on my photoblog.
Wow! Thanks for posting this! I’m a wanna-be baby photographer and these are awesome tips! I just found your site today but I’ll be checking back often. 🙂
What a great post and so many great tips and suggestions. Thanks for the info and the list, I’ll be getting that from you!
All the best, Kelley
These tips are so great that I want to find a newborn to take pictures of now! Thanks for the great info.
thank you very much for the helpful tips! I have my very first newborn shoot coming up in a few weeks 😉
You are always so on my wavelength! I am putting together a posing guide just for myself of all the things I have so far learned ( and to give me some cheat sheets to scan to calm my nerves before a baby shoot) A few of these were new to me! Your articles are awesome ! I heart ya!
Thank you for compiling this information in such a user friendly format. I have only been on one newborn shoot, and I could see how I would piece this advice together myself over time. How nice that I don’t have to do that! You have saved me time which is very valuable. Thank you.
I so wish I’d known you when my son was a newborn – we would have been showing up on your doorstep for his first photos. These are amazing, Amanda. You know how to rock that camera!
Amanda,
After viewing the video today, I get it. Now I see that what you were doing with the gradient tool. Thank you so much for the video and your tutorial, both help immensely!
thanks a lot for this post, this is really great!
100% agree with tilting the camera. I work as a newborn photographer for the hospital. We do the studio style not the funky bassinet mug shot photos.lol It makes a world of difference when I do the belly shots. I can have them completely flat but when I tilt the camera just a tad it makes them look as if they are propped up. Thanks for the article. Unfortunately we don’t use all the extra reflectors and such but I still manage to get some good shots with what I do use. it sucks because we are only limited to certain poses approved by the company 🙁 But I shall use your tips for my own shoots so Thanks again.
Thank you so very, very much! ♥
Thanks so much for this! It is REALLY helpful!
I havent been taking pictues very long, but have found a passion for it. I hope someday to be able to take newborn photos and have searched high and low for tips and tricks and this is one of the most comprehensive lists I have found. Thank you!
Wow!! Thank you for all these tips…so helpful! I’m so glad to find resources where experienced photogs aren’t afraid to share their wisdom! Thank you, thank you, thank you!!
i LOVEEEEEEEE YOU!!!!!!!
I just found this entry via Pinterest. Thank you so much for all of your tips. I have had a few newborn photoshoots and I am very excited to find this which you have so freely shared with those of us just starting out. Thank you for your generosity.
Such a great post! I love the idea of using a presentation board as a backdrop stand. Thanks!
WOW! Thank you so much for writing this and posting this! I’m getting ready to be a great aunt in about 8 weeks and this will be my first newborn session. 😀 Can’t wait to try all this wonderful and informational tips out.
Love this post! Super helpful!
Thank you SO much for your time and diligence with your tricks and tips for photography. I have just now started to enjoy taking pictures, I have a nice camera finally so am enjoying candid shots with my kids. But would love to start out with child photography. So these tips are fantastic for me! Thanks again!
You are such a dear to share your talent with all of us. Thank you so very much. I adore your posts and have learned so much from you.
Barb, you are very generous with me. Thank you! I know I’m not a super-duper pro like many out there, but I enjoy helping others and if what I do know helps them, I’m very excited!
Thank you so much for your post!!!
AWESOME POST!!! as an aspiring photographer these were some most helpful tips.
thank you
Awesome article! I actually found the “do nots” even better than the “do’s” 🙂
Awesome article! I actually found the “do nots” even better than the “do’s” 🙂
Checklist is great too! Thanks for (probably) the 1000th tip I have learned from you!
Awesome tips…thank you!! 🙂
Amanda,
I have been looking at newborn tutorials for days! Yours in not only by far the most informative and easy to follow, it has tips that I almost wonder if others wanted to keep on the down low- like the camera tilt. But my reason for writing in is to say that of all the hundreds of photos I have trolled through in the last week…. yours are by far my fav. That blue wrap shot above was the first one that made me think… now when I can give someone that shot thats when I know I’m good! I guess with photography its 60% about – learning cameras & light and buying expensive equipment- but there is natural talent factor that cant be found or learned or practised and you have it.
Thank you so much for this tutorial, it’s the most honest and comprehensive newborn tutorial I have ever seen. I have learned more from you than any of the $$$$ classes I have taken. I’m in upstate SC, so if you ever need an assistant in the area pick me!!
This is awesome!! I’m a beginner this is my new hobby and I love these tips!! Thank You
Great tips, photography is a hobby for me this will help make it so much more pleasing.
Great post!!!! it was really helpful and I loved all your tips! Thank you so much for sharing this!!
Thanks for the tips Amanda, I plan on using them to take newborn photos of a great niece can’t wait to see how they turn out
Amanda you’re an angel! Thanks for sharing your tips. I’ll be shooting my first newborn this Saturday. A good friend gave birth to the sweetest baby and she asked if I could take some pictures. I was afraid to say yes but after reading your post I am more confident. I hope it comes out ok.