Today we are going to tackle editing raw files with ACR. Both Photoshop Elements and Photshop CS# come with a plug-in called Adobe Camera Raw, which converts their raw files to a format (such as JPG, TIFF, or DNG) that can be edited in PSE and PS.
This tutorial used Photoshop Elements 9, but all the steps are the same in PS CS5 and older versions. The difference between the ACR plug-in for PS and PSE is that the one in PS CS# is on steroids. 😉
The screen prints and steps are minimal, as doing step by step screen prints would be have been overwhelming. Instead I did a more inclusive video tutorial, which is at the bottom of the post.
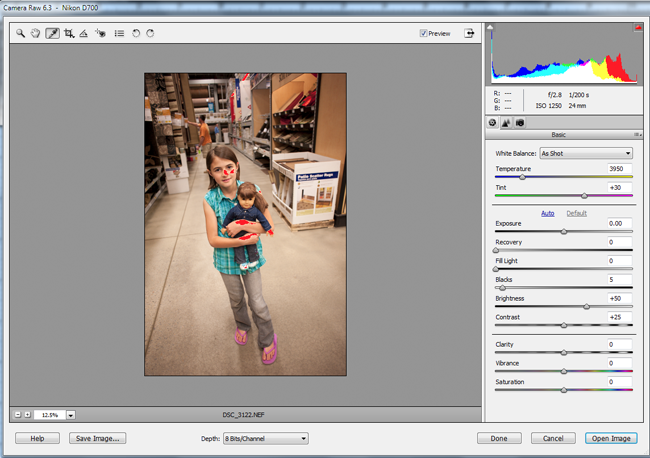
Step 1: Open the image image in ACR by clicking on the picture in Organizer and choosing Full Edit, or in the Full Edit mode, go to File, Open, and then navigate to the image and click open. ACR will pop up.
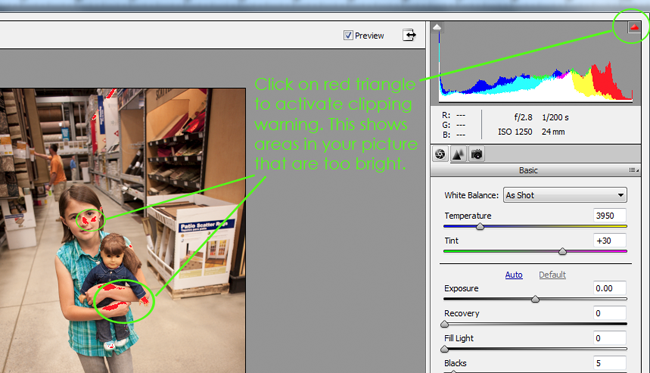
This is an image from a few weeks ago. The White Balance is clearly off and we have some clipping (highlighted in red).
If I do not see any red in my picture (when editing other images) I click the triangle in the top right corner of the histogram box to make sure my highlight warning is activated.
Step 2: The first thing I want to do is fix the White Balance. I click the eye dropper tool in the top menu bar, then I click on an area in the image that is gray or should be gray. If there isn’t anything of that sort, I will use the whites of the eyes.
If I get a WB that is close to what I want, but not quite, then I will bump the temperature and tint until I get what I am looking for. This requires LOOKING at your picture and identifying the color that is the issue. Sometimes it will be too much green, sometimes too much magenta, other times too much blue (too cool) or too much red (too warm).
What if you have neither a gray nor whites of eyes? Then you need to tweak the temperature and tint sliders to best suite the image.
Step 3: I then tweak the exposure and contrast of the image by moving the Exposure slider to suit the image, either raising or lowering it (sometimes not messing with it at all) and increasing the blacks to around 8 or 9.
Step 4: After adjusting exposure and contrast, if there is still clipping, I will pull the recovery slider over until I have reclaimed the vital areas. I try not to exceed 25.
Step 5: Now I move on to the Clarity and Vibrance sliders.
Clarity defines edges, slightly similar to sharpening. You do not want to increase the clarity to a high level on a person as it will accentuate blemishes, wrinkles, etc.
Vibrance will make your colors more intense and vibrant. This is a much preferred option over using the Saturation slider, which can make skin tones very orange.
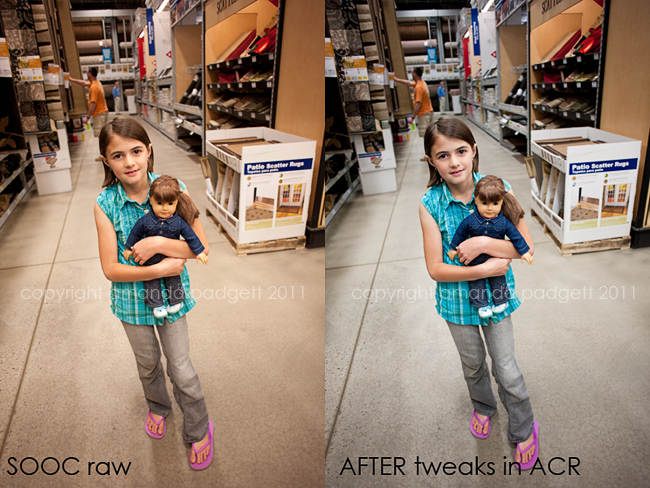
Here is the before/after of the image I used for this tutorial. The only edits made were in ACR.
In the video tutorial below I do a brief overview of ACR, the various sliders and even talk about the noise reduction slider ACR offers. Also, I quickly show how to batch edit pictures in ACR.





This is a very helpful tutorial. Thank you so much!
Thanks for the tutorial 🙂 I have tried editing in Adobe Camera Raw before, but I really didn’t understand exactly “what” I was doing when I was moving each of those sliders :p. Your tutorial was easy to follow and I can’t wait to try my hand at batch editing now! Thanks so much 🙂
I never knew I could batch edit in PSE! Thanks for the tutorial!
Thank for so much for all the helpful tutorials! I’ve learned so much from you! I don’t know if you do this, but I have a question about a different topic on editing. I read that you need to sharpen photographs (and can do so using the High Pass filter/Overlay) for web usage…but do photographs need sharpening for printing? I’m afraid they will print poorly. Just wondering!
Thanks again!
Amanda,
thanks so much for the refresher course on ACR. As always it is clear and concise and easy to follow. I used to shoot RAW + JPEG Fine, but saw another forum that said that that takes up too much space. I am thinking of going back to shooting RAW but am wondering how to “see” the photos without having to click on each one.(?)
Hi Amanda, fantastic article and tutorial, as per uge.
My only question is if it’s better to ALWAYS go with editing in ACR before turning to PSE or…not? I only shoot JPEG right now but can still open up all my files in ACR and edit them before sending them back into PSE. Aside from batch editing, which is a great feature, are there definitely more reasons to start your workflow in ACR over PSE? Thanks so much.
Zoe
Another great tutorial Amanda! I’ll be sharing this on my fb page! 🙂
Thanks for the tutorial. A lot of the things shown here using ACR can also be done in PSE, so how do you when to use ACR and when to use PSE, and which is the better option. TIA
That’s HUGE! I’ve asked lots of people about Batch Editing on PSE and have been told “nope, nope, nope.” This is so helpful for white balance and exposure edits. Thank you!
This video was great!! I’m slowly going through and watching your videos while my daughter naps and this really answered a lot of my questions. I’m hoping she sleeps a long time today : )
Thank you!