Noise – what the heck is it? Noise is the digital graininess images sometimes have. How does noise get on the pictures? There are two main ways to cause noise:
- Using a high ISO (although new cameras can handle higher ISOs better than older cameras)
- Underexposing a picture will introduce noise to the image, despite fixing exposure in post processing. I wrote a whole post on that topic, in case you are interested.
What can you do to prevent noise? Well, look at the above two causes and try not to do them. 😉 No, seriously, here are some things you can do:
- Use lower ISO and instead widen your aperture to allow in more light
- Use a reflector to put more light on your subject, allowing you to use lower ISO
What can you do when you cannot avoid #1 above, you have to use a higher ISO to get a sharp, well exposed image (which is what I strongly advise)? There are noise-reduction filters that you can purchase to bring into PSE or PS, to reduce the noise in your picture. These filters reduce noise by knitting together the little pixels in your picture, blending them together so that the noise is reduced or eliminated.
The filter I use is Noiseware from Imagenomic. They have two versions: a) the “community” version that exists outside of Photoshop (Elements) and you run pictures through before or after editing or b) the standard version, $50, that gets added as a filter plug-in and you can run from inside of Photoshop (Elements).
The tutorial I am showing today is that of my using my Noiseware filter plug-in, not the “community” version. You cannot add layers and masks to the community version, you simply apply and then save.
The best time to run Noiseware is before you sharpen. Some people run it at the very beginning, others towards the end. I lean towards the latter. I give my image a clean edit, flatten and then run Noiseware. If you sharpen before reducing noise, you are effectively sharpening the noise also, making it more defined. Get rid of the noise, then sharpen.
Step 1: Open your image and do your edits to ensure good contrast, exposure and color. My image below is SOOC, before I did a Levels adjustment to bring up contrast.
This image does not look bad, and really the noise isn’t terrible, but here is a 100% crop to help you see what I am working with.
Step 2: Create a duplicate layer of your background by pressing ‘control’ and ‘j’ (‘command’ and ‘j’ on a Mac).
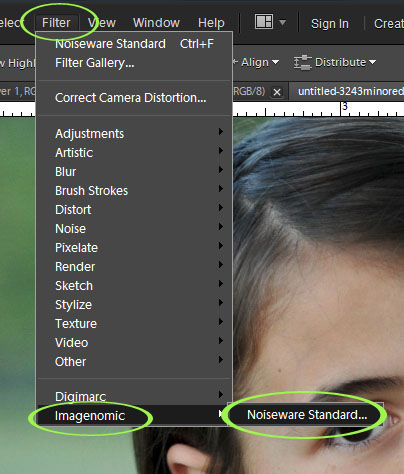
Step 3: Go to Filter, Imagenomic, then Noiseware.
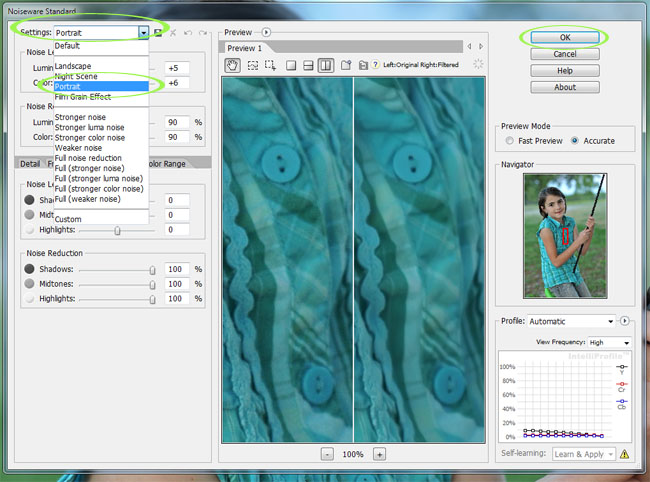
Step 4: Play with the settings in the Noiseware menu (they provide you a how-to booklet to download) or just use one of the presets, which is what I do. Hit okay.
Here is a 100% crop of what the image looks like with the Noiseware run on it. Looks great, but her skin is a bit too smooth and her eyes have lost some sharpness. We are going to fix that with the magic of layer masks. From this point on, I use the crop for the screen prints, in case you get confused by the thumbnails in the layers palette.
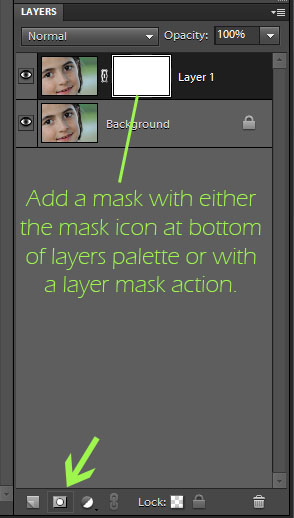
Step 5: Add a layer mask, either with the mask icon in PSE 9 or CS#, or use a layer mask action if you have PSE 8 or older. (Click on layer mask action to be taken to the page with my free actions, where you can download the free Add a Mask action).
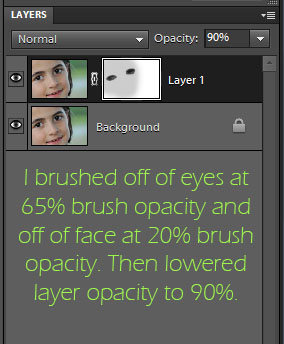
Step 6: Click on your brush in the tool bar (or press ‘b’ on your keyboard), switch it to a black brush, and set the brush opacity to around 65%. Make your brush size about as big as the eye and brush over the eyes and eyelashes. Then lower your brush opacity to around 20% and make your brush about the size of her check and brush over her whole face.
Lower the layer opacity a bit, to suit your image.
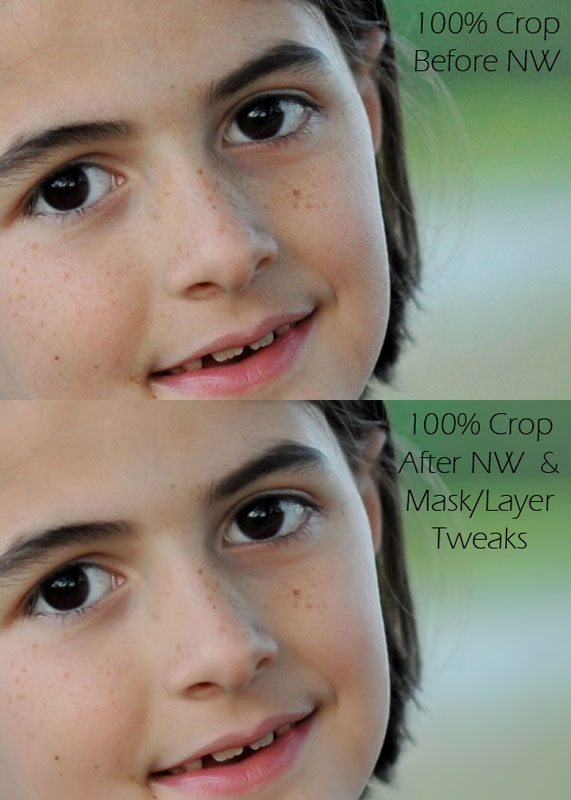
Here is a comparison of the 100% with Noiseware run without adjustments, then with a layer mask added and areas brushed off.
See how much more smooth her skin is? If you usually do some type of skin smoothing in your edit process, remember to brush off some of the Noiseware filter over the face when you run it. You do not want the skin to be so smooth it looks like plastic.
Here is the full “after” picture.
On the web it is hard to tell the difference. It isn’t until you zoom in that you can see the noise. However, for those interested, here is a full size before/after. The only edits done was a Levels adjustment and the Noiseware filter.
This is not a paid advertisement, rather a post about what I really use to help battle noise in Photoshop Elements or Photoshop CS5. I am not an affiliate and I get ZERO compensation from them.







You always have the best tutorials. They are so easy to follow and in this case, extremely timely. I was just searching for information on noise and noiseware software yesterday! Thank you for sharing what you know. I have learned so much from you over the last six months or so.
great one. thanks for sharing!
So, if you couldn’t afford the plug in version, would it be possible to run the community version on a pic, and then use it as an overlay on the noisy pic and “erase” the areas you wanted left sharper?? Just wondering if it’s possible . . .
Great tutorial. I have been wondering about the noise removal tool on PSE. I’m guessing it’s not as good as this one. Perhaps I’ll give the community one a try just to see how it works. Thanks.
You are the queen of photo editing and make it look so easy. Still learning. Thanks for the tip. 🙂
Thanks for another great post, I always look forward to learning something new from you! I was wondering if you could comment on how you feel Noiseware noise reduction compares to the noise reduction that is part of LR3? Thanks! Kelly
I just found this tutorial on using Noiseware. I do have that plug-in and love it. I didn’t know that I could adjust the outcome….thanks! I have One-to-One sessions at the Apple store and my trainer there is a retired teacher having taught Photoshop for several years in the Mac lab at his high school. I was lucky to be paired with him in the beginning and he is now the only trainer I want to work with. He can figure out how to get my Noiseware Pro in my PSE upgrades, but he can’t seem to get it installed in my CS5. Any ideas there?