Special Announcements!
Everyday Elements is going to be undergoing some “remodeling” later this week and certain pages may not be available at various times. By next week all should be well again, so just hang tight.
Also, Everyday Basics 123, a brand new set of actions for beginners with PSE and/or Photoshop, will be released tomorrow. This is a workshop within an action set, with a PDF and a video teaching users how/when/why to use the actions.
********************************************************************************
We did it! We made it to the last post in the three part series on White Balance. To recap what we have talked about so far (and will talk about today):
- How to use in camera presets to get a better WB
- How to custom WB in camera with a gray card or tissue
- How to use a gray card in a picture to sync WB settings in ACR (this post)
Today I am discussing how you can use a gray card in an image to help get a standard, which you will then use in Adobe Camera Raw (or Lightroom) to change your white balance.
First, get a neutral gray card, (or even a sheet of flat white paper if you’re in a pinch), and have the subject hold it, or place it near them. You then take a picture of them with the card/the card in the scene (if a still life shot), then remove the gray card and continue to shoot in that light.
When you are ready for post processing:
- Highlight all the images that are in that same light, along with the picture with the gray card
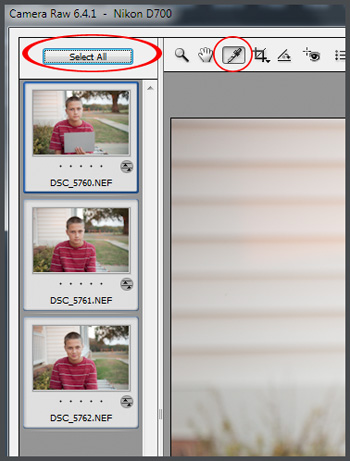
- Once they are open in ACR click the “Select All” button so that all the image are highlighted
- Click on the gray dropper to activate it, and click on the gray card and the WB will change on that image as well as the others


If using a grey card, in camera should WB be set to Auto or the closest preset to the lighting conditions?