With portrait editing in Photoshop and Photoshop Elements, the most effective and non-destructive way to edit is with layers and masks. The layer mask is useless without a brush, so that is what we are going to focus on today.
If you are totally unfamiliar with layers and/or masks, please pause here and check out my Understanding Layer Masks tutorial or get the All About Layers mini-workshop.
Layers
Layers are the individual steps you take during the edit process. They build on each other, blending from the top and going down. Edits or changes on the layers can be minimized/altered through use of masks or layer opacity.
Layer Masks
Layer masks are how you can localize a change to just a portion of the image. When filters or adjustments are made, they are global, meaning they are applied to the whole image.
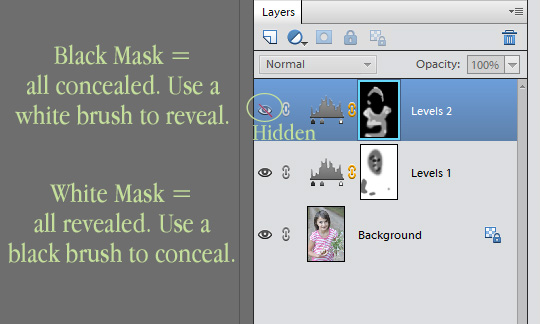
White Masks: Use this type of mask when you make a change and you like most of it, but want to hide/conceal part of it, use a black brush and brush over the area you wish to hide or reduce the effect on. Think of it like day and night, where in the day you can see everything around you and at night your surroundings are still there but too dark to see.
- White = daylight, with the sun allowing us to see everything around us
- White mask = clear, visible, need sunglasses (black brush) to darken the light
Black Masks: Use this type of mask when you make a change and you only want the change on a small part of the picture, change the white mask to a black mask (control + i). Then use a white brush and brush over the area you wish reveal the effect on.
- Black = night, when everything is hidden in darkness but still there
- Black Mask = all dark, need a flash light (white brush) to see what is there
The above analogy is new and not what is used in the video, so please don’t be confused. I previously suggested thinking of black/white masks like good vs evil, with white being good, honest and black being sneaky, hiding something (like the cowboys in old western movies).
If you feel led to leave an unkind comment, it will be deleted.
Creating Layers
With this concept, the best way to learn it is to do it hands on. For the tutorial I am using the same picture I used in the last tutorial. If you already downloaded it, just open it in PSE/PS. If you have not downloaded it before, you can do so here.
We are going to create TWO adjustment layers, both Levels, to illustrate how to use brushes with masks. The layers will be identical, but we will hide the effect of the second layer by inverting the mask (switching it from white to black).
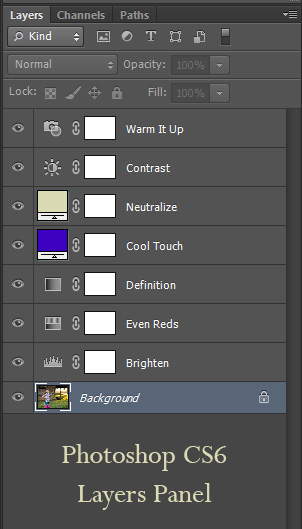
- Create a Levels adjustment by clicking on the half white/half black circle at the TOP of the Layers panel in PSE 11, and at the BOTTOM of the Layers panel in PSE 10-8 and Photoshop CS6-4.
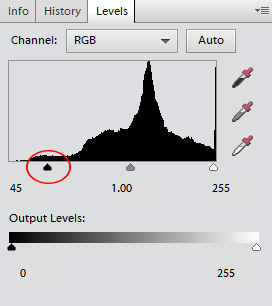
- Move the black slider to 44
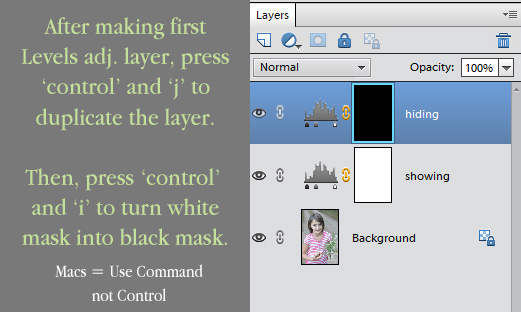
- Press ‘control’ and ‘j’ to duplicate the layer (‘command’ and ‘j’ on a Mac)
- While on the second layer (layer should be dark in the Layers panel) press ‘control’ and ‘i’ to invert the mask and make it go from white to black.
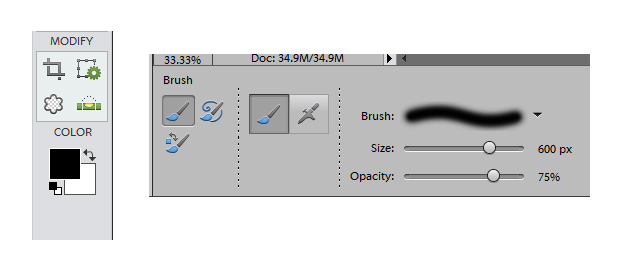
Setting the Brush
At this point we have TWO layers in the Layers panel/palette, both Levels layers, one with a white mask and one with a black mask. Now we need to get our brush.
- Click ‘b’ on your keyboard or press the brush icon in the toolbar
- Make sure it is a SOFT brush (read the tutorial on the soft, round brush if you need a refresher)
- Set the brush opacity to around 75%
- Set the brush size to around 600 px (we will increase/decrease with the [ and ] keys when we edit)
If the brush is not black/white, press ‘d’ on your keyboard to reset the colors back to black and white. To change from white to black (and vice-versa) simply press ‘x’ on your keyboard.
Using the Mask and Brush
White Mask With Black Brush: After you have a soft, round brush at about 75% brush opacity, set it to be a black brush and brush over the face and arms. This will conceal (hide) the darkened effect over the face and arms, while leaving the rest of the image dark.
So that we can focus on change one layer at a time, let’s go ahead and hide the layer after you have finished brushing by clicking the eye icon on the left-side of the layer. Below you can see how I hid the top layer.
Black Mask with White Brush: Move to the top layer (one with the black mask) and switch your brush to a white brush (hit x on your keyboard to toggle between black and white). Now brush over the hair and shirt, which reveals the dark effect that the black mask was hiding.
Video Tutorial
Below is a not-so-brief video tutorial to accompany this tutorial. Since I also had to cover masks, it was hard to keep it short, sorry about that. It is a very helpful video, though, for those who are brand new to Photoshop CS, Photoshop Elements or new to using layer masks.
If you are reading in a blog reader or email, please click over to the site to watch the video.

Join us for a weekend of all things photography and editing.


I am enjoying the many tutorials. Do you ever put them into a .pdf download? I am much better at reading and doing so I usually print instructions out and then give them a try. Just a thought.
Jackie,
Thank you for the kind feedback; I’m glad you’re enjoying the series.
Yes, all of the tutorials are being made into PDFs. They will include all the tutorials for the entire series (which continues through beginning of July) and will be a newsletter freebie perk.
Thanks so much. I already get your newsletter so I will be set to go. Thanks again.
Thank you so much for these tutorials!!! I LOVE them!!!
I love these tutorials and am so excited to hear they will be available in pdf. I’m already a subscriber and look forward to receiving that newsletter.
I’m a subscriber too and am looking forward to being able to read these in .pdf – thank you
Zoom in on the apples in the photo so they fill your workspace. Activate the brush tool, pick an appropriately sized brush, and set opacity to 100%. Set the foreground color to black (you can do this by pressing D, then X). Now click on the layer mask thumbnail in the layers palette and then begin painting over the apples in the photo. This is a good time to use a graphics tablet if you have one.