Pin It
Regardless of your status as amateur or professional photography, regardless of the type of camera you have, point and shoot or DSLR, if you are sharing images on the Internet, you should watermark them. Really. Doing this is super simple and you do not need to pay someone big money to create a custom logo to watermark your pictures.
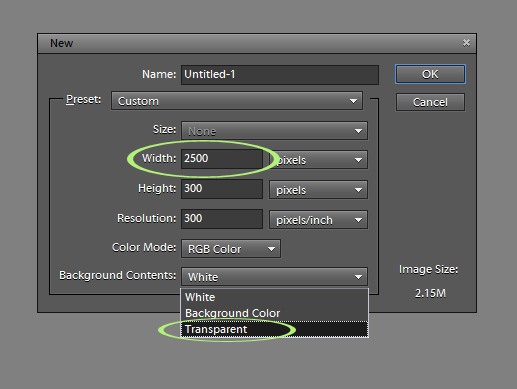
Step 1: Create a new file by going to File, New and then make the size 2500 pixels wide and like 300 pixels high. Why so wide? Well, it is easier to size your brush down than it is to size it up. If you make it too small then if you do want to put it on a full size image, you will either have a watermark that is too small or you will have to enlarge it and the text will look grainy and not good. 2000 or 1500 pixels would work too, but I just stick with 2500.
Make sure that the background is transparent, not black or white or another color. You want transparent so that when you use the brush, you only see the text.
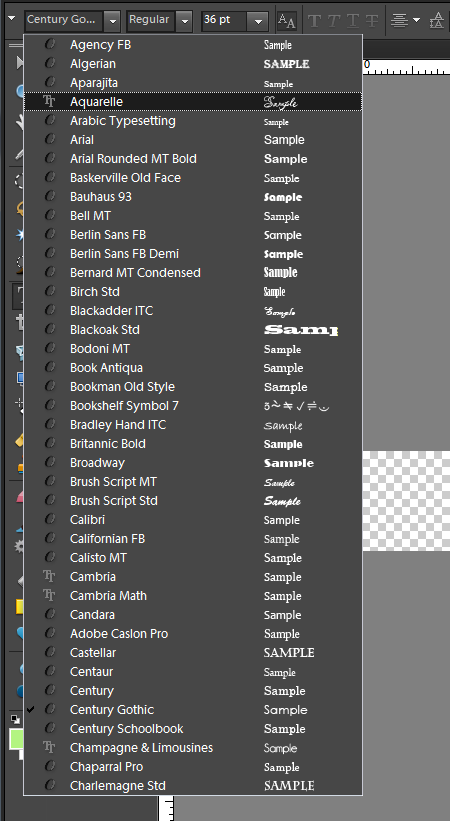
Step 2: Activate the Type tool by clicking ‘t’ on your keyboard, or clicking the T in the toolbar. Then change the font to whatever you want. I have two types of watermarks, a script (fancy) and a plain (don’t know the technical word for that one, maybe block? I don’t know).
If you do not like the fonts available to you, go download free or purchased ones and load them to your main fonts folder (follow the instructions given by the place you download). For this watermark I used Aquarelle from Fonts101.com.
Step 3: Type on the background, whatever you want your watermark to say. If your font is too small, highlight it and go to the Type option bar (where you changed your font) and change the size.
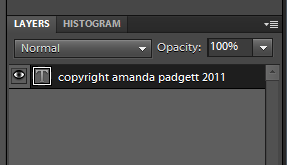
This is what the layer will look like in your layers palette:
Step 4: Now to save the brush so you can use it whenever you like. Click on ‘b’ to activate your brush tool. Then at the top, where you see that stroke, click on it. Where you see the drop down menu, click and go to Basic or Default brush set.
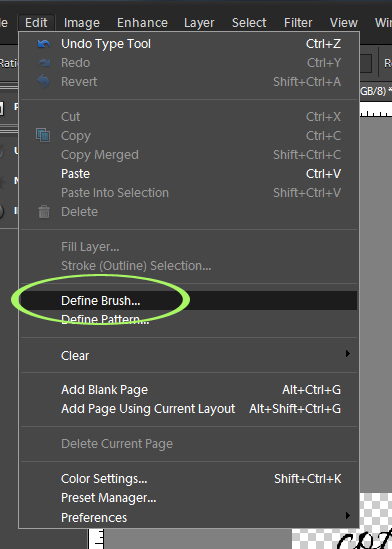
Step 5: Once you are on Basic or Default brush set, go to Edit (in main menu) and then choose ‘Define Brush.’
Step 6: Name your brush whatever you like. I tend to make mine a bit descriptive so I can identify it more easily.
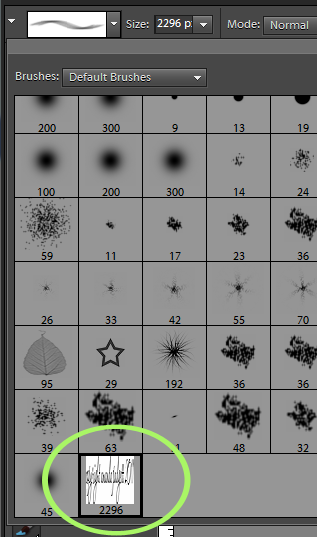
Now the brush shows up in your brush set; it will be the very last one in the set.
Step 7: In order to not lose the brush the next time you change brushes, you need to save it. Click on the brush stroke and then the double triangles. When the drop down menu pops up, click on Save Brushes.
Step 8: Navigate to where you want to save the brush. I have a folder just for brushes, so I went to it. The brush will save as a set, not an individual brush, so it might help to name it such. There is a way to create a special brush set, with only the brushes you create in them, but that is something more involved and I won’t get into it here.
Now your brush is saved! You did it! But, how do you use it now?
When you have a picture ready to put on the Web, activate your brush tool, click on the stroke and then the two triangles. Go to “Load Brushes.”
Navigate to where you saved the brush set, click on the .abr file and then click Load.
Create a BLANK layer (folded paper icon in Layers palette, or go to Layer in Main Menu, then New Layer). Make your brush whatever color you want the watermark to be. Remember, whatever color is in your foreground (white/black box below) will be the color used for your watermark. To change it to something else, just click on the top box. I chose to use white.
Size your brush to fit your image (tip: use the [ or ] keys to make brushes bigger or smaller), and click on your image where you want the watermark to be.
Lower the layer opacity to suit.
Example of this exact watermark on my image used for tutorial yesterday:
For those curious, the steps in CS5 are very similar.










Good information. Lucky me I came across your website by accident (stumbleupon).
I’ve bookmarked it for later!
Good information. Lucky me I came across your website by accident (stumbleupon).
I’ve bookmarked it for later!
Amanda,
What a great tutorial. You make it so easy. Thanks.
I have followed the exact steps, and have made my brush. However, the watermark never shows up in my saved images! Its there in my PSE screen, but disappears. I have Elements 7.. any help would be greatly appreciated, its driving me crazy!
I found this the best set of instructions I have tried so far. Only problem I am having is how to “drop” my watermark where I want it on my photo – it keeps moving. Any help will be much appreciated.
Thanks.