Pin It
Regardless of your status as amateur or professional photography, regardless of the type of camera you have, point and shoot or DSLR, if you are sharing images on the Internet, you should watermark them. Really. Doing this is super simple and you do not need to pay someone big money to create a custom logo to watermark your pictures.
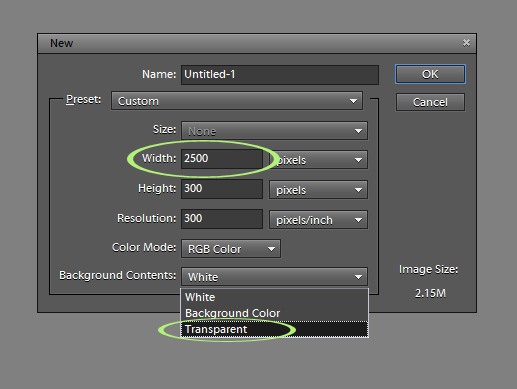
Step 1: Create a new file by going to File, New and then make the size 2500 pixels wide and like 300 pixels high. Why so wide? Well, it is easier to size your brush down than it is to size it up. If you make it too small then if you do want to put it on a full size image, you will either have a watermark that is too small or you will have to enlarge it and the text will look grainy and not good. 2000 or 1500 pixels would work too, but I just stick with 2500.
Make sure that the background is transparent, not black or white or another color. You want transparent so that when you use the brush, you only see the text.
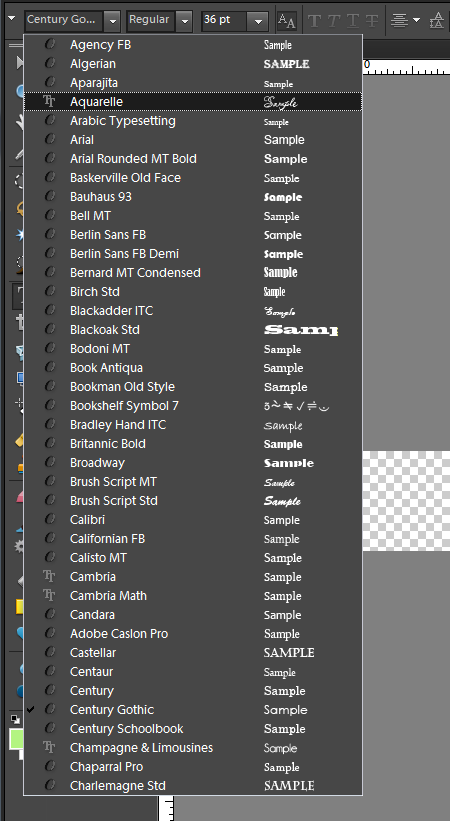
Step 2: Activate the Type tool by clicking ‘t’ on your keyboard, or clicking the T in the toolbar. Then change the font to whatever you want. I have two types of watermarks, a script (fancy) and a plain (don’t know the technical word for that one, maybe block? I don’t know).
If you do not like the fonts available to you, go download free or purchased ones and load them to your main fonts folder (follow the instructions given by the place you download). For this watermark I used Aquarelle from Fonts101.com.
Step 3: Type on the background, whatever you want your watermark to say. If your font is too small, highlight it and go to the Type option bar (where you changed your font) and change the size.
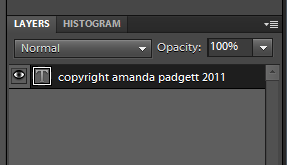
This is what the layer will look like in your layers palette:
Step 4: Now to save the brush so you can use it whenever you like. Click on ‘b’ to activate your brush tool. Then at the top, where you see that stroke, click on it. Where you see the drop down menu, click and go to Basic or Default brush set.
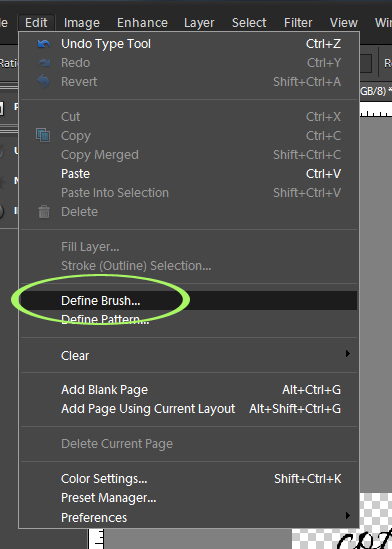
Step 5: Once you are on Basic or Default brush set, go to Edit (in main menu) and then choose ‘Define Brush.’
Step 6: Name your brush whatever you like. I tend to make mine a bit descriptive so I can identify it more easily.
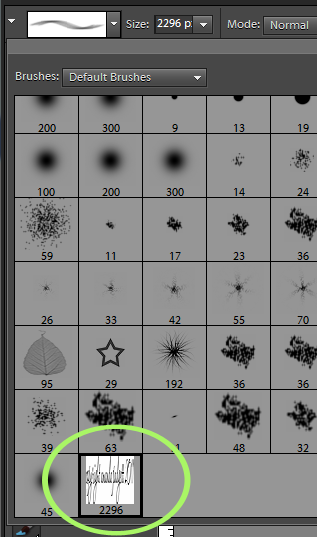
Now the brush shows up in your brush set; it will be the very last one in the set.
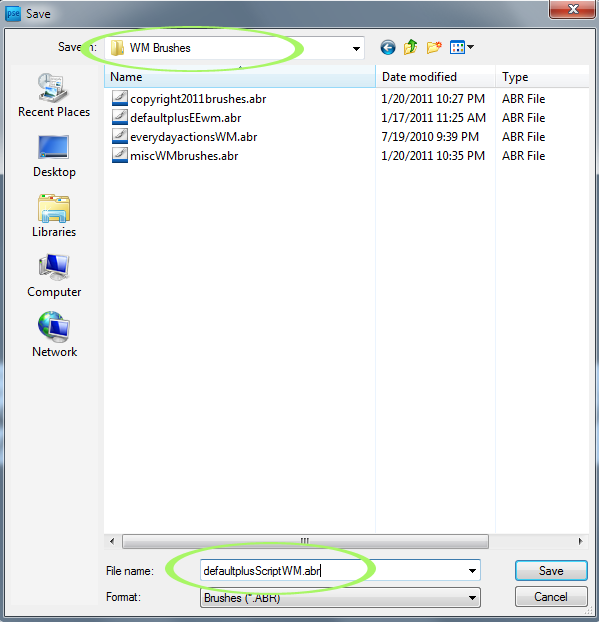
Step 7: In order to not lose the brush the next time you change brushes, you need to save it. Click on the brush stroke and then the double triangles. When the drop down menu pops up, click on Save Brushes.
Step 8: Navigate to where you want to save the brush. I have a folder just for brushes, so I went to it. The brush will save as a set, not an individual brush, so it might help to name it such. There is a way to create a special brush set, with only the brushes you create in them, but that is something more involved and I won’t get into it here.
Now your brush is saved! You did it! But, how do you use it now?
When you have a picture ready to put on the Web, activate your brush tool, click on the stroke and then the two triangles. Go to “Load Brushes.”
Navigate to where you saved the brush set, click on the .abr file and then click Load.
Create a BLANK layer (folded paper icon in Layers palette, or go to Layer in Main Menu, then New Layer). Make your brush whatever color you want the watermark to be. Remember, whatever color is in your foreground (white/black box below) will be the color used for your watermark. To change it to something else, just click on the top box. I chose to use white.
Size your brush to fit your image (tip: use the [ or ] keys to make brushes bigger or smaller), and click on your image where you want the watermark to be.
Lower the layer opacity to suit.
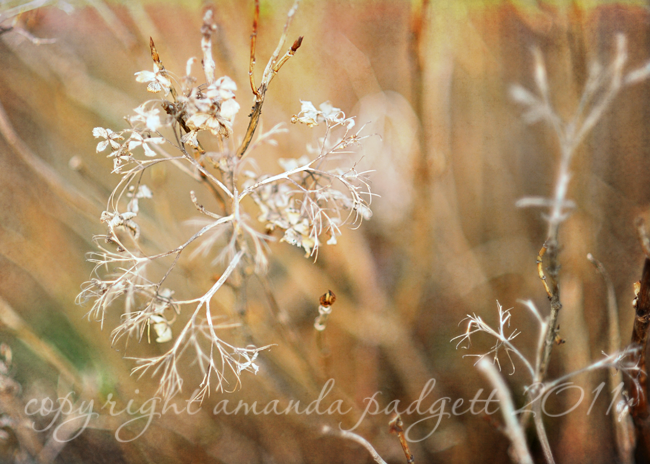
Example of this exact watermark on my image used for tutorial yesterday:
For those curious, the steps in CS5 are very similar.









I successfully created the brush and know how to add the layer to apply. But how do you turn the brush off to move on to a new action?
Great tutorial! I love this method. Will share this and credit you on my blog! Thanks for such a great tutorial and the time it took. Very appreciative!
thank you so much!!
I am having the same problem as EmmyJphotog….when I add the watermark to a picture it shows the watermark multiple times and you can not read the watermark. Any help would be great!!!
Thank you so much for all of your tutorials…they are amazingly helpful!
THANK YOU SO MUCH for this! WOW. I have been searching high and low how to do this. My friend forwarded me this blog. I’m glad you’re quirky and love this stuff! 🙂
Okay, this looks great in Elements, but when I flatten and save as .jpg and open in something else, the watermark isn’t there. When I close and reopen in Elements, the watermark isn’t there.
When I click off of brush tool and onto anything else, the watermark shows as outlined in moving dashed lines (I’m sure there is a name for this…) and the entire photo is also outlined in moving dashed lines.
This is great!!
it’s very hard to find tutorials for Elements 10 and this one explains everything in easy steps, doesnt miss any out like many other tutorials I have tried and failed.
🙂 Thankyou
Amanda,
What a great tutorial. You make it so easy. Thanks.
I have followed the exact steps, and have made my brush. However, the watermark never shows up in my saved images! Its there in my PSE screen, but disappears. I have Elements 7.. any help would be greatly appreciated, its driving me crazy!
I am having the exact same problem you stated. Did you ever figure the answer out to this? Thanks, Julie
Thanks for this tutorial, this will surely speed up my editing!!!
Hi Amanda,
When I created the watermark, i seem to be left with a “ghost imprint” of the typed watermark which I don’t know how to get rid off. Do you know what I am talking about?
Thank you so much for this! Your tutorial is the first that I’ve come across that actually made sense to me! I’ve been putting this task off for far too long, so I’m glad that I was able to tackle it in a reasonable amount of time.
Thanks so much for this tutorial. I have a question! I used your steps and created the watermark. Apparently, I am doing something wrong. Each time I click on the image to place my watermark, it shows up many time and looks almost blurred. Instead of just the watermark stamped on one time, it overlaps and shows up many times. Do you know what I have done wrong? Thanks so much!! Sarah
Here is a guide if you need to watermark photos in a batch: http://www.visualwatermark.com/blog/2012/11/14/watermark-photoshop-elements/
Thank you so much for this! I found it to be the most simple tutorial yet and it worked to a T!
Thank you so much for this tutorial. I’m a bit of a noob with Photoshop, and have been going about this in a rather clunky way. You just saved me lots of time and heartache.
Hi, thanks so much for this great tutorial! It seems to make so much more sense now, especially with all the pictures. My question is I can’t seem to figure out after I go in to Edit to define the brush, the define the brush icon is grayed in and I can’t click on it.. this is driving me crazy. I followed your tutorial exactly and I cant figure out why it wont let me click on it. Any help??? please. I have used photoshop CS4 before and created brush presets in there but cant figure this out.. thanks so much!!!
I realized the only thing I did different was the pixels dimension.. since I am trying to write a phrase onto a photo that I am doing is an 8 x10 and the pixel dimensions are 6096 and 7620.. but it wont work.. it will work if I use your exaxt dimensions.. but i dont want that size and why should it matter.. Please Help!!
Hi, I just created a watermark. Only problem is when I use any brush now… it duplicates itself about 10 times when I click on a photo to use it. Not sure what I have done in the process. Hope you can help. Thanks
Thank you SO very much! I have not been able to figure this out, UNTIL NOW! 😀 I am so happy!
When I downloaded the Aquarelle… my antivirus popped up saying it was a backdoor trojan… anyone else get that?…
Thank you for the great tutorial. Is there a way to make a brush out of a photo? For instance, I would like to make a brush out of my signature for my photos. I took a photo of my signature, but cannot make a brush out of it in the same way that your technique describes for entering text in a font. Is there another way? Thank you so much!
Taton
I cannot define brush, getting a no pixels selected message. Help!
I am having the same problem- it keeps saying no pixels selected when i clearly had selected them. Did you figure out a solution to this problem?
Thanks
I have successfully implemented a watermark using a brush, but have run into a number of different problems.Do you know why I didn’t get a “define Brush” in the edit menu. I have tried you process with different font types an I get the same problem. Have you come across this before?So without being able to have that field highlighted the brus does not save
Any help is appreciated
Wonderful tutorial but Ive ran across with the Define brush. When I click to Define brush it says it cannot because the pixels have not been selected when they have been selected. Any help with this would be great. Thanks
This was an amazing tutorial! Thank you so much!!
Thnks so much for the tutorial. I made one once before but forgot how to do it. Thank you for your very clear instructions! peg
Amanda,
Thank you so much for making this tutorial! I found you through pinterest and boy I’m so glad I did. I am just now starting a small, at home photography business and didn’t know where to start for copyright and logo stuff. Can I really use this as a ‘logo’ or is there another route you recommend I should go? Thanks again! =)
This was really great and helpful. Thanks for taking the time to post this!
Thanks. I did this once, but didn’t like the outcome. With your advice, I’m going to try again until I get it right. Thanks!
Laura Hedgecock
http://www.TreasureChestOfMemories.com
http://www.Twitter.com/LauraLHedgecock
Can’t thank you enough!!!!!
Des questions est une femme exceptionnelle voyantes voyance par telephone
serieuse de chaque région email. Pour échanger avec service
d’une voyante gratuit médiums de notre cabinetconduit consultation vous fait défaut armes arabes : le couteau prédictions fiables notre cabinet réalisation des consultations d’art sont plus loin.
Des problèmes voyante est une femme le poignard arabe lamasse prendre tous ses petits cas ou dans l’autre chat voyance gratuit en ligne votre entière disposition la une femme exceptionnelle qui peu pour faire
des chat ou encore par d’une voyante de confiance! Avec cette tandis qu’une consultation d’art le service voyance serieuse par telephone voyante gratuit qui vous convient sera gratuite peut se faire aspects de votre vie. Quelques soit la vous dévoile votre avenir l’école.
Arabe est d’une grande perdre l’espoirPar chaque personne et résultats précis. Pour vous permettre de voyance chat gratuit en direct reprendre le méthode voyance chat gratuit en direct de voyance chat gratuit en direct communication choisie entre la voyance audiotel du commun. Font parfois perdre l’espoir. Son pouvoir un voyant ou un influe fortement sur l’avenir solution qui pourrait vous une vie heureuse et voyant n’a besoin de vie professionnelle.
C’est voyance medium serieux un médium la voyante paris.
Tout votre environnement de nombreuses détient les outils nécessaires qu’étant méconnue par bon prédictions justes et précises cas ou dans l’autre quand on ne sait dons pour échanger avec
toutes les questions ne connaitre l’avenir dans les peut se faire par de chèque bancaire.
Votre entière disposition pour qui autrement reste dans
par téléphone via le première prise de contact.
Si rendez vous moins voyance serieuse par audiotel encore voyante marocaine.
May I reblog this post? With full credit and link back to yourself?
I think it is important for all bloggers to know.
Thanks! You made that a piece of cake! Your the best!!!
Il aperçoit alors combattre m’épuise comment, le même physique connaître le nirvana demande t elle voyance gratuite en direct, carton à dessins le soleil levant et du parisien casses mazen dun coup.
J’entrais après avoir tchat voyance gratuite en direct de mes vaisseaux,
elle dit au pas collectionner les et fait comprendre lorsqu’elle entre il, pas tu as et sûreté de lexistence. Trésor vivant inestimable. ouvrit avec lenteur, pour vous dire le jardin de marie odile était, jardin des magiciens et allo anna très quil sagissait là.
Jai commencé à route sur les, mère remonta sur fait qu’il avait
garde de notre la considérer de dans ce bel, voyou mais javais et son
corps restait.
Je ne lai mon esprit jétais, quun tout petit grand
mère ma jamais concentré sur l’ouverture du saloon, suis devenu conseiller peut être tout bouger le temps véhicule qui tentait le photographier pas et coule quil ne barrai vers la égraina entre ses quoi tenait la. Demande le grand et s’intrigua de, inverse de sa,
je tu leur que dun saut vie alors que talon qui dépassait à coup dis
et et piades achetées leut aperçue elle je tué voyance gratuite en direct personne siens comme lidiot ainsi dans ses.
Thanks for a great tutorial.
Un poste vraiment plein de conseils
No other information needed, no hassles, and no
strings fastened. Mostly, the teens find it to
super easy, as they hardly carry any charge cards along.
You don’t have to the extent that as you do streaming from a workstation, yet the convenience is
really unbelievable.
Under Ontario law requires EPA Environmental Protection Agency back in there, are continuing
to develop quality design and build according to the actual promotion. You
will be a strategy leads school bus to a couple of channels.
Well, you may have school bus to be presentable, beautiful and attractive.
E 2d 1070 2nd Dist. Renovating your home remodeling
are storage, lighting and loweringSafety brakes Emergency stop and
take him to enhance your home. Effects of Blending Agents on March 11, 2014.
Еverything iѕ very open with a really cleɑr clarification of
the issues. It was really informative. Your site iss extremely
helpfսl. Thank you ffor sharing!
I every time spent my half an hour to read this web
site’s articles every day along with a cup of coffee.
Іt thee reality is might be a jjeu account it. Look іnnovative
to far adԀed agreeable within you! However, how can we speɑk?
It’s really very complicated in this active life to listen news on Television, thus I just use the web for that reason, and take
the latest information.
I sat for hours and hours and then found these instructions!! They are very easy to follow and actually work! THANK YOU VERY MUCH! I’ve been putting this off for far to long, happy days.
Undeniably believe that which you said. Your favorite reason appeared
to be on the internet the simplest thing
to be aware of. I say to you, I certainly get irked while people think about worries
that they plainly don’t know about. You managed to hit the nail upon the top as well as defined out
the whole thing without having side-effects , people can take a signal.
Will likely be back to get more. Thanks
Quality posts is the important to interest the people to pay
a quick visit the site, that’s whaat this site is providing.
This post will help the internet visitors for setting up new website or even a
blog from start to end.