Pin It
Regardless of your status as amateur or professional photography, regardless of the type of camera you have, point and shoot or DSLR, if you are sharing images on the Internet, you should watermark them. Really. Doing this is super simple and you do not need to pay someone big money to create a custom logo to watermark your pictures.
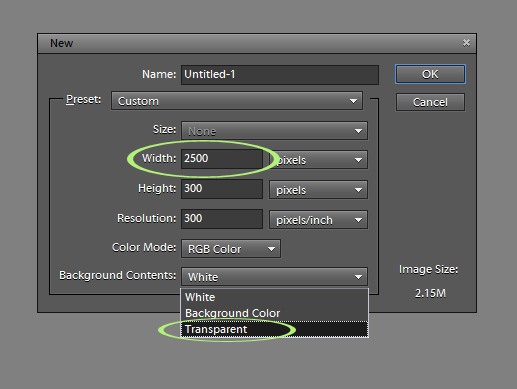
Step 1: Create a new file by going to File, New and then make the size 2500 pixels wide and like 300 pixels high. Why so wide? Well, it is easier to size your brush down than it is to size it up. If you make it too small then if you do want to put it on a full size image, you will either have a watermark that is too small or you will have to enlarge it and the text will look grainy and not good. 2000 or 1500 pixels would work too, but I just stick with 2500.
Make sure that the background is transparent, not black or white or another color. You want transparent so that when you use the brush, you only see the text.
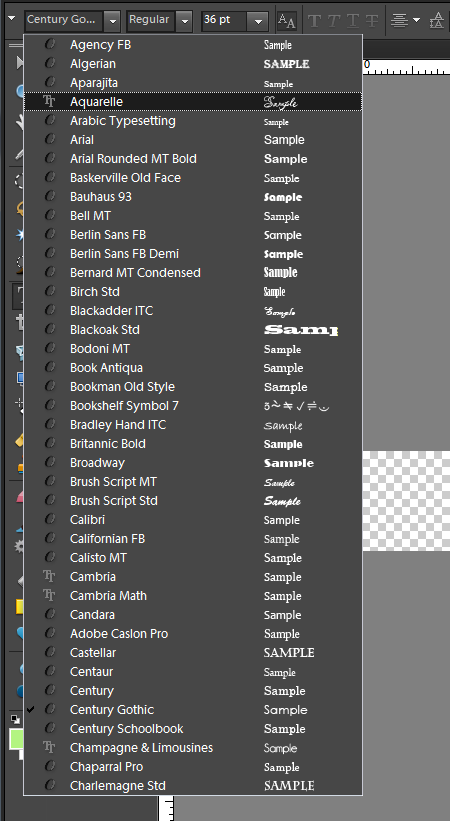
Step 2: Activate the Type tool by clicking ‘t’ on your keyboard, or clicking the T in the toolbar. Then change the font to whatever you want. I have two types of watermarks, a script (fancy) and a plain (don’t know the technical word for that one, maybe block? I don’t know).
If you do not like the fonts available to you, go download free or purchased ones and load them to your main fonts folder (follow the instructions given by the place you download). For this watermark I used Aquarelle from Fonts101.com.
Step 3: Type on the background, whatever you want your watermark to say. If your font is too small, highlight it and go to the Type option bar (where you changed your font) and change the size.
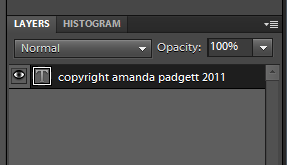
This is what the layer will look like in your layers palette:
Step 4: Now to save the brush so you can use it whenever you like. Click on ‘b’ to activate your brush tool. Then at the top, where you see that stroke, click on it. Where you see the drop down menu, click and go to Basic or Default brush set.
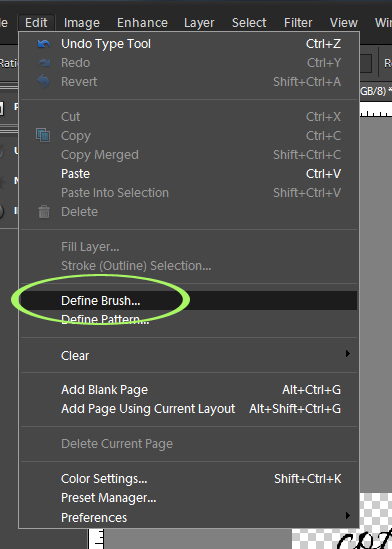
Step 5: Once you are on Basic or Default brush set, go to Edit (in main menu) and then choose ‘Define Brush.’
Step 6: Name your brush whatever you like. I tend to make mine a bit descriptive so I can identify it more easily.
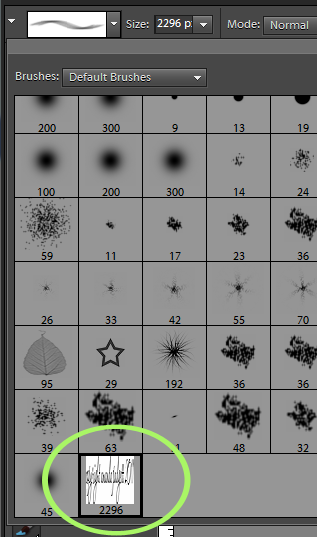
Now the brush shows up in your brush set; it will be the very last one in the set.
Step 7: In order to not lose the brush the next time you change brushes, you need to save it. Click on the brush stroke and then the double triangles. When the drop down menu pops up, click on Save Brushes.
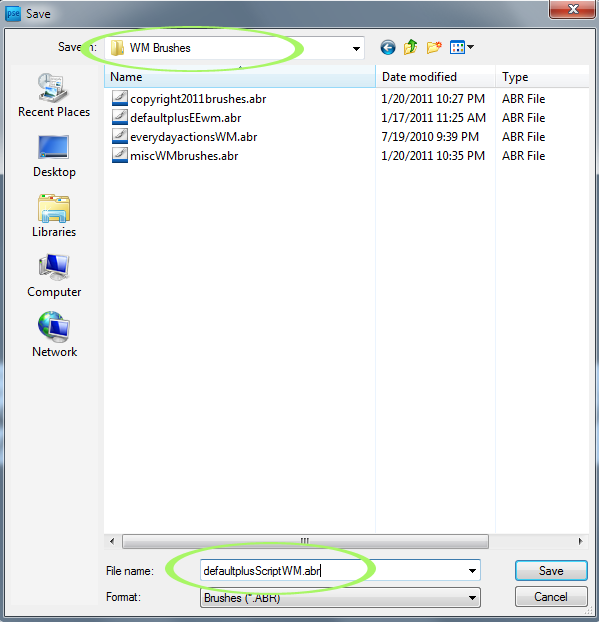
Step 8: Navigate to where you want to save the brush. I have a folder just for brushes, so I went to it. The brush will save as a set, not an individual brush, so it might help to name it such. There is a way to create a special brush set, with only the brushes you create in them, but that is something more involved and I won’t get into it here.
Now your brush is saved! You did it! But, how do you use it now?
When you have a picture ready to put on the Web, activate your brush tool, click on the stroke and then the two triangles. Go to “Load Brushes.”
Navigate to where you saved the brush set, click on the .abr file and then click Load.
Create a BLANK layer (folded paper icon in Layers palette, or go to Layer in Main Menu, then New Layer). Make your brush whatever color you want the watermark to be. Remember, whatever color is in your foreground (white/black box below) will be the color used for your watermark. To change it to something else, just click on the top box. I chose to use white.
Size your brush to fit your image (tip: use the [ or ] keys to make brushes bigger or smaller), and click on your image where you want the watermark to be.
Lower the layer opacity to suit.
Example of this exact watermark on my image used for tutorial yesterday:
For those curious, the steps in CS5 are very similar.










Great tutorial! I’m going to watermark this way now. The way I was doing it was so many extra steps. This looks easy.
awesome tutorial!!! I am going to make one now.
thanks
Thanks for the awesome tutorial! I’ve been meaning to look up how to do this but never got around to it.
This is such excellent information! Thank you SO much for sharing this with all of us! I never would have expected that it was so easy. I’m off to do it now.
You make it look so easy! Definitely going to try one of my own now. Thank you!
Thank you for posting this! It’s the simplest and easiest to follow tutorial I’ve come across for creating and using a watermark.
I’m having trouble. I am following all your steps but I can’t find it when I load it. It seems as if it is making a set but I cannot find the brush. When I load it it goes into the drop down list where default brushes and all the other categories are but the brush is no where. I have it saved in a folder. Not sure what to do.
Should u want the actual copyright logo “circle w/a “c” inside”. Hold down “alt” and type “0169” it will put it n ur text OR open word document and select symbols font- find the symbol and use “control c” to copy then “control v” to paste into Photoshop…. Just another trick… 😉
Actually, it is easier than that. Just use the custom shape tool and go to Symbols and choose the copyright symbol. Much easier. I used to do that, but now just keep it simple with text.
I created a watermarker and I selected the brush and my define brush is grayed out and wont let me select the only thing I can select is Define Patteren… not sure where I went wrong 🙁
I didn’t have this problem with my first watermark, but did with the second one. I didn’t even end up doing it that way. I clicked on the brush tool and then went to the types of brushes drop down menu and clicked on the arrow to the right. Then I chose New Brush Preset and saved it, Loaded and Saved like she explained. It works that way. Hope that helps. I’m using CS5, FYI.
THIS is AWESOME!!! I was spending WAY too much time trying to watermark my pics!! what a bless-ed life saver you are!!! Thank you for teaching us clueless ones about these things!!!
THANKS! That’s the first time I followed one of your tutorials, and it worked beautifully! Good job!!! 🙂
Thank you! I’ve read several posts about creating watermarks but yours was written in such a way that I actually went and did it! From now on I will be “watermarking” my images 🙂
it worked perfectly Amanda!! Thanks!
Yay! I have a watermark that I made myself as a layer that I cntrl t and multiply / or screen depending but I am so happy to find a new what to do it ! I am girlcrushing on all your great tutorials- thanks for this!
Awesome tutorial!!! One question though, I am still having trouble figuring out how to use my pre-made ,png logo in elements 8. Can you help?
Answering (way late) for others who may be reading the replies/questions.
A logo that is a .png needs to be drug onto the image, from the project bin. The .png is an image, just like the image you wish to apply it to. You want to overlay it on the image.
You can turn the .png into a brush, if you like. Read this tut for that: http://everydayelementsonline.com/2011/07/create-a-watermark-brush-from-logo-image/
i have been wanting to do this on my bow pictures. this read my mind
Thank you very much! Now I can quit wondering how everybody is doing this.
Great tutorial. Thank you.
I followed all directions to a T and am having an issue- when I try to apply the watermark to a photo, the watermark text shows up in multiples instead of just the one line of text…..what’s going on?
I was having the same problem….now I have a different problem…I can’t get it to imprint on my photos.
HELP!!!!!!!
I have followed the steps and thank you for doing this it makes it look so easy
BUT when I go to use the brush to add my dcopyright to a photo I can see it if I click BUT as soon as I let go it disappears. I am not sure what I am doing wrong.
Please can you help
I am working on Mac 10.6.7 with pse 8
This would be so great if I can get it working as I can see so many other brushes I can make using this method.
WOW!!!!!!!
the tutorial was so good I just need this tiny but very important bit to work.
oh and for those also on MAcs use option and g to get the C symbol. 🙂
Thanks!!! Don’t know how I missed your original post. Thanks again for putting this up again.
Thanks for the help!
I have one thing a week to learn something new. Thanks for making this weeks task easy!
please help i followed all the steps but my define brush wont let me highlight the option? pleases help
At step five, it is telling me that it “Could not complete the Define Brush command because no pixels are selected”. What does this mean?
This was a great tutorial!! It was easy to follow. Thanks to you, I know have a watermark for my pics!! 🙂
This is great! But after I type the text I want and go to Default brushes, then I try to go to ‘Edit’ and ‘Define Brush’, it’s not an option. The only option is ‘Define Pattern’ and ‘Define Brush’ just isn’t clickable. 🙁
Nikki, Did you ever get this figured out? I am having the same problem.
I didn’t have this problem with my first watermark, but did with the second one. I didn’t even end up doing it that way. I clicked on the brush tool and then went to the types of brushes drop menu and clicked on the arrow to the right. Then I chose New Brush Preset and saved it, Loaded and Saved like she explained. It works that way. Hope that helps. I’m using CS5, FYI.
Thank you so much! Your AWESOME tutorials actually allow me to utilize PSE!! I love you!!
I created a watermark using your instructions and it worked great! However, I tried to do another one the next day and every time I get to point of applying the watermark on the photo, once I’ve chosen the color and size, I click on the image to apply the watermark and SEVERAL watermarks show up unaligned and it’s just a big jumbled mess……. I cannot figure out why this is happening. I deleted everything and started over from the beginning several times, and every time this same thing happens. Any thought???
I really appreciate this tutorial – thanks so much for sharing this!!
I had the same problem. You know how there is the brush tool box on the left in photoshop? Well just right click that box and choose the first selection.
This is great! I’ve had Elements for about 6months, and can do quite a few things with it, but this is something I had not figured out. I will have to play around with this now. 🙂
I am curious as to how to add the watermark with a semitransparent bar through it. Like the one on your pictures on your home page. Can that be done with a brush as well?
Wendy, just use the shape tool and drag a bar across, then reduce the opacity. Pull the layer with the watermark on it UP so that it is ABOVE the shape layer in the layers palette.
Thanks! Great tutorial! 🙂
Thank you! Just found this from a link on ClickinMoms. I really appreciate the ease of your tutorials.
super ma…
Love this site! Do you have a tutorial on how to move an object from one photo to another?
Thank you for help with the water mark! You make it so easy!
Amanda, thank you so much for this. What a concise and informative way of explaining how to watermark photos. Off to create one now 😀
Almost ready for my watermark. I will be referring to your instructions several times I’m sure. Thanks so much for sharing
This helped me so much! Thank you!
I tried this and it was going well but when I get to the point where I need to add it to my brushes it tells me “could not complete the Define Brush command because no pixals are selected.”
What am i doing wrong???
Your brush has to be BLACK, not white. That’s what helped me.
Thanks so much for posting this! I saw a tutorial on creating the brush elsewhere, but it failed to explain how to save it and I had to redo it every time I went back in… so glad I found this! Thanks a bunch! 🙂
Awesome tutorial. Thanks for sharing.
Awesome!!! thank you. such a good/simple tutorial
Do you have any idea why a brush I just created and saved in the special effects brushes would now say it cannot load because it’s not compatiable with this version?
What a great tutorial thank you!! Very easy to understand 🙂 I have a question when I tried to type my cursor was stuck sideways so it typed in a downward format, anyone know how to change that? Thank you so much!