I get a lot of questions about the watermark brush tutorial I did a while back and many people have asked how to make a watermark from an existing logo. So, I thought I would show you how to do that today. This tutorial applies to both Photoshop Elements and Photoshop CS#.
Usually when a logo designer creates a logo for someone, they are given a transparent version and a full color version, which is on a white background (mine is shown above). You can make a watermark brush from either of them.
Step 1: Open your JPG or PNG file given to you by the logo designer. Check the image size. If it is wider than 2500 pixels wide you will need to resize the image.
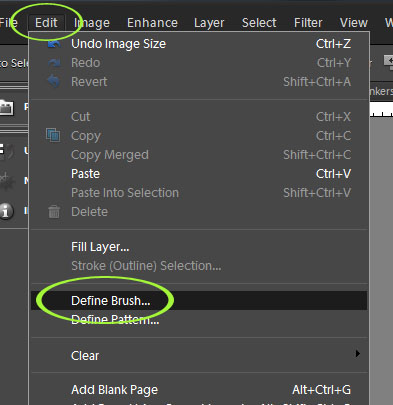
Step 2: Go to Edit, then Define Brush. You will be asked to name the brush. Give it an easy to decipher name. The little images in your brush preset menu is small and you’ll rely on the name that pops up when you hover over them to differentiate between them. For instance, some of my watermark brush names are: eecircle, apcopyright2011, eecopyright2011, aplogo and others.
Step 3: Once you have the brush named, it is active and you can apply it on an image right then. If you plan to use it later, take a moment and save the brush. I did not spell out how to do that in this tutorial, but you can find out how in my other watermark brush tutorial.
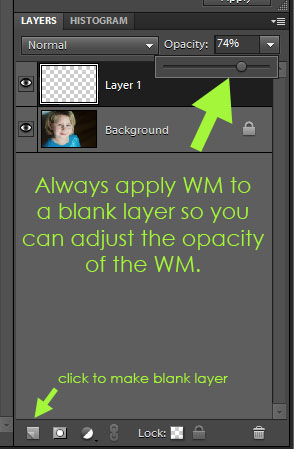
To apply the watermark on an image, create a blank layer and set the color for the brush. Make the brush the size you want it to be (use [ and ] keys to make your brush go larger or smaller), then click it somewhere in the image. Lower the layer opacity to suit.
Below is a video tutorial I did LATE last night for this and I watched it again this morning and just had to laugh. I was obviously more tired than I realized; it’s almost like I’m drunk. Yes, it would be more professional to remake it, but I thought y’all would get a kick out listening to me stumble and mumble. Hey, I’m human just like you. 😉 The video does its job, lest I have made you think it’s just junk.
Real quick….new dates for the Beginners PSE editing workshop and the Photography (beginners with DSLR) workshop have been posted and you can register here. New dates for the next Everyday Live workshop (in person workshops) are coming soon.


HI Amanda-
This is great- just what I needed. Thanks so much for the great tutorial.
Thank you SO Much for this. I was just going to start looking for directions on how to do that today. I love your blog & tutorials – so much help to a beginner like me 🙂
I follow your blog, but I think I’ve only commented once :~) I actually have a question about resizing an image, but I know you’re busy, so I totally understand if you don’t have time to answer it :~)
I’m confused about resizing an image. I’m not clear on when the “Resample Image” box should be unchecked. I noticed that you left it checked when you downsized the resolution of the image in the video, so I’m thinking that you only uncheck it when increasing the resolution? I haven’t been reducing the size of my images for Flickr and I probably should.
Thanks for all your hard work and for sharing it with everyone!!!
hi Amanda!!!!!
loved this tutorial on watermark brushes. Ive been strugling with finding something like this for sometime. all looks good when I put my logo on picture however i can not move the image to place it just anywhere or change size. i click on the brush and the click on the picture and it places it but then i tried clicking on the hand and of course that only moves the whole picture… maybe I need a diff tool bar? I have elements 10. Thank you for your wonderful tutorials and blog!
Kathy