I have been asked repeatedly over the past few months how to blend backgrounds, especially on newborn pictures and this tutorial is my best guess (well, my friend Sandy is the one who gave me the idea back in January, thank you Sandy!). The professional newborn photographers, like Keri Myers, who do such a beautiful job may do something completely different, but I think this does a nice job too.
What this technique uses is the gradient tool, along with a blur filter. I used the median filter, but you can use Gaussian blur, surface blur and others; just play until you find one you like best.
For those wondering, this tutorial works just the same in Photoshop CS5 and older versions.
Step 1: With your picture open, create a duplicate layer by pressing ‘control’ and ‘j’ (or ‘command’ and ‘j’ on a Mac).
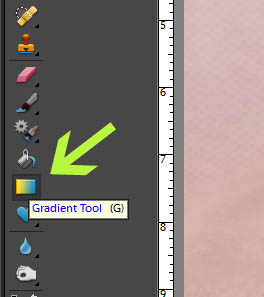
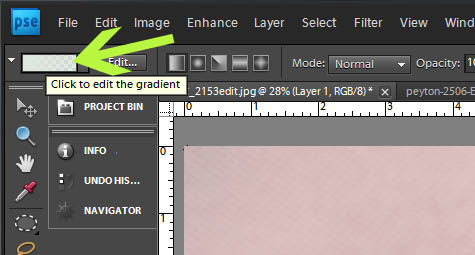
Step 2: Click on the gradient tool in the tool bar and then click on the linear gradient box (second picture below).
Step 3: Set your gradient colors by clicking on the gradient color box in the option menu for the gradient tool.
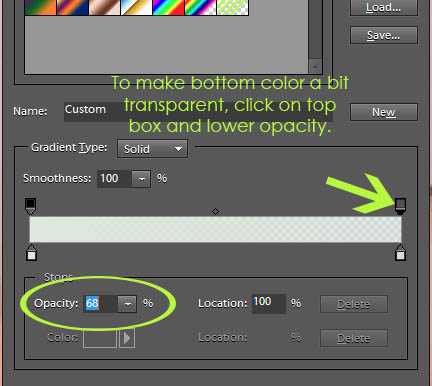
Click on the black boxes to set the colors for your gradient. The left box will be your top color, the right box will be your bottom color.
To make the bottom/foreground have less color applied, you can lower the opacity by clicking on the top box over that color.
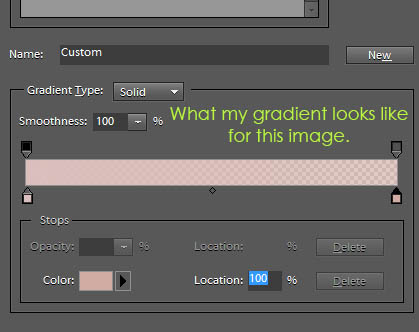
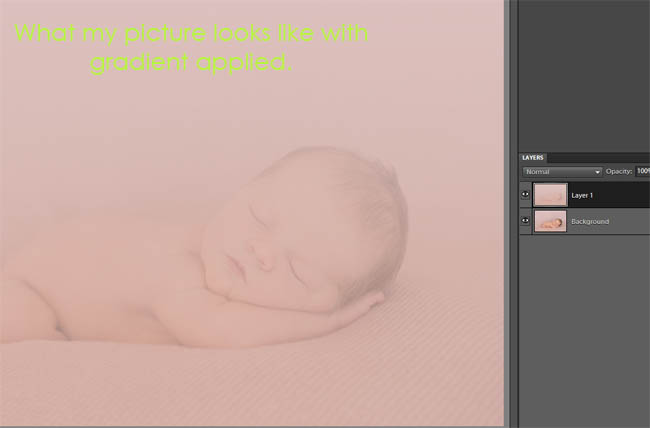
I did the screen prints before actually setting the gradient for the image I am using to demonstrate. Here is what my gradient looks like after picking the top and bottom colors:
Step 4: After setting your colors, your cursor will be like a + sign and you need to apply the gradient by clicking on the top of the image, holding down your mouse and go down to the bottom of the image and then let go. This will apply the colors you set from top to bottom.
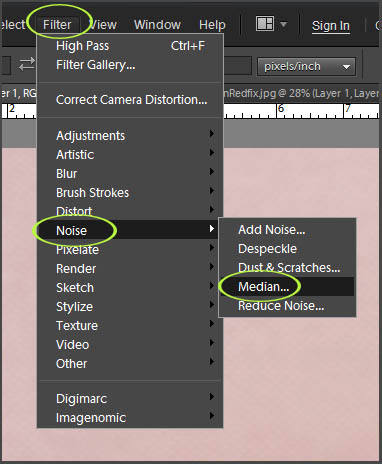
Step 5: Now we are going to blur the layer by going to Filter, Noise, Median and choosing a pixel radius of 10.
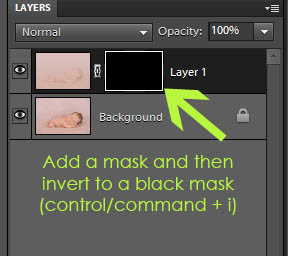
Step 6: Add a layer mask to the layer by clicking on layer mask icon in PSE 9 (and CS#) or using my free layer mask action for PSE 8 and older. Invert the layer mask by pressing ‘control’ and ‘i’ (‘command’ and ‘i’ on a Mac).
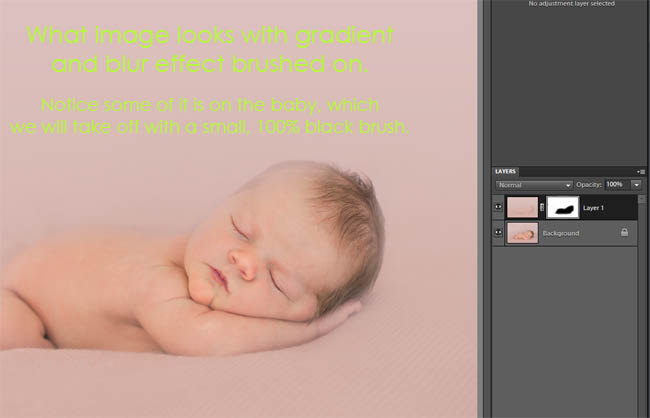
Step 7: Use a white brush at 100% brush opacity and brush on background on the top half of the image. Lower your brush opacity to like 70% and brush on lower half of image.
Step 8: Brush gradient off of the subject by using small, black brush, at 100% brush opacity and brushing over the skin affected. Be careful as you get to the edge of the baby’s skin, not to brush it off the blanket around him or her.
Step 9: Lower the layer opacity to suit your image and flatten.
Here is a quick video tutorial showing this technique, hope it helps.








Thank you for this tutorial!
Is anyone else having trouble viewing a few of the photos?
Thanks Amanda! I’ve been trying to figure this out on my own, but couldn’t quite get it!! LOVE your tutorials!!!
Amanda,
Thanks for the tutorial! Very good idea! I wish I could see the original SOOC to see what the background looked liked before you applied the gradient.
Charlotte
Charlotte, I will add that this evening. You’re right, a before and after comparison would be helpful.
Amazing tutorial, Amanda. I always learn so much from you!!!
Thank you so much for this tutorial, Amanda! I’ve played around with trying to do this a few times, but this is by far the best result. Thank you 🙂 🙂
THANK YOU for this fabulous tutorial!!!! I actually did a newborn shoot for a friend two weeks ago and this is just what I needed. You are awesome!
Awesome! Can’t wait to try…
you never cease to amaze me with your awesome talent and genorosity to share your knowledge! thanks som ver y much 🙂
I bought one of the tutorials from Keri Myers about blanket fade when I first started doing newborns. This method seems to be look smoother and blend a bit easier. thanks so much for making my work simpler!
fantastic
Thank you so much for the tutorial! it was just what I needed to get some “extra stuff” out of a black background from an outdoor shoot. I had tried some other methods but wasn’t having any luck. The pictures look so much better now and it was easier than anything I had tried.
I downloaded the action but after “command i” it doesn’t blend it for me. :/ Any suggestions?
This was very helpful. I tried it on a textured blanket and it still worked out the same way! Thanks a lot for taking the time to do this for us!
Thank you so much!!! You just saved my $50! I was going to buy an action set, but now I don’t need to. 🙂
THANK YOU! THANK YOU! THANK YOU! This Tutorial is a lifesaver! Plus the added bonus of actually understanding each step! Thank you again!
What a great tutorial! I was searching for tips on blending a photo and a shape in PSE today and came across your blog…so helpful! I will definitely be subscribing in Google Reader now!
I am following until I have to add the mask (around the 1:40 mark)….I can’t find this option on my version of PSE10…
Thank you so much for sharing this tuturial!! It has really helped me give that added touch to many of my photos I was previously stuck on!
Great tutorial. Are you using LR 4? I don’t have the same toobar that you do. Please help.
Teresa
You certainly will furthermore like to make certain you take
out the filter after putting the coffee reasons in, because some machines will also
overrun if recently there tend to be any kind of reasons relaxing in the
rest of the drip region and causing the block. Exactly what is the best consume
of coffee without the right coffee maker? When you
are taking the work to choose out the finest top quality of coffee beans, discover your own favorite roast, and discover the most perfect blends,
you really need to discover the coffee maker what kind of
will .
wow. very, very helpful! I appreciate you sharing this, especially the video!!!
Thanks so much for this tut. I found it on Pinterest recently. The video helped me the most. I played it over and over until I got it right. Thanks so much!!!
OMG, thank you you are a life saver best tut ever
Thank you for the tutorial. Best one I’ve found. Thanks so much. 🙂
Use the free golf lessons online as a starting point, and then you may also require some isabel marant soho professional advice too.
Can I hug you??? because your fricken aawesome for posting this video! Thank you!! 😀
Amazing tutorial. Thank you!!!!!!!
I tried it and it seems that it only works on the 1st gradient option, when I try the other different gradient colors, the picture is gone.
P.s. I’m using elements 9.
Thanks for this tutorial..been looking for a way to do it..Wanted to buy an action for a blanket fade but dont have the extra money so this was so helpful! Thanks! but also would love to see the SOOC photo!
Thank you soo much for generously sharing your knowledge! This is very helpful. I was wandering though if this would also be the best way to say blend a wooden floor into a solid colored background in an indoor portrait setting?
Thank you! This was a lifesaver! I had to improvise taking a corporate headshot by using my reflector as the background. I used your tutorial (PSE 13) to smooth the wrinkles out of the background.