For over a year I have been teaching Photoshop Elements via online workshops. In late August it will be a year that I have been writing tutorials for PSE here at Everyday Elements. Not once have I written a tutorial for Photoshop (although I have done video tutorials for it), but that is changing today. Many people follow Everyday Elements who have Photoshop CS5 or an older version, and I decided to start doing occasional tutorials for them. However, each time I do that, I will try to present an alternative edit approach for PSE that works just as well.
Today’s tutorial is on the basics of the Curves adjustment layer. Photoshop Elements users, do not be discouraged. You can run a Curves action on your background and have access to some of the functionality of curves, although not all of it. Also, in this tutorial I show you how Levels can do most of the same things Curves can do and how it can often create the same exact result (see the second video tutorial).
So, what the main things can Curves do for you?
- Change White Balance
- Adjust exposure and contrast
- Alter color tones
- Identify clipping
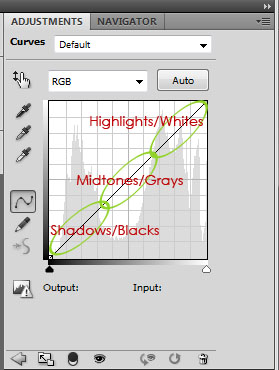
First let me explain you how the diagonal line in the Curves dialog box works. The top of it is the highlights, middle is the midtones and bottom is the contrast. If you pull up on the line, each of those areas are brightened (values go up). If you pull down, the areas are darkened (values go down).
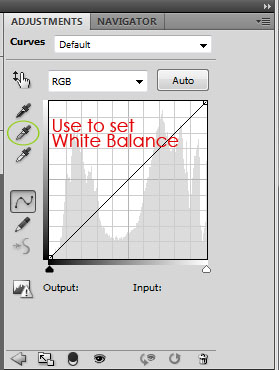
White Balance: To change the color temperature of your picture, the White Balance, click on the gray dropper and click somewhere neutral in the image. This can be the whites of the eyes, silver or pewter jewelry or buttons, zippers, etc. Keep clicking until you find the WB that best suits your image.
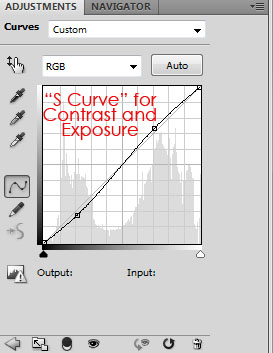
Contrast/Exposure: To change the contrast and exposure of your image, you are usually going to create a “S curve” which will be you pulling down the bottom of the line and pulling up the top of the line. Sometimes you will also pull up on the midtones. These pulls will create a curve that looks like a very slight ‘S’ formation.
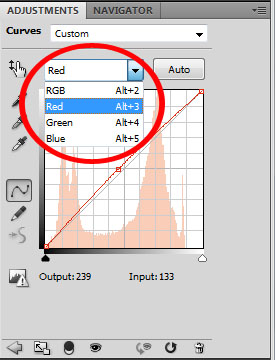
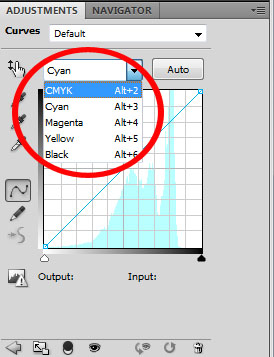
Alter Color Tones: If you need to further manipulate the color values in your picture, you can do that by going into the color channels of the Curves dialog. Click on the RGB menu and Red, Green and Blue channels will be accessible to you.
In Photoshop (NOT Photoshop Elements) you can choose to work in CMYK values instead of RGB. What the heck are those things? CMYK = Cyan, Magenta, Yellow and Black. RGB = Red, Green and Blue. I will explain in another post how those colors affect each other, but in the mean time, Morgan Kervin did a very helpful post on the color wheel.
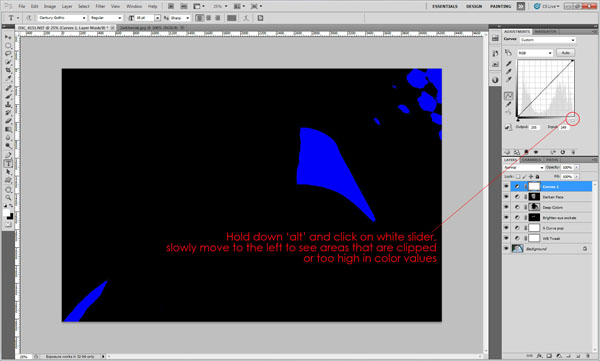
Check For Clipping: You can check to see if your image has blown or clipped areas (where it is too bright, overexposed or color values too high). Hold down your ‘alt’ key (‘option’ on a Mac) and click on the white slider and slowly move to the left.
There is a lot more I have to share about Curves, but this is all I am going to share in this post. Next time we can dig a bit deeper. If you have Photoshop Elements (and you’ve made it this far), check out my tutorial on the learning to use Levels and you will see how similar Levels and Curves are, and hopefully not feel left out by not having Curves.
Video Tutorial for Curves:
Video Tutorial for Levels:


Fabulous Amanda!!……….you know I made the switch to CS5 and I”m needing to learn all of this!! Thanks for the great tutorial
Bless you, Cheryl, for your awesome support and encouragement. ♥
Thanks so much Amanda. I always forget about inverting the levels adjustments. I just need to remember how to do that now 🙂
Anita, to invert a layer, simply press ‘control’ and ‘i’ at the same time (‘command’ and ‘i’ on a Mac).
Thank you for these videos. May I move in with you for about a month? I have been editing newborn skin almost all day and am so frustrated. I was in your online class Sunday, June 12, and I re-watched the video and took notes, but am still lacking a lot of skills. Not fun!
Thanks for the feedback, Cindy. Help me help you and others…what still has you stumped? It would be good for me to know, so I can better explain in the workshop or video tutorials.
I loved the curves tutorial, Amanda! It’s crazy what you can do just using curves. I’ll move onto the levels tutorial next. 🙂 Thanks so much for helping us all out.
that was an awesome tutorial on curves. Thank you so much.
Amanda, you never stop giving!!! Thanks for the Curves info..I’ve been staring at it for months not checking it out.. but now I will! 🙂
Nice Photoshop Tutorials and also see this Photoshop Link this may be useful for you thank you,,
Fresh Photoshop tutorials of 2013
Link : http://goo.gl/YpNIUI
Its all nice tutorials.
nice tutorial..,
Ya this link is really good,thanks!!!