
Yes, I am once again talking about Levels. Why? Well, first of all because I l.o.v.e. Levels and second of all because it’s a message that cannot be shared enough.
Just so we are all on the same page: I start every single edit (in PSE or Photoshop) with a Levels adjustment.
- Levels to fix exposure
- Levels to fix contrast
- Levels to fix white balance
- Levels to fix color casts (sometimes)
- Levels to fix (some) clipping
- Levels to add brightness to eyes
- Levels, levels, levels
If you would like to learn how to utilize Levels for all of the above, read the extensive tutorial I wrote: Learn to Use Levels.
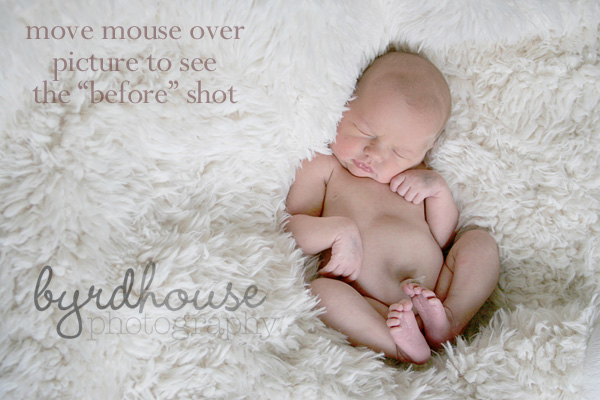
Becky of Birdhouse Photography (LOVE her logo by the way) graciously sent me some pictures to use as samples for the blog. One of the pictures was a newborn shot that was very precious. It had great composition and posing, but the exposure was off. You know, that happens “in the field” at times, and fortunately we have amazing programs like PSE, Photoshop or Lightroom to quickly fix pictures.
When I looked at the picture, I thought to myself “oh, very easy fix – Levels.” And, I did just that. TWO Levels adjustments and it was pretty much finished. A quick skin smoothing layer and the picture would be ready for the client to see.
Here is a screen print of my two layers:

Here is the result of those two adjustments. You can mouse over the picture to see the SOOC shot. The ONLY thing I did to the picture was the two Levels adjustments, nothing else.
Now, let’s take this edit one step further…..
What if you wanted to run an action on this picture? Which one would you run it on? Yes – the one that has the exposure fixed. If you ran a creative action on the image as it was SOOC, no action would look right (unless it had substantial brightening built into it). In the video tutorial below, I illustrate how drastically different actions look on pictures with issues versus pictures that have clean edits.
Before I do, I want to share the final edit of this sweet picture. It was so precious, I couldn’t help myself.

Below is a video showing the two Levels adjustments and a few more things….
Remember, blog reader/email subscribers – the video will not show for you. Please pop over to the blog post to view it. iPad users, the video will play for you. If it is not, check to make sure your iOS is up-to-date.


So many uses for the levels adjustment…the ultimate “all-in-one” tool. Well…almost.
Thank you so very much. I truly appreciate all your help. You have helped me so much. I am a senior (73 yrs. soon) and on such limited income that I cannot afford to take classes and just getting help like this has been so great for me.
A big thanks again.
Thank you so much for this video! It makes it very clear how the levels and adjustments are two totally different things. I can’t wait to see how pictures will look after doing more of these corrections!
Thank you for this fantastic tutorial!
This is a really great tutorial, but your Learn to Love Levels full tutorial is just fabulous. You do a great job of explaining things and I appreciate more than I can express the things you post. I’ve come back to them many times. Thank you!
Thanks for sharing all your wonderful knowledge. I will have to check out your full levels course.
Have a beautiful day.
Just discovered your site, wonderful info.! Love this tutorial! Thanks 🙂
Thank you! I’m a new user of PSE and it hadn’t yet occurred to me to use layer masks with multiple levels adjustments. It was an AHA! moment 🙂
How come you have to make an adjustment layer..and not just use the levels on the orginal photo?