The following post is by Kelly Newbury of Fine Art Prints by Kelly Newbury.
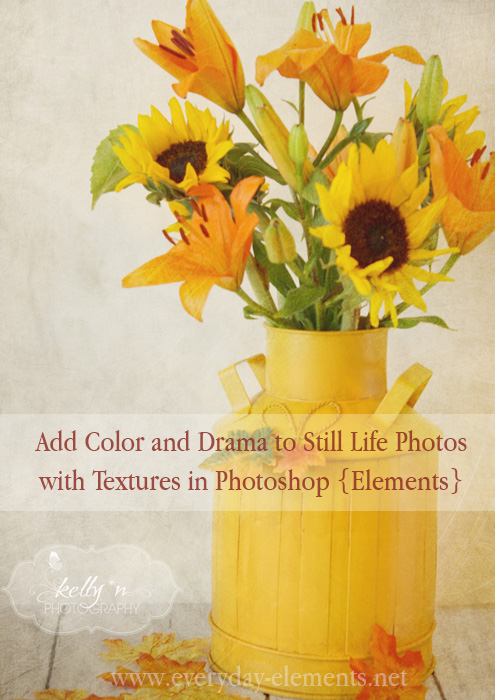
Welcome to part two of the still life photography post. In part one I talked about how to set up and capture a still life photo (for fine art). After I have the pictures I want, I view them in PSE and select the one that best fits my vision for the piece.
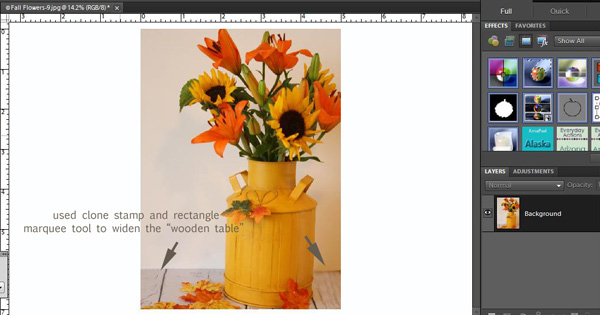
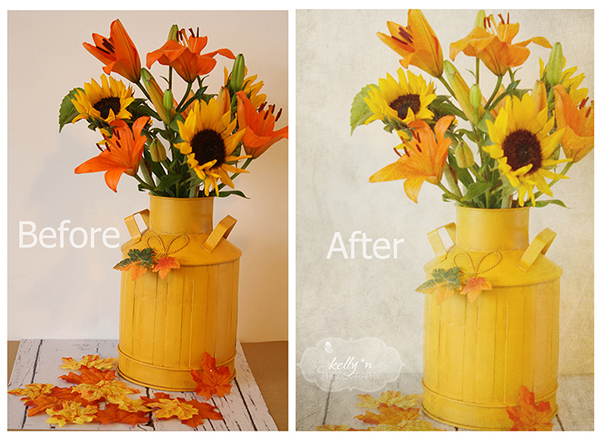
After deciding on the shot to use, I open it in PSE9. I crop it and using the marquee tool and clone stamp tool, I widened the white “wooden table” on the sides.
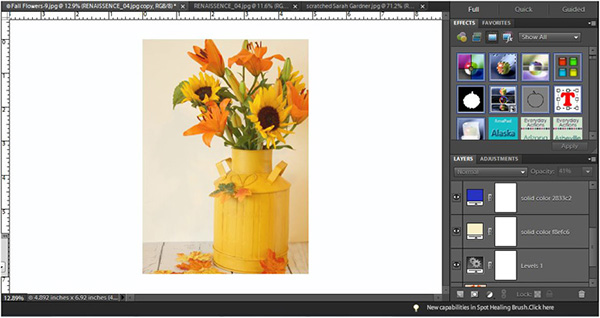
I did a levels adjustment to adjust the tones and light. I added a solid color in a cream tone (soft light 68%) to lighten and give a soft sunny haze feel. Next, I added solid color in blue (exclusion 10%) to tone down the brightness of the yellows, and add a sort of vintage feeling to it.
Now it’s time to add my textures.
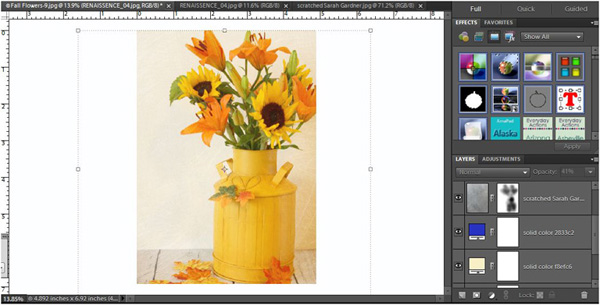
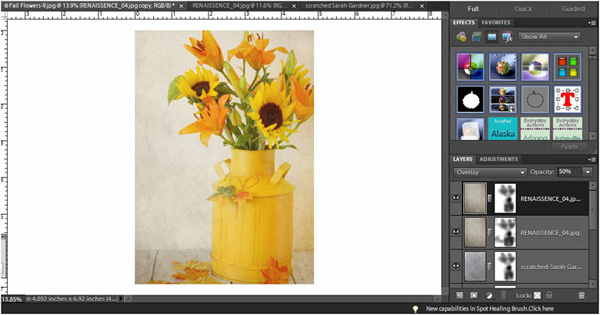
I want to add some light to the image without really changing the tone, and I want to start adding interest to the background. I am choosing something in a grey shade, knowing it won’t really mess with the tone I’ve established, but it will add light to my shadows, and the scratches will add depth and interest to the background. I chose “Scratched” by Sarah Gardner. I think it was in her Free trial set. I set it on Overlay at 84%, and used a layer mask and a soft brush to brush the texture off the canister and flowers. I usually set my bush to 30% opacity and go over a section as needed to conceal the texture.
Now I want to add some drama to the background, especially on the left side, and give the whole image a ‘painterly’ feeling, so I used Sarah Gardner’s Renaissence_04 on Darken blend mode at 41%. This darkened the image overall a bit, but I get that cool painterly look and it made the background more marbled.
The effect was too dark on the flowers and canister, so I copied the layer mask from the previous layer, by going to the previous layer, highlighting the layer mask, hold CTRL+click inside the mask. Go up to the new layer where you want the mask copied, click to highlight that layer, then go down to your layer mask icon, and click it. That will add a layer mask with the same ‘brushed off’ areas already done for you! I brushed off a little more in the areas I wanted less texture, and lowered my brush opacity to taste. (Amanda did a tutorial on copying layer masks another way – click HERE to see that tutorial0).
Now it still feels a bit dark, so I add that same Renaissence_04 texture again, but this time I set it on overlay at 50%. That gives me some dramatic light, and I still get the texture, but now it’s really giving me that painterly look I like. From here, I could leave it like that and call it done, but I still want to mask off some of the texture from the canister and flowers, so I add a layer mask and brush some off. I could copy the mask from the first layer, or second layer and just tweak it, or I can just do a new one. I masked some off in the same places, and like it enough to be done.
If it still feels dark, I can add another levels or curves adjustment for light or tone correction, but I like it, so I just add my watermark and save it as a .psd file. If I want to post it to Flickr or the web, I will resize, sharpen, and save it as a .jpeg for the web.
Done!
Playing with textures is a really fun way to make your images more dramatic, or just give them a little extra something to set them apart. There are many amazing free textures out there, and many amazing textures for purchase! I love textures by Florabella, Flypaper, ShadowHouse Creations, Sarah Gardner, Kim Klassen, and FrenchKiss to name a few.
Give it a try!





Surprisingly very few items came up when I googled pool house/hotel with pool on Korčula, most of the result, was agencies offering the same units, so the selection was between a villa 10 km from Korčula town and a hotel in Lumbarda (4 km from Korčula town), when the internet marketers saw the pictures on the hotels homepage the decision was taken
what a great “After” pic! thanks for all the tips, Amanda! Hope all is well!
Wow – those are great tips! I love how you made the table wider. That made such a difference!!
xoxox
comment3 where eagles dare studio