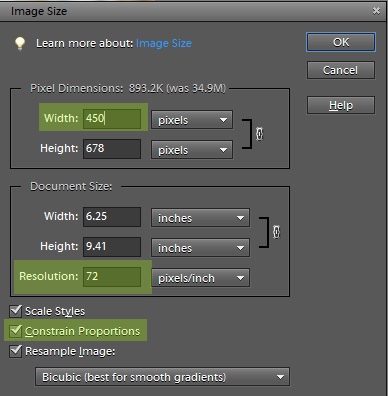
One of my most frequently asked questions is how to resize images for uploading to the Internet, on like a blog or Facebook. I have shown it many times in other video tutorials, but never did a tutorial just on resizing by itself.
First let me explain few fundamentals about the Internet and pictures and file size.
- A full size (i.e. print size) picture can be up 3 megabytes in size (sometimes larger)
- A web size picture is usually 100 to 300 kilobytes in size
- Large files take up more space on your server (especially if you are on a WordPress.org blog)
- Blogs/sites have to work much harder to pull up a large size file than a small size file, so your blog may be slower to load and frustrate your readers
Each time you crop or resize an image, make sure to save that as a different file name so you are not overwriting the original. Note below that I have FIVE files for one image:
- The original
- The PSD, with layers unflattened
- The edit, uncropped
- The edit, cropped and sharpened
- The edit, cropped, resized and sharpened
Now, even if you aren’t concerned with file size and speed of upload, sharing full resolution (i.e. print size) images make them easier for others to steal and print. A web size image is a fraction of the size of a print size and if enlarged will be very pixelated and generally not great.
So, with a few reasons why you should resize your pictures, let’s get into resizing.
- Save your image as a full size file first (if you have done any edits to it)
- Do not sharpen first and then resize; resize then sharpen
- Go to Image – Resize – Image Size
- Make sure “Constrain Porportions” is checked
- Change Resolution to 72
- Make the width whatever you like it to be and height will change respectively
For most blogs, a pixel width of 500 is a safe bet. Many blogs can handle pictures wider than that, so just find out the width of your posting area and use that. For instance, my blog post area used to accommodate pictures up to 650 pixels wide, now they can only be 600 pixels because my area is smaller.
What a Facebook sizes? Well, they keep changing it, so I’m not exactly certain. I think right now pictures can be up to 900 pixels wide, but before that the max they could be was 720 pixels wide OR high. That means if your picture exceeded those measurements, Facebook would squish or compress your image, leaving it looking no so great. Personally, I still stick to the 720 pixel settings.
One more thing to remember about resizing – you want to sharpen AFTER you resize, not before. I have tutorials on sharpening HERE and HERE.
I do recommend watermarking your images in some fashion, prior to sharing on the Internet. You can use a logo or a brush to do that, or simply use the type tool (as I illustrate in the video). To make things a bit quicker, you can make a watermark brush.
Below is a video tutorial showing the process. If you are reading this in an email or blog reader and cannot see the video, you have to click over to the actual post at the blog to be able to view it. Not my decision, just the way it is.


Thank you Amanda!!!
When you click the “x” on the picture to close it, the dialogue box appears that asks “Do you want to save image?” Since you’ve already saved your different versions, do you just say no?
Thanks for sharing so much great info!
Thanks for the tips. I find your site helpful and I come here a lot. Great reminders about old stuff that I forgot and new stuff I’m trying to learn. Keep up the great work. 🙂
Thank you! Thank you!! I needed this tutorial.
Just used this tutorial! Thank you for making things so easy to understand and learn!