It’s here!! The day I finally revisit the watermark brush topic! The tutorial I wrote (a long time ago) about creating custom watermark brushes continues to be one of the most popular posts for EE. However, it is also the one that creates the most questions. I have not been good about answering questions left in the comments, but hopefully this will address and rectify all of them.
Photoshop CS users don’t shoot me, but this tutorial is not going to be one that converts 1:1 for you. The steps are basically the same but there is some variation between the programs. I will try to have a tutorial for you in the coming weeks.
Those who are new to PSE or Everyday Elements may be wondering what is a custom watermark brush and why do I need one?
A custom watermark brush is a brush you create so that when you are finished editing an image and ready to share it on the Internet, you can easily grab the brush and add a watermark to the image, in the color, size and location of your choice.
You can create one multi-purpose watermark brush and never make another. Or, you can create multiple brushes for different types of images or purposes. You can have it be just text, or you can use a symbol, shape or other elements in it. You can even create a brush from a custom logo you might have for your business.
Very quickly, here are the basic steps to creating a watermark brush (and I show it in the video tutorial below):
- Create a new, blank file that is no more than 2000 pixels wide and about 300 pixels high, resolution of 300 and a TRANSPARENT background.
- Type on the blank canvas with font of your choice, but in BLACK color.
- Save it as a brush by going to Edit, Define Brush, and name it whatever you want.
Now, here is where we get started with NEW content. Today we are going to create a set of watermark brushes and save them as one brush preset.
Once you have made several wonderful, beautiful and perfect watermark brushes, go to Edit, and then Preset Manager.
Once the Preset Manager dialogue box pops open, highlight the brushes you have made by clicking on one, then holding down your control (command on Mac) and then clicking on the others). After that, choose Save Set on the right side of box.

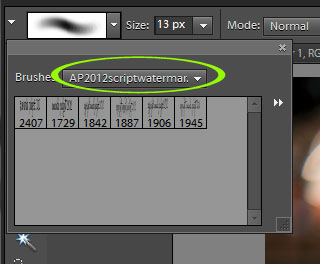
The next time you go into your PSE, you can load that set of brushes by opening the brush menu, then clicking on the double arrows (shown below) then Load Brushes.

Below is what one set of my watermarks looks like.

If you are having a hard time seeing which brush is which, you can change the set to show as a list.

Did you make a mistake when naming, or adopt a new naming convention midway through? No worries, you can rename them quite easily by right clicking over the brush and choosing Rename Brush. You can delete old brushes the same way.

Want your watermark brush sets to load automatically into PSE at start-up? Copy the brush into your PSE brush folder by following this path:
- PC with Win 7 or Win Vista: Local Disk C drive / Users / Amanda (YOUR USER NAME) / AppData / Roaming / Adobe / Photoshop Elements / 10 (or YOUR PSE version) / Presets / Brushes
- Mac with Lion: In Finder menu click on GO, then Computer / Macintosh HD / Applications / Adobe Photoshop Elements / Support Files / Presets / Brushes
Note: The file path for the Mac may not be right for you and how things were loaded on your computer. Good luck. 😉
Phew!!! This was a loaded topic, so it ended up being loaded with screen prints. Hope you were able to follow well enough. If not, don’t lose heart; below is a video tutorial that walks through it (and it’s not short – 19 minutes).


Thank you so much for putting this together and sharing it. I have wanted to make a brush to use on my photos but was not sure how to go about creating one. Can’t wait to try this. Thanks again.
THANK YOU SO MUCH! For two years I’ve been trying to figure this out!!!
Love your site!
Doing this in CS5 is super D dooper easy … let me know if you would like the steps to post, Amanda. 🙂
Thank you so much for this Amanda!!
Most of mine come out beautiful, but sometimes they come out all blurry and pixelated, what am I doing wrong?
thank you for your time and talent-your tutorials are very helpful and I am a begginner thanks
This tutorial totally rocks! Thanks Amanda!
You girls are awesome, thanks for all you do Amanda, Laura and all others!
Luv this tutorial ! Helped Me with just what I was looking for ! I Luv all Your Tutiorals,
ThankYou for all Your hard work !!!!!
Tammy L