Today I am going to share how to correct White Balance issues in your pictures with a Levels adjustment in Photoshop Elements (applies to regular PS also). I am not going to explain what White Balance is, that is a whole other post, and until I get to it, here is a great one by Cambridge in Colour: Understanding White Balance.
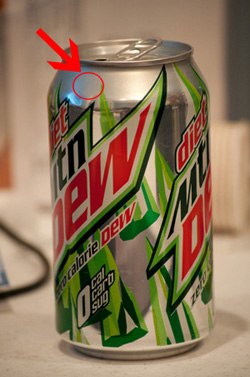
To keep things really easy, I am using a picture of a can and the WB is a bit too warm, a common problem when shooting inside without a flash.

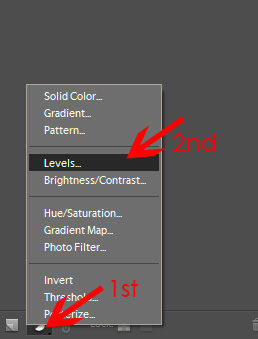
Step 1: Create a Levels Adjustment layer by clicking on the circle at the top (PSE 6 and 7) or bottom (PSE 8 ) of your Layers palette and choose Levels.
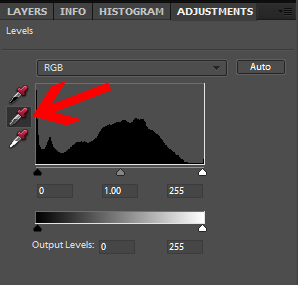
Step 2: Once the Levels dialogue box is open, click on the gray dropper.
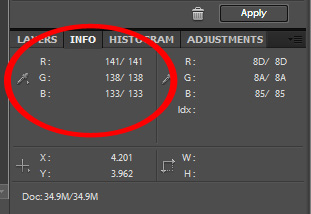
Step 3: Go to your Info box. If you do not have your Info box out, go to Windows and choose Info. Once you have your Info box out, look at the top left section, where it says R: G: B: and has numbers beside those letters. Move around your image and find a gray area and try to get the RGB numbers to be very close, if not the same. Click on that spot when you find it. Tip: For pictures of people, try the whites of their eyes.
I found a close enough number set in the area I circled on the picture below.
I did another Levels adjustment layer, bumping in the black and white sliders and moving the gray slider to the left a bit. Here is the final image:

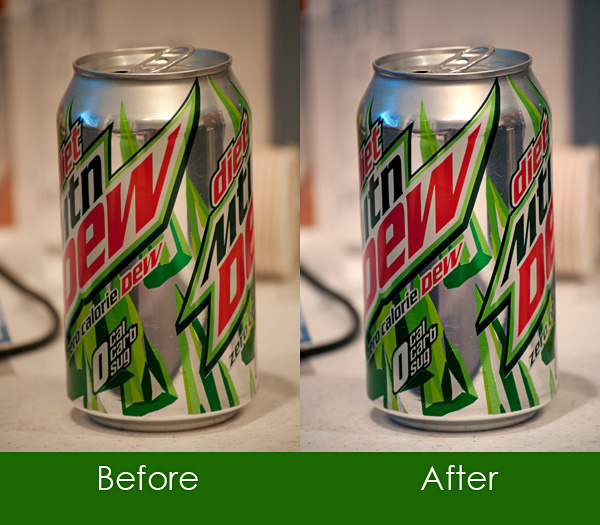
And, to better see what a big difference a click or two of your mouse can make, here is a side by side comparison.


Exellent. Thanks for sharing your tutorials. I’m learning a lot.
Giozi,
I am glad the tutorials help. I really enjoy teaching others and it is wonderful to get feedback that it is making a difference.
I love this tutorial! I learned this technique in one of your workshops too! Awesome!!! Thanks for sharing!!!
Thanks for the tut I am just crazy about photography and fiddling with my pics after. i love this site to by the way
cool. I needed that. I must practice it but at the moment I am banned to my room and I am blog surfing while my teenager has control of the downstairs for her sleepover. I have always wondered how to fiddle with the levels.
Good dispatch and this fill someone in on helped me alot in my college assignement. Say thank you you seeking your information.
Thanks for this, very handy to know, just found you in facebook and am enjoying your blog , tassiesim in flickr also
I would like to exchange links with your site everydayelementsonline.com
Is this possible?
You are awesome! Thanks for this tutorial.
Again with the amazing, simple tutorials. Thank you 🙂
When you said, “I did another Levels adjustment layer, bumping in the black and white sliders and moving the gray slider to the left a bit.” Did you flatten the image after doing the gray and then do a new levels layer for the black and white? If not, how did you do it? THanks
Crystal,
Did you get an answer to your question?
Thanks,
Kirstie with Everyday Elements
Thanks so much for this!
I love this tip! I wanted to pin it, but it doesn’t work. Could you make this “pinable?”
I never even thought of using the info numbers to check for a neutral-thank you so much!
Hello, I have just stumbled across your site after trying to find a way to convert photos to black and white. I have had a little look around and I am very excited to try some of your tips. No, all of them! I’m just not sure where to begin.
I have had PSE 10 for about a year now and I have just been using it to make minor adjustments to my photos, but they never looked quite finished. Or right. I can’t wait to try some new things.
I have never seen the tip of finding a spot with the RGB the same and using that for your neutral spot. Awesome, this is so much faster than randomly clicking around and seeing what you get!