One of the most powerful, useful and probably overlooked tools in Photoshop and Photoshop Elements is Levels. It isn’t a “tool” exactly, rather an adjustment that can be used as an adjustment layer or as an adjustment on a duplicate layer.
The slightly more powerful brother to Levels is Curves, which is only available as an adjustment layer in Photoshop, not PSE (although Curves can be run on a duplicate layer in PSE, see my post on that topic).
Many people jump to the conclusion that Curves is vastly superior to Levels, and often feel the need to upgrade from PSE to CSwhatever before bothering to learn Levels and rock the program they already had in their hands. I find Levels every bit as useful to Curves, and it is the foundation for all of my edits.
So, what all can Levels do for you?
- Adjust exposure and contrast
- Change White Balance
- Alter color tones
- Fix color casts
- Identify clipping
- Fix sun haze
I am going to briefly show how to use Levels for the uses I just listed out. There is also a video tutorial at the bottom showing most them, and I will link to other tutorials I have written that expound on the various uses.
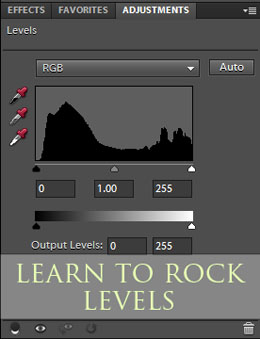
1. Adjust exposure and contrast on an image by moving the black and white sliders in to meet the base of each side of the histogram “mountain.” This is the general rule, not one to be followed 100% of the time. There are times when the sliders should not be pulled in all the way; use your eyes and best judgment. For this picture I moved each slider (circled in image) in to meet the side of the “mountain” or in the case of the white slider, I moved it in just a bit even though it was already hitting the side.
You can lighten or darken the midtones in the image by moving the gray slider to the right or left to suit the image.
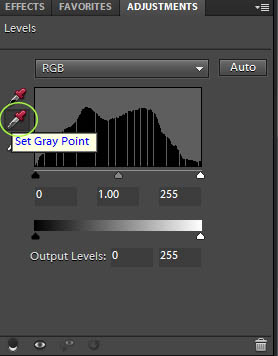
2. White Balance adjustments can be made by clicking on the gray dropper and then clicking on something in the image that is gray. Look for things like jewelry, buttons, belt buckles, you name it. No gray? Use the whites of the eyes. Click around until you find a WB that looks best. If you get near to correct but it looks too much (like too green, too blue, etc.) just adjust the layer opacity down.
I clicked in the white’s of my niece’s eyes until I found a WB that worked for me. It substantially pulled down the blue in the image, making her less cool and making her brown hair and brown shirt much more brown and less red.
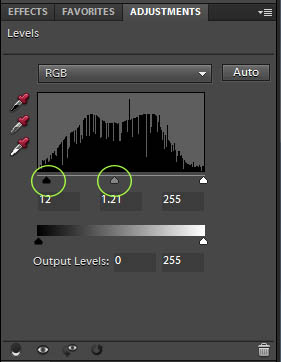
3. Selectively brighten areas with midtone adjustment and inverted mask. Move the middle, gray slider to the left, pull in the blacks a bit so you don’t have a washed out image, then press ‘control’ and ‘i’ (‘command’ and ‘i’ on a Mac) to invert the mask. Take a soft, white brush and brush over areas you want to brighten.
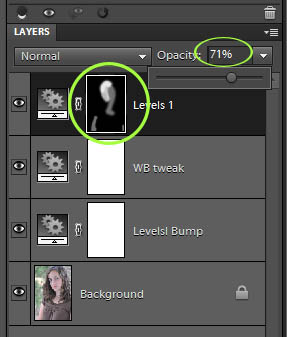
Adjust the layer opacity to suit. You will be able to see where you brushed on the mask.
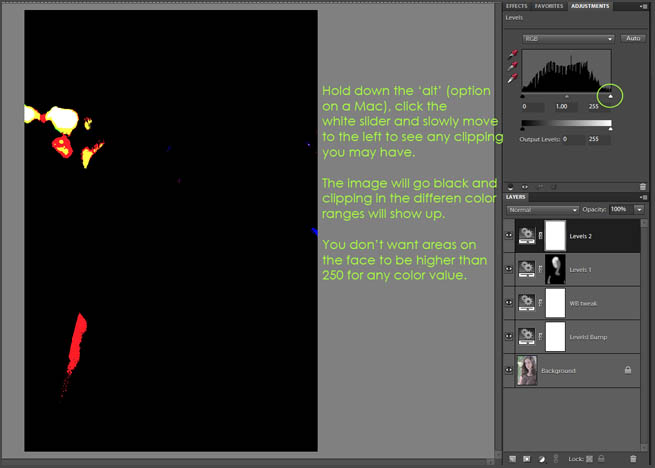
4. Check for clipping, or “blown” areas in your image. Sometimes you will already know areas that are blown, like windows, doors, etc., but sometimes there are areas of the skin that are brighter in color values that you realize. Open a Levels adjustment, hold down your ‘alt’ key (‘option’ on a Mac) and click on the white slider. Sometimes you will see clipping right away, if not, slowly pull the slider to the right.
What should you be looking for? You don’t want areas on the skin to be higher than 250 or they won’t print well. If you have areas that are clipped, open the image in ACR if you shot raw and pull the exposure down and increase the recovery, then reopen in PSE and begin to edit again. If you shot JPG you can fix it, but I don’t want to get into that in this tutorial, just too much in this already. 😉
Want to hear something funny? To get this screen print below I had to hold down the ‘alt’ key with my left hand, use the mouse and click on the white slider and then pressed the ‘screen print’ key with my nose. Oh the things I do for this blog….
Anyway, in the screen print below you can see that there is an area on her arm that has red clipping.
5. Access color channels to change warmth/coolness of image plus do other color changes. This image was still too cool, so I did a Levels adjustment, then clicked on the RGB drop down box and chose the Blue channel.
I clicked on the gray slider and slowly pulled it toward the right, which pulled blue down in the image, increasing the yellow some and warming up the image.
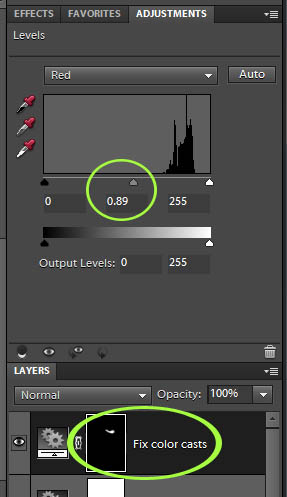
6. Correct color casts. Use lasso tool and fix color casts (accessing color channels again). This creates an inverted mask, so you can use a brush and brush on other areas of the image that have similar casts.
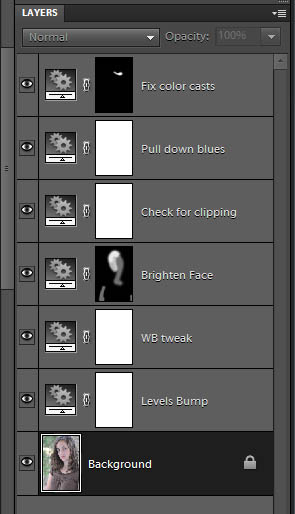
To recap, below is a print showing the adjustments I made, all of them being Levels. Now, the show clipping one is really a dead or empty layer because nothing was changed, I just left it there to illustrate things you can do with it.
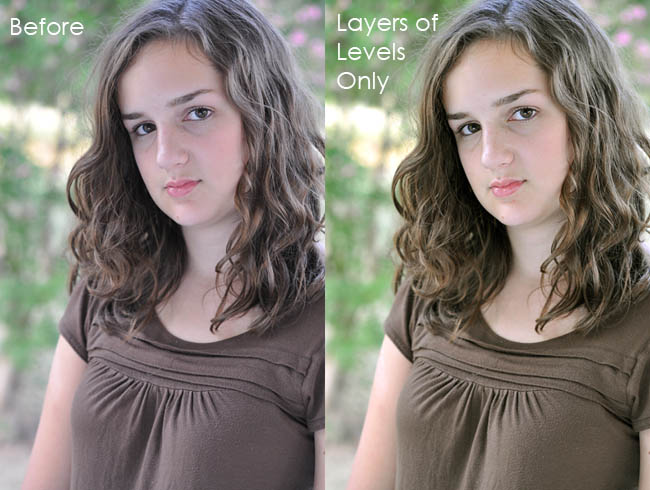
Here is a before and after of the image used for the tutorial. The ONLY changes made were the ones I listed out. More can be done with this image, but I wanted to show what you can do with Levels, what a difference just a few adjustments can make.
If this tutorial was helpful to you, I’d love to hear from you. Just leave a comment; you would be surprised how they feed a blogger’s soul. Have questions about Levels? Leave your question in a comment and I will answer you back in a reply comment here at the blog so others can learn too.
I do try to get to all questions, but if one is left months after this post went live, I may miss it. In that case, use the contact form and send me your question.
The video below was made Thursday while my blog was down due to technical difficulties. Later when I went to make the screen prints, I decided to use a different picture than the one of my wonderful husband that was used in the video. 😉








Amanda, this is such an informative post. Even knowing what I already do about the miracle of Levels adjustments, you mention a few other tips and tricks in here that are so useful. Also, as someone who is very intimidated about ‘graduating’ to full-blown Photoshop, I love knowing that I can stay in my PSE comfort zone.
Color casts still elude me and when I’ve seen it in downloaded actions, I never know what to do with it and so I end up discarding the layer. I was going to save my question about this for another time but I felt very compelled to comment. I really laughed at your comment about pressing PrintScreen with your nose, too!
Thanks for the depth of detail you go into – I love learning all this stuff!
Thank you so much for this tutorial. I love your tips and come to your site often when I need help with PSE. I wish I had you sitting over my shoulder all the time when I am working on my photos. I have learned quite a bit since I first stared blogging, but have lots more to learn.
My best- Diane
Me again – Do you know how to create visual redesigns of room. Where you have a before photo and then re-do the room by placing images(furniture, color, drapes over the existing photo. I know it can be done, but can’t seem to find any info on how to do it. Do you know of any tutorials.
Thanks again – Diane
thank you for this tutorial it was very helpful
Thanks for all the great tutorials! Do you have any tips on printing? Whenever I am ready to print, my photo looks good on the screen but always prints too dark. Is this an issue with my screen or my printer? I have my option to let PSE manage color set when I print. Just wondering if you had any suggestions? Thanks again!
I have the same problem…even if I choose PSE or my printer manage color..I’ve even tried using different print options in PSE from the drop don list {In print mode}..nothing helps. I’ve calibrated my computer a few times and the print is off…I have a Brother’s MCF 240c Printer…any advice would be awesome
Thank you so much! Very helpful and clear. The video is a nice addition to the text.
This is a great post. Very helpful for me as I am just starting to learn all the ins and outs of elements. I’m a big believer in getting the most out of what you already own and can see that I have a lot to learn about all that elements can offer. I’ll be playing with the techniques you’ve outlined here. Thanks!
Thank you so much for posting this, Amanda! I knew about the “mountain” but using the white balance droppers is really going to help.
Awesome tutorial! I will probably have to watch this several times for all the tips/info to sink in, as I am a new PE user!! Thanks much!
This is fantastic. I love your site! Thank you for the tips!!
Thank you Amanda very informative.
great post…lots of wonderful info that I can’t wait to experiment with! 🙂
A timely, informative post! Ty! Ty! Ty!!!
Yes! Heck yes, this was tremendously (or will be just as soon as I get home & give it a try) helpful!!! Thank you for taking the time to share your knowledge with us.
~ingrid
Thank you for the tutorial! I understand levels much better now!
That was really helpful for a younger person just getting into photoshop! thank you ! it was very easy to follow .
Could you tell us how to changed your photoshop interface to be a dark color? Are you using cs5?
Just found your website….look forward to checking it out!
I read several photo/editing blogs and always hear about curves and levels…but until now, I didn’t completely understand how to use them! Thank you SO much!
Absolutely going to give it another go today 🙂
Hi Amanda,
What an informative tutorial. I have used the levels adjustment to fix white balance and exposure but haven’t really gone as far as I see that I can. Thanks for all that you do!
thank you so so much for all of this. after a year, i’m still trying to figure all this out.
this ROCKED!!! I may have a few questions after I work through it, so I will let you know. Thanks
thank you so much!!! How amazing are you for all the freebies and wonderful tutorials! I can’t wait to try out your tips on levels. I’ve always only used it for exposure and contrast adjustments as I’ve never know how to use the other features. Thank you again!
Amanda great tutorial!! Just a couple of questions for you…..
1. Checking for clipping…..If you shot JPG you can fix it, but I don’t want to get into that in this tutorial, just too much in this already. Do you have a tutorial on this by chance??
2. Checking white balance…..what if you have a picture that has no gray or eyes to check with??
Thanks for a great tutorial!!
I thought I understood levels pretty well but this made my eyes pop out of my head! Thanks so much!
This was very helpful since i have been deep diving into Levels. Its amazing what just that lil adjustment can do for a photo. Thanks Amanda!
I love how you so openly share your knowledge, your information is very very helpful to me. I love taking photos, always have. About a year ago I finally got a DSLR, and up until only a few weeks ago have never used editing software. I used a simple program that came with my scanner, and all it allowed me to do was tweak the brightness, contrast, simple stuff like that. I finally took the plunge and got Lightroom and Elements, and your tutorials are great. Not only do they help so many of us learn how to use editing software, your teaching method is down to earth and easy to understand, so thank you so much for all of your help. I wish you would do a tutorial on how to set proper exposure, as when I use manual mode my pics really suffer, as I really do not know how to properly choose the settings. I most often will shoot in aperture mode, and let the camera choose all the other settings.
I stumbled up on this today during your tutorial on eyes – this is probably the single most useful thing I’ve read in a long time. I have been trying to combat WB forEVER and I’ve tried everything both in-camera and in post and just never seem to get it right. Can’t wait to put what I’ve learned here to use. Would love to see the tutorial on fixing clipping from a JPG!!
Amanda, I can’t even BEGIN to tell you how much your tutorials help me, I really appreciate all the time an effort you put into them and every time I read one of your posts I learn something, you are a star!
You’ve done really awesome job! Fantastic tutorial it is, thanks a lot for sharing this nice post & I’ll visit your site again 🙂
thank you – fantastic. I thought I was using levels, but only about a quarter of this! I love your blog!
Your tutorials are so fantastic – thank you for each and every one. They are tremendously helpful. This one on Levels is packed with great info that I didn’t know about. Thanks again!
I am writing a comment late in the game, but just wanted to let you know how amazing your tutorials are!! I am going to have to read this over a couple times, but it’s bookmarked and all set!! You are such a help to my (amateur) photography…thank you, thank you, thank you!!
I love the written directions in addition to the video tutorials! Thank you 🙂
I have learned so much through your tutorials! Thank you! After reading through the information above, I’m wondering whether you ever did a tutorial on fixing the blown out areas in a jpeg. You touch on it above but say it is a different subject for a different day. I’m struggling with how to do this! Thanks for any advice you can offer.
Kimberly,
I have thought about doing a post on that topic for a while. I will try to get something written soon about how to help JPG files with blown areas. Thanks for the nudge.
Loved the tips – especially the white balance with the gray point for the eye dropper. I use light room and had no idea that was the tool to use for it. Thanks for this!
Briana,
You are very welcome! Thank you for taking time to comment. Lightroom and PSE/PS are all wonderful programs and have many things that are similar, which can make the learning easy and hard at the same time. LOL
I just came across this post via Pinterst. I’m an amateur photographer and use Elements for my editing. As I read your post I turned to my husband and said, “this is the most helpful post I’ve ever read about using Photoshop.” Thank you. I’ve known I rely way too much on others’ created actions and the guided tools to edit my photos. I assumed learning the processes would be difficult and remembering the steps would be impossible as I only edit once a month or so. Your blog just made the learning easy and the recall an absolute breeze. I can’t thank you enough.
Kelyn,
Thank you so much for the sweet comment! I am very glad that the post was able to help you, even though you’ve been using PSE for a while. It’s those a-ha moments that I love, love, love being able to be a part of!
I use levels for everything. It’s the first thing I do when I edit. Most time levels gives me that “pop” I’m looking for without fiddling with too many actions or spending too long on one image.
Thank you so much for this great tutorial! I just used to use the auto button but didn’t always like what it returned to me! I appreciate this so much! I pinned it!
loved this, did you ever do a separate tutorial on how to get rid of blown areas w/ JPEG?
Thanks for the awesome tutorial! It’s very helpful! I hated seeing tutorials for curves adjustments only, these are great tips, I will definitely be using them!! I feel a lot of my images are leaving something to be desired, I have a feeling these tips will make all the difference! Thanks! Feel free to check-out my images and email me simple suggestions/critiques, if you have time, of course. Thanks!
This has been the most informative site of tutorials I have ever found. You’re not just showing how to make a change, you’re telling me WHY and HOW it works, which is incredible!!!
Here is my question: If I find clipping and adjust the blue level, should the clipping go away after that? I am unsure how to fix it.